9-Building_and_sharing_demos-3-Sharing_demos_with_others
中英文对照学习,效果更佳!
原课程链接:https://huggingface.co/course/chapter9/4?fw=pt
Sharing demos with others
与他人分享演示

![]()

Now that you’ve built a demo, you’ll probably want to share it with others. Gradio demos
can be shared in two ways: using a temporary share link or permanent hosting on Spaces.
在Studio Lab中打开在Colab中打开的问题现在您已经构建了一个演示,您可能希望与其他人分享它。GRadio演示可以通过两种方式共享:使用临时共享链接或在共享空间上永久托管。
We’ll cover both of these approaches shortly. But before you share your demo, you may want to polish it up 💅.
我们稍后将介绍这两种方法。但在你分享你的演示之前,你可能想要在💅上润色一下。
Polishing your Gradio demo:
完善您的GRadio演示:
To add additional content to your demo, the Interface class supports some optional parameters:
Gradio接口概述gradio接口概述为了在您的demo中添加额外的内容,Interface类支持一些可选参数:
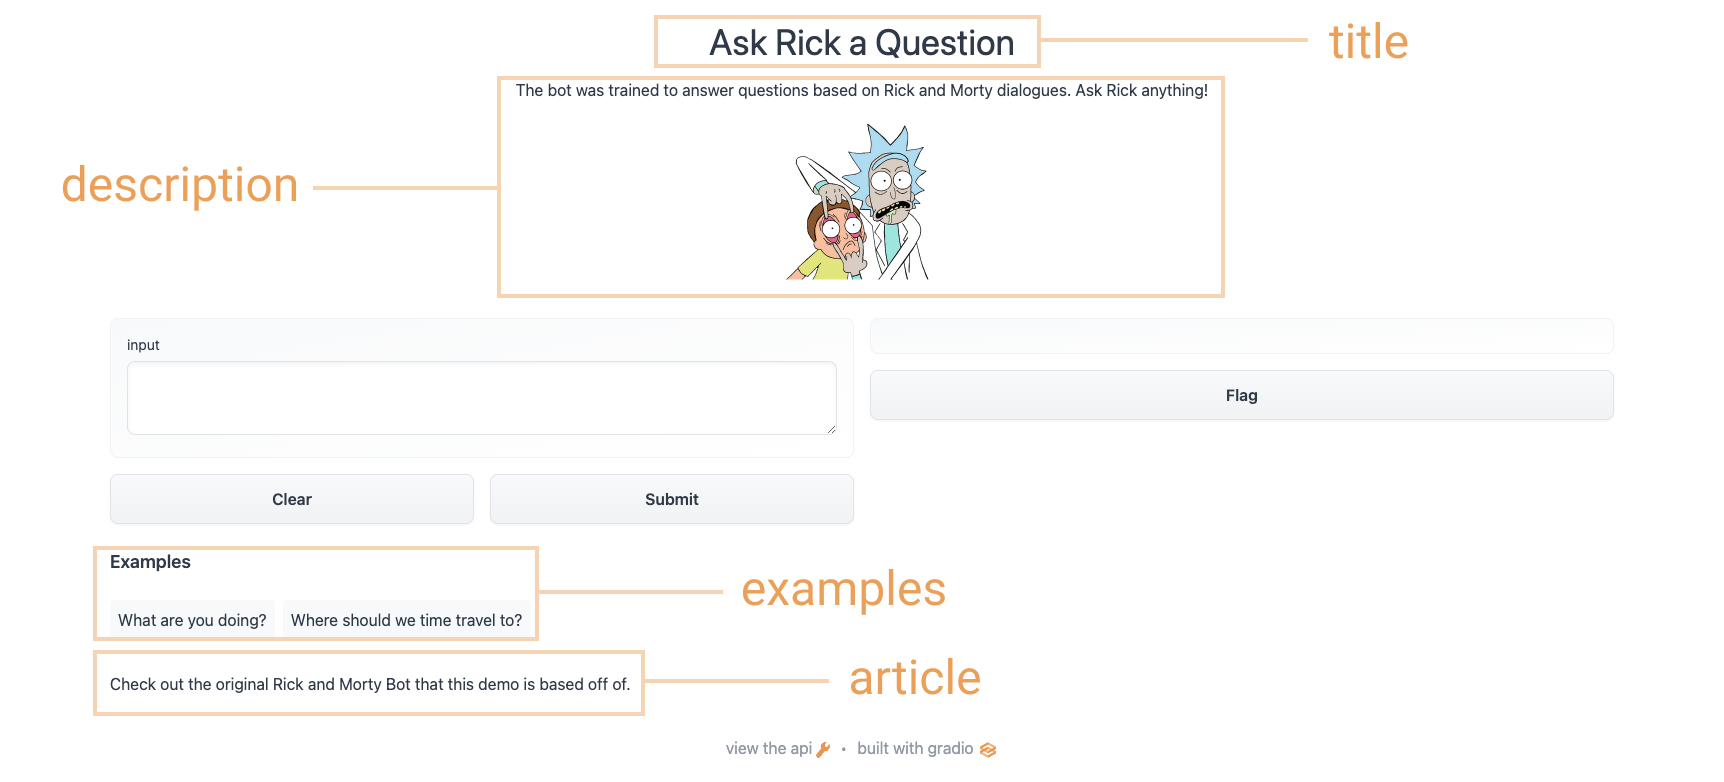
title: you can give a title to your demo, which appears above the input and output components.description: you can give a description (in text, Markdown, or HTML) for the interface, which appears above the input and output components and below the title.article: you can also write an expanded article (in text, Markdown, or HTML) explaining the interface. If provided, it appears below the input and output components.theme: don’t like the default colors? Set the theme to use one ofdefault,huggingface,grass,peach. You can also add thedark-prefix, e.g.dark-peachfor dark theme (or justdarkfor the default dark theme).examples: to make your demo way easier to use, you can provide some example inputs for the function. These appear below the UI components and can be used to populate the interface. These should be provided as a nested list, in which the outer list consists of samples and each inner list consists of an input corresponding to each input component.live: if you want to make your demo “live”, meaning that your model reruns every time the input changes, you can setlive=True. This makes sense to use with quick models (we’ll see an example at the end of this section)
Using the options above, we end up with a more complete interface. Run the code below so you can chat with Rick and Morty:
1 | |
Using the options above, we end up with a more complete interface. Try the interface below:
`标题:您可以为您的demo添加标题,标题显示在输入输出组件的上方。Description:您可以对界面进行描述(文本、Markdown或Html),它出现在输入输出组件的上方、标题的下方。文章:您还可以编写一篇展开的文章(Text、Markdown或Html)来解释界面。如果提供,它会显示在输入和输出组件的下方。heme:不喜欢默认颜色?设置主题使用default、huggingface、gras、peach之一。您也可以添加dark-前缀,例如dark-peach表示暗主题(或者只添加dar表示默认的暗主题)。amples:为了让您的demo方式更好用,您可以为函数提供一些示例输入。这些组件显示在UI组件下方,可用于填充界面。它们应该以嵌套列表的形式提供,外部列表由样本组成,每个内部列表由每个输入组件对应的输入组成。live:如果您想让您的demo直播,即每次输入发生变化时您的模型都会重新运行,您可以设置live=True`。这对于使用快速模型(我们将在本节末尾看到一个示例)是有意义的。使用上面的选项,我们将得到一个更完整的界面。运行下面的代码,这样您就可以与Rick和Morty聊天:使用上面的选项,我们最终会得到一个更完整的界面。请尝试下面的界面:
通过临时链接共享您的演示
Sharing your demo with temporary links
现在我们已经有了机器学习模型的有效演示,让我们学习如何轻松地共享指向我们的界面的链接。通过在Launch()方法中设置Share=True,可以方便地公开共享接口:
Now that we have a working demo of our machine learning model, let’s learn how to easily share a link to our interface.
Interfaces can be easily shared publicly by setting share=True in the launch() method:
这会生成一个公共的、可共享的链接,您可以将其发送给任何人!当您发送此链接时,另一方的用户可以在他们的浏览器中试用该型号,最长可达72小时。因为处理是在您的设备上进行的(只要您的设备保持开启状态!),所以您不必担心打包任何依赖项。如果你是在谷歌Colab笔记本上工作,分享链接总是自动创建的。它通常如下所示:XXXXX.gradio.app。虽然链接是通过GRadio链接提供的,但我们只是您的本地服务器的代理,不存储通过接口发送的任何数据。
1 | |
This generates a public, shareable link that you can send to anybody! When you send this link, the user on the other side can try out the model in their browser for up to 72 hours. Because the processing happens on your device (as long as your device stays on!), you don’t have to worry about packaging any dependencies. If you’re working out of a Google Colab notebook, a share link is always automatically created. It usually looks something like this: XXXXX.gradio.app. Although the link is served through a Gradio link, we are only a proxy for your local server, and do not store any data sent through the interfaces.
但是请记住,这些链接是公开可访问的,这意味着任何人都可以使用您的模型进行预测!因此,请确保不要通过您编写的函数公开任何敏感信息,或允许在您的设备上发生任何关键更改。如果设置Share=False(默认),则仅创建本地链路。
Keep in mind, however, that these links are publicly accessible, meaning that anyone can use your model for prediction! Therefore, make sure not to expose any sensitive information through the functions you write, or allow any critical changes to occur on your device. If you set share=False (the default), only a local link is created.
在Hugging Face空间上主持你的演示
Hosting your demo on Hugging Face Spaces
一个你可以传递给同事的分享链接是很酷的,但你如何才能永久地托管你的演示,并让它存在于互联网上自己的“空间”中?
A share link that you can pass around to collegues is cool, but how can you permanently host your demo and have it exist in its own “space” on the internet?
Hugging Face空间为你的GRadio模型在互联网上的永久托管提供了基础设施,免费的!Spaces允许您创建并推送到(公共或私有)repo,其中您的GRadio接口代码将存在于app.py文件中。阅读分步教程开始学习,或观看下面的示例视频。
Hugging Face Spaces provides the infrastructure to permanently host your Gradio model on the internet, for free! Spaces allows you to create and push to a (public or private) repo,
where your Gradio
interface code will exist in an app.py file. Read a step-by-step tutorial to get started, or watch an example video below.
✏️让我们来应用它吧!
✏️ Let’s apply it!
使用我们到目前为止在各节中所学的内容,让我们创建我们在本章第一节中看到的草图识别演示。让我们在我们的界面中添加一些定制,并设置Share=True来创建一个我们可以传递的公共链接。
Using what we just learned in the sections so far, let’s create the sketch recognition demo we saw in section one of this chapter. Let’s add some customization to our interface and set share=True to create a public link we can pass around.
我们可以从class_names.txt加载标签,并从pytorch_Model.bin加载预先训练好的pytorch模型。点击链接并点击文件预览左上角的下载按钮,即可下载这些文件。让我们看一看下面的代码,看看我们如何使用这些文件来加载我们的模型并创建一个recast()函数:
We can load the labels from class_names.txt and load the pre-trained pytorch model from pytorch_model.bin. Download these files by following the link and clicking download on the top left corner of the file preview. Let’s take a look at the code below to see how we use these files to load our model and create a predict() function:
现在我们有了一个‘recast()’函数。下一步是定义并启动我们的gradio接口:
1 | |
Now that we have a predict() function. The next step is to define and launch our gradio interface:
注意Interface中的live=True参数,这意味着每次有人在SketchPad上画画(没有提交按钮!),草图演示都会做出预测。
1 | |
Notice the live=True parameter in Interface, which means that the sketch demo makes
a prediction every time someone draws on the sketchpad (no submit button!).
此外,我们还在Launch()方法中设置了share=True参数。这将创建一个您可以发送给任何人的公共链接!当您发送此链接时,另一端的用户可以尝试草图识别模型。重申一下,你也可以把这个模型放在Hugging Face空间上,这就是我们嵌入上面的演示的方式。
Furthermore, we also set the share=True argument in the launch() method.
This will create a public link that you can
send to anyone! When you send this link, the user on the other side can try out the
sketch recognition model. To reiterate, you could also host the model on Hugging Face Spaces,
which is how we are able to embed the demo above.
接下来,我们将介绍GRadio在Hugging Face生态系统中的其他使用方式!
Next up, we’ll cover other ways that Gradio can be used with the Hugging Face ecosystem!