7-Main_NLP_tasks-1-Token_classification
中英文对照学习,效果更佳!
原课程链接:https://huggingface.co/course/chapter7/2?fw=pt
Token classification
代币分类

![]()

The first application we’ll explore is token classification. This generic task encompasses any problem that can be formulated as “attributing a label to each token in a sentence,” such as:
提问在Colab中打开在Studio Lab中打开我们将探索的第一个应用程序是令牌分类。这项一般性任务包括任何可以表述为“为句子中的每个标记赋予标签”的问题,例如:
- Named entity recognition (NER): Find the entities (such as persons, locations, or organizations) in a sentence. This can be formulated as attributing a label to each token by having one class per entity and one class for “no entity.”
- Part-of-speech tagging (POS): Mark each word in a sentence as corresponding to a particular part of speech (such as noun, verb, adjective, etc.).
- Chunking: Find the tokens that belong to the same entity. This task (which can be combined with POS or NER) can be formulated as attributing one label (usually
B-) to any tokens that are at the beginning of a chunk, another label (usuallyI-) to tokens that are inside a chunk, and a third label (usuallyO) to tokens that don’t belong to any chunk.
Of course, there are many other types of token classification problem; those are just a few representative examples. In this section, we will fine-tune a model (BERT) on a NER task, which will then be able to compute predictions like this one:
命名实体识别(NER):查找句子中的实体(如人、位置或组织)。词性标记(POS):将句子中的每个词标记为对应于特定词性(如名词、动词、形容词等)。组块:查找属于同一实体的标记。这项任务(可以与POS或NER结合使用)可以表示为将一个标签(通常为B-)赋予位于块开头的任何令牌,将另一个标签(通常为I-)赋予位于块内的令牌,并将第三个标签(通常为‘O’)赋予不属于任何块的令牌。当然,还有许多其他类型的令牌分类问题;这些只是几个具有代表性的例子。在本节中,我们将对NER任务的模型(BERT)进行微调,然后该模型将能够计算如下预测:
You can find the model we’ll train and upload to the Hub and double-check its predictions here.
One-用于回答问题的热编码标签。One-用于回答问题的热编码标签。你可以在这里找到我们将训练并上传到The Hub的模型,并仔细检查它的预测。
Preparing the data
准备数据
First things first, we need a dataset suitable for token classification. In this section we will use the CoNLL-2003 dataset, which contains news stories from Reuters.
首先,我们需要一个适用于令牌分类的数据集。在本节中,我们将使用CoNLL-2003数据集,其中包含路透社的新闻报道。
💡 As long as your dataset consists of texts split into words with their corresponding labels, you will be able to adapt the data processing procedures described here to your own dataset. Refer back to [Chapter 5] if you need a refresher on how to load your own custom data in a Dataset.
💡只要您的数据集由拆分成带有相应标签的单词的文本组成,您就能够使这里描述的数据处理过程适应您自己的数据集。如果您需要复习一下如何在Dataset中加载您自己的自定义数据,请参阅第5章。
The CoNLL-2003 dataset
CoNLL-2003数据集
To load the CoNLL-2003 dataset, we use the load_dataset() method from the 🤗 Datasets library:
要加载CoNL2003数据集,我们使用🤗数据集库中的Load_DataSet()方法:
1 | |
This will download and cache the dataset, like we saw in [Chapter 3] for the GLUE MRPC dataset. Inspecting this object shows us the columns present and the split between the training, validation, and test sets:
这将下载并缓存数据集,就像我们在第3章中看到的GLUE MRPC数据集一样。检查此对象将向我们显示存在的列以及培训、验证和测试集之间的划分:
1 | |
1 | |
In particular, we can see the dataset contains labels for the three tasks we mentioned earlier: NER, POS, and chunking. A big difference from other datasets is that the input texts are not presented as sentences or documents, but lists of words (the last column is called tokens, but it contains words in the sense that these are pre-tokenized inputs that still need to go through the tokenizer for subword tokenization).
特别是,我们可以看到数据集包含我们前面提到的三个任务的标签:NER、POS和Chunking。与其他数据集的一个很大不同之处在于,输入文本不是以句子或文档的形式呈现,而是以单词列表的形式呈现(最后一列被称为‘tokens’,但它包含的词的意义在于,这些是预先标记化的输入,仍然需要通过标记器进行子词标记化)。
Let’s have a look at the first element of the training set:
让我们来看看训练集的第一个元素:
1 | |
1 | |
Since we want to perform named entity recognition, we will look at the NER tags:
由于我们要执行命名实体识别,因此我们将查看NER标记:
1 | |
1 | |
Those are the labels as integers ready for training, but they’re not necessarily useful when we want to inspect the data. Like for text classification, we can access the correspondence between those integers and the label names by looking at the features attribute of our dataset:
这些都是可以训练的整数标签,但当我们想要检查数据时,它们不一定有用。与文本分类一样,我们可以通过查看数据集的Featureres属性来访问这些整数和标签名称之间的对应关系:
1 | |
1 | |
So this column contains elements that are sequences of ClassLabels. The type of the elements of the sequence is in the feature attribute of this ner_feature, and we can access the list of names by looking at the names attribute of that feature:
因此,该列包含的元素是ClassLabel的序列。该序列的元素的类型在这个ner_Feature的Feature属性中,我们可以通过查看那个Feature的namure`属性来访问名称列表:
1 | |
1 | |
We already saw these labels when digging into the token-classification pipeline in Chapter 6, but for a quick refresher:
我们在第6章的令牌-分类管道中已经看到了这些标签,但为了快速刷新一下:
Omeans the word doesn’t correspond to any entity.B-PER/I-PERmeans the word corresponds to the beginning of/is inside a person entity.B-ORG/I-ORGmeans the word corresponds to the beginning of/is inside an organization entity.B-LOC/I-LOCmeans the word corresponds to the beginning of/is inside a location entity.B-MISC/I-MISCmeans the word corresponds to the beginning of/is inside a miscellaneous entity.
Now decoding the labels we saw earlier gives us this:
`O‘表示单词不对应于任何实体。B-PER/I-PER表示单词对应于人实体的开头/在人实体内。B-ORG/I-ORG表示单词对应于组织实体的开头/在组织实体内。B-LOC/I-LOC表示单词对应于位置实体的开头/在位置实体内。B-MISC/I-MISC表示单词对应于杂乱实体的开头/在其他实体内。现在对前面看到的标签进行解码,得到如下结果:
1 | |
1 | |
And for an example mixing B- and I- labels, here’s what the same code gives us on the element of the training set at index 4:
对于混合B-和I-标签的例子,相同的代码在索引4处的训练集的元素上给出了什么:
1 | |
As we can see, entities spanning two words, like “European Union” and “Werner Zwingmann,” are attributed a B- label for the first word and an I- label for the second.
正如我们所看到的,横跨两个单词的实体,如“欧盟”和“Werner Zwingmann”,被赋予第一个单词的B-‘标签和第二个单词的I-`标签。
✏️ Your turn! Print the same two sentences with their POS or chunking labels.
✏️轮到你了!打印相同的两个句子,加上它们的POS或组块标签。
Processing the data
正在处理数据
As usual, our texts need to be converted to token IDs before the model can make sense of them. As we saw in Chapter 6, a big difference in the case of token classification tasks is that we have pre-tokenized inputs. Fortunately, the tokenizer API can deal with that pretty easily; we just need to warn the tokenizer with a special flag.
像往常一样,我们的文本需要被转换为令牌ID,然后模型才能理解它们。正如我们在第6章中看到的,令牌分类任务的一个很大的不同之处在于我们有预标记化的输入。幸运的是,令牌化器API可以很容易地处理这一问题;我们只需要用一个特殊的标志来警告`tokenizer‘。
To begin, let’s create our tokenizer object. As we said before, we will be using a BERT pretrained model, so we’ll start by downloading and caching the associated tokenizer:
首先,让我们创建tokenizer对象。正如我们前面所说的,我们将使用BERT预先训练的模型,因此我们将从下载和缓存相关的记号赋值器开始:
1 | |
You can replace the model_checkpoint with any other model you prefer from the Hub, or with a local folder in which you’ve saved a pretrained model and a tokenizer. The only constraint is that the tokenizer needs to be backed by the 🤗 Tokenizers library, so there’s a “fast” version available. You can see all the architectures that come with a fast version in this big table, and to check that the tokenizer object you’re using is indeed backed by 🤗 Tokenizers you can look at its is_fast attribute:
您可以使用Hub中您喜欢的任何其他模型替换Model_Checkpoint‘,也可以使用保存了预先训练的模型和标记器的本地文件夹替换。唯一的限制是令牌化器需要由🤗令牌化器库支持,因此有一个“快速”版本可用。您可以在这个大表中看到FAST版本附带的所有架构,要检查您正在使用的tokenizer对象是否确实受🤗Tokenizers支持,您可以查看它的is_fast`属性:
1 | |
1 | |
To tokenize a pre-tokenized input, we can use our tokenizer as usual and just add is_split_into_words=True:
要对预标记化的输入进行标记化,我们可以照常使用我们的标记器,只需添加is_plit_into_word=True:
1 | |
1 | |
As we can see, the tokenizer added the special tokens used by the model ([CLS] at the beginning and [SEP] at the end) and left most of the words untouched. The word lamb, however, was tokenized into two subwords, la and ##mb. This introduces a mismatch between our inputs and the labels: the list of labels has only 9 elements, whereas our input now has 12 tokens. Accounting for the special tokens is easy (we know they are at the beginning and the end), but we also need to make sure we align all the labels with the proper words.
正如我们看到的,标记器添加了模型使用的特殊标记([CLS]开头和[SEP]结尾),而大部分单词保持不变。然而,单词lamb‘被标记化为两个子词:la和##mb`。这在我们的输入和标签之间引入了不匹配:标签列表只有9个元素,而我们的输入现在有12个标记。计算特殊标记很容易(我们知道它们位于开头和结尾),但我们还需要确保将所有标签与适当的单词对齐。
Fortunately, because we’re using a fast tokenizer we have access to the 🤗 Tokenizers superpowers, which means we can easily map each token to its corresponding word (as seen in Chapter 6):
幸运的是,因为我们使用的是快速令牌化器,所以我们可以访问🤗令牌化器超能力,这意味着我们可以轻松地将每个令牌映射到其对应的单词(如第6章所示):
1 | |
1 | |
With a tiny bit of work, we can then expand our label list to match the tokens. The first rule we’ll apply is that special tokens get a label of -100. This is because by default -100 is an index that is ignored in the loss function we will use (cross entropy). Then, each token gets the same label as the token that started the word it’s inside, since they are part of the same entity. For tokens inside a word but not at the beginning, we replace the B- with I- (since the token does not begin the entity):
只需做一点工作,我们就可以扩展标签列表以匹配令牌。我们要应用的第一条规则是,特殊令牌的标签为-100。这是因为在我们将要使用的损失函数(交叉熵)中,默认情况下-100是一个被忽略的指标。然后,每个令牌都会获得与其所在单词开头的令牌相同的标签,因为它们是同一实体的一部分。对于单词内部但不在开头的标记,我们将B-替换为I-(因为标记不是实体的开始):
1 | |
Let’s try it out on our first sentence:
让我们来试试我们的第一句话:
1 | |
1 | |
As we can see, our function added the -100 for the two special tokens at the beginning and the end, and a new 0 for our word that was split into two tokens.
正如我们所看到的,我们的函数为开头和结尾的两个特殊标记添加了`-100‘,并为拆分为两个标记的单词添加了一个新的’0‘。
✏️ Your turn! Some researchers prefer to attribute only one label per word, and assign -100 to the other subtokens in a given word. This is to avoid long words that split into lots of subtokens contributing heavily to the loss. Change the previous function to align labels with input IDs by following this rule.
✏️轮到你了!一些研究人员倾向于每个词只有一个标签,并将`-100‘分配给给定词中的其他子标记。这是为了避免长词分裂成大量的子符号,这对损失有很大影响。通过遵循此规则,更改前面的函数以使标签与输入ID对齐。
To preprocess our whole dataset, we need to tokenize all the inputs and apply align_labels_with_tokens() on all the labels. To take advantage of the speed of our fast tokenizer, it’s best to tokenize lots of texts at the same time, so we’ll write a function that processes a list of examples and use the Dataset.map() method with the option batched=True. The only thing that is different from our previous example is that the word_ids() function needs to get the index of the example we want the word IDs of when the inputs to the tokenizer are lists of texts (or in our case, list of lists of words), so we add that too:
要对整个数据集进行预处理,我们需要对所有输入进行标记化,并在所有标签上应用Align_Labels_with_tokens()。为了利用快速标记器的速度,最好同时标记化大量文本,因此我们将编写一个处理示例列表的函数,并使用带有Batcher=True选项的Dataset.map()方法。与我们前面的示例唯一不同的是,Word_ids()函数需要获取我们想要的示例的索引,当词汇化器的输入是文本列表(在我们的例子中是单词列表)时,需要获取该示例的单词ID,所以我们也添加了这一点:
1 | |
Note that we haven’t padded our inputs yet; we’ll do that later, when creating the batches with a data collator.
请注意,我们还没有填充我们的输入;我们将在稍后使用数据校验器创建批处理时进行填充。
We can now apply all that preprocessing in one go on the other splits of our dataset:
现在,我们可以在数据集的其他拆分上一次应用所有的预处理:
1 | |
We’ve done the hardest part! Now that the data has been preprocessed, the actual training will look a lot like what we did in [Chapter 3].
我们已经完成了最难的部分!现在数据已经经过了预处理,实际的培训将与我们在第3章中所做的非常相似。
Fine-tuning the model with the Trainer API
使用Traine接口对模型进行微调
The actual code using the Trainer will be the same as before; the only changes are the way the data is collated into a batch and the metric computation function.
使用Traine的实际代码将与以前相同;唯一的变化是将数据整理成批处理的方式和指标计算函数。
Data collation
数据整理
We can’t just use a DataCollatorWithPadding like in [Chapter 3] because that only pads the inputs (input IDs, attention mask, and token type IDs). Here our labels should be padded the exact same way as the inputs so that they stay the same size, using -100 as a value so that the corresponding predictions are ignored in the loss computation.
我们不能像第3章那样只使用DataCollatorWithPadding,因为它只填充输入(输入ID、注意掩码和令牌类型ID)。在这里,我们的标签应该以与输入完全相同的方式填充,以便它们保持相同的大小,使用-100作为值,以便在损失计算中忽略相应的预测。
This is all done by a DataCollatorForTokenClassification. Like the DataCollatorWithPadding, it takes the tokenizer used to preprocess the inputs:
这一切都是由一个DataCollatorForTokenategication来完成的。与DataCollatorWithPadding类似,它接受用于对输入进行预处理的tokenizer:
1 | |
To test this on a few samples, we can just call it on a list of examples from our tokenized training set:
要在几个样本上测试它,我们只需在我们的标记化训练集中的一个示例列表上调用它:
1 | |
1 | |
Let’s compare this to the labels for the first and second elements in our dataset:
让我们将其与数据集中第一个和第二个元素的标签进行比较:
1 | |
1 | |
As we can see, the second set of labels has been padded to the length of the first one using -100s.
正如我们所看到的,第二组标签已经用`-100‘s填充到第一组标签的长度上。
Metrics
量度
To have the Trainer compute a metric every epoch, we will need to define a compute_metrics() function that takes the arrays of predictions and labels, and returns a dictionary with the metric names and values.
要让Traine在每个纪元计算一个指标,我们需要定义一个接受预测和标签数组并返回一个包含指标名称和值的字典的culate_metrics()函数。
The traditional framework used to evaluate token classification prediction is seqeval. To use this metric, we first need to install the seqeval library:
传统的评估标记分类预测的框架是序贯的。要使用此指标,我们首先需要安装seqval库:
1 | |
We can then load it via the evaluate.load() function like we did in [Chapter 3]:
然后,我们可以像在第3章中所做的那样,通过valuate.load()函数加载它:
1 | |
This metric does not behave like the standard accuracy: it will actually take the lists of labels as strings, not integers, so we will need to fully decode the predictions and labels before passing them to the metric. Let’s see how it works. First, we’ll get the labels for our first training example:
该指标的行为与标准精度不同:它实际上会将标签列表作为字符串,而不是整数,因此在将预测和标签传递给该指标之前,我们需要对它们进行完全解码。让我们看看它是如何工作的。首先,我们将获得第一个训练示例的标签:
1 | |
1 | |
We can then create fake predictions for those by just changing the value at index 2:
然后,我们只需更改索引2处的值,即可为这些预测创建假预测:
1 | |
Note that the metric takes a list of predictions (not just one) and a list of labels. Here’s the output:
请注意,该指标包含一个预测列表(而不仅仅是一个预测)和一个标签列表。以下是输出:
1 | |
This is sending back a lot of information! We get the precision, recall, and F1 score for each separate entity, as well as overall. For our metric computation we will only keep the overall score, but feel free to tweak the compute_metrics() function to return all the metrics you would like reported.
这是在发回很多信息!我们得到了每个单独实体的精确度、召回率和F1得分,以及总体得分。对于我们的指标计算,我们将只保留总得分,但可以随意调整COMPUTE_METRICS()函数,以返回您想要报告的所有指标。
This compute_metrics() function first takes the argmax of the logits to convert them to predictions (as usual, the logits and the probabilities are in the same order, so we don’t need to apply the softmax). Then we have to convert both labels and predictions from integers to strings. We remove all the values where the label is -100, then pass the results to the metric.compute() method:
这个Compute_Metrics()函数首先获取logit的argmax,将它们转换为预测(通常,logit和概率的顺序相同,因此我们不需要应用Softmax)。然后,我们必须将标签和预测从整数转换为字符串。我们去掉标签为-100的所有值,然后将结果传递给metric.cote()方法:
1 | |
Now that this is done, we are almost ready to define our Trainer. We just need a model to fine-tune!
现在这些都完成了,我们几乎准备好定义我们的‘火车’了。我们只需要一个‘模特’来微调!
Defining the model
定义模型
Since we are working on a token classification problem, we will use the AutoModelForTokenClassification class. The main thing to remember when defining this model is to pass along some information on the number of labels we have. The easiest way to do this is to pass that number with the num_labels argument, but if we want a nice inference widget working like the one we saw at the beginning of this section, it’s better to set the correct label correspondences instead.
由于我们正在处理一个令牌分类问题,因此我们将使用AutoModelForTokenategication类。定义此模型时需要记住的主要内容是传递有关我们拥有的标签数量的一些信息。要做到这一点,最简单的方法是将该数字与`num_Labels‘参数一起传递,但如果我们想要一个很好的推理小部件工作,就像我们在本节开头看到的那样,最好设置正确的标签对应。
They should be set by two dictionaries, id2label and label2id, which contain the mappings from ID to label and vice versa:
应该由id2label和label2id两个字典来设置,这两个字典包含ID到标签的映射,反之亦然:
1 | |
Now we can just pass them to the AutoModelForTokenClassification.from_pretrained() method, and they will be set in the model’s configuration and then properly saved and uploaded to the Hub:
现在,我们只需将它们传递给AutoModelForTokenClassification.from_pretrained()方法,它们将在模型的配置中进行设置,然后正确保存并上载到Hub:
1 | |
Like when we defined our AutoModelForSequenceClassification in [Chapter 3], creating the model issues a warning that some weights were not used (the ones from the pretraining head) and some other weights are randomly initialized (the ones from the new token classification head), and that this model should be trained. We will do that in a minute, but first let’s double-check that our model has the right number of labels:
就像我们在第3章中定义我们的`AutoModelForSequenceClass‘时一样,创建模型会发出警告,一些权重没有被使用(来自预训练头的权重),而另一些权重被随机初始化(来自新的令牌分类头部的权重),并且该模型应该被训练。我们将立即执行此操作,但首先让我们再次检查我们的模型是否具有正确的标签数量:
1 | |
1 | |
⚠️ If you have a model with the wrong number of labels, you will get an obscure error when calling the Trainer.train() method later on (something like “CUDA error: device-side assert triggered”). This is the number one cause of bugs reported by users for such errors, so make sure you do this check to confirm that you have the expected number of labels.
⚠️如果您的机型的标签数量错误,则稍后调用Traine.train()方法时会得到一个隐晦的错误(类似于“CUDA Error:Device-Side Assert Trigated”)。这是用户为此类错误报告的错误的头号原因,因此请确保执行此检查以确认您拥有预期数量的标签。
Fine-tuning the model
微调模型
We are now ready to train our model! We just need to do two last things before we define our Trainer: log in to Hugging Face and define our training arguments. If you’re working in a notebook, there’s a convenience function to help you with this:
我们现在准备好训练我们的模特了!在定义我们的训练之前,我们只需要做最后两件事:登录Hugging Face,定义我们的训练论点。如果你在笔记本上工作,有一个方便的功能可以帮助你做到这一点:
1 | |
This will display a widget where you can enter your Hugging Face login credentials.
这将显示一个小部件,您可以在其中输入您的Hugging Face登录凭据。
If you aren’t working in a notebook, just type the following line in your terminal:
如果您不是在笔记本电脑上工作,只需在您的终端中键入以下行:
1 | |
Once this is done, we can define our TrainingArguments:
完成后,我们可以定义我们的TrainingArguments:
1 | |
You’ve seen most of those before: we set some hyperparameters (like the learning rate, the number of epochs to train for, and the weight decay), and we specify push_to_hub=True to indicate that we want to save the model and evaluate it at the end of every epoch, and that we want to upload our results to the Model Hub. Note that you can specify the name of the repository you want to push to with the hub_model_id argument (in particular, you will have to use this argument to push to an organization). For instance, when we pushed the model to the huggingface-course organization, we added hub_model_id="huggingface-course/bert-finetuned-ner" to TrainingArguments. By default, the repository used will be in your namespace and named after the output directory you set, so in our case it will be "sgugger/bert-finetuned-ner".
您以前已经看到了其中的大多数:我们设置了一些超参数(如学习速率、要训练的历元数和权重衰减),并指定PUSH_TO_HUB=True以指示我们想要保存模型并在每个历元结束时对其进行评估,并且我们想要将结果上传到Model Hub。请注意,您可以使用Hub_Model_id参数指定要推送到的存储库的名称(特别是必须使用此参数才能推送到组织)。例如,当我们将模型推送到HuggingFace-Course组织时,我们将hub_model_id=“huggingface-course/bert-finetuned-ner”添加到TrainingArguments中。默认情况下,使用的存储库将位于您的命名空间中,并以您设置的输出目录命名,因此在我们的示例中,它将是“sgugger/bert-finetuned-ner”。
💡 If the output directory you are using already exists, it needs to be a local clone of the repository you want to push to. If it isn’t, you’ll get an error when defining your Trainer and will need to set a new name.
💡如果您正在使用的输出目录已经存在,则它需要是您要推送到的存储库的本地克隆。如果不是,则在定义您的Traine时会出现错误,并需要设置一个新名称。
Finally, we just pass everything to the Trainer and launch the training:
最后,我们只需将所有内容传递给Traine,并启动培训:
1 | |
Note that while the training happens, each time the model is saved (here, every epoch) it is uploaded to the Hub in the background. This way, you will be able to to resume your training on another machine if necessary.
请注意,在进行训练时,每次保存模型(这里是每个时期)时,都会将其上载到后台的Hub。这样,如果需要,您将能够在另一台计算机上恢复您的训练。
Once the training is complete, we use the push_to_hub() method to make sure we upload the most recent version of the model:
培训完成后,我们使用Push_to_Hub()方法确保上传模型的最新版本:
1 | |
This command returns the URL of the commit it just did, if you want to inspect it:
如果您要检查它,此命令将返回它刚刚执行的提交的URL:
1 | |
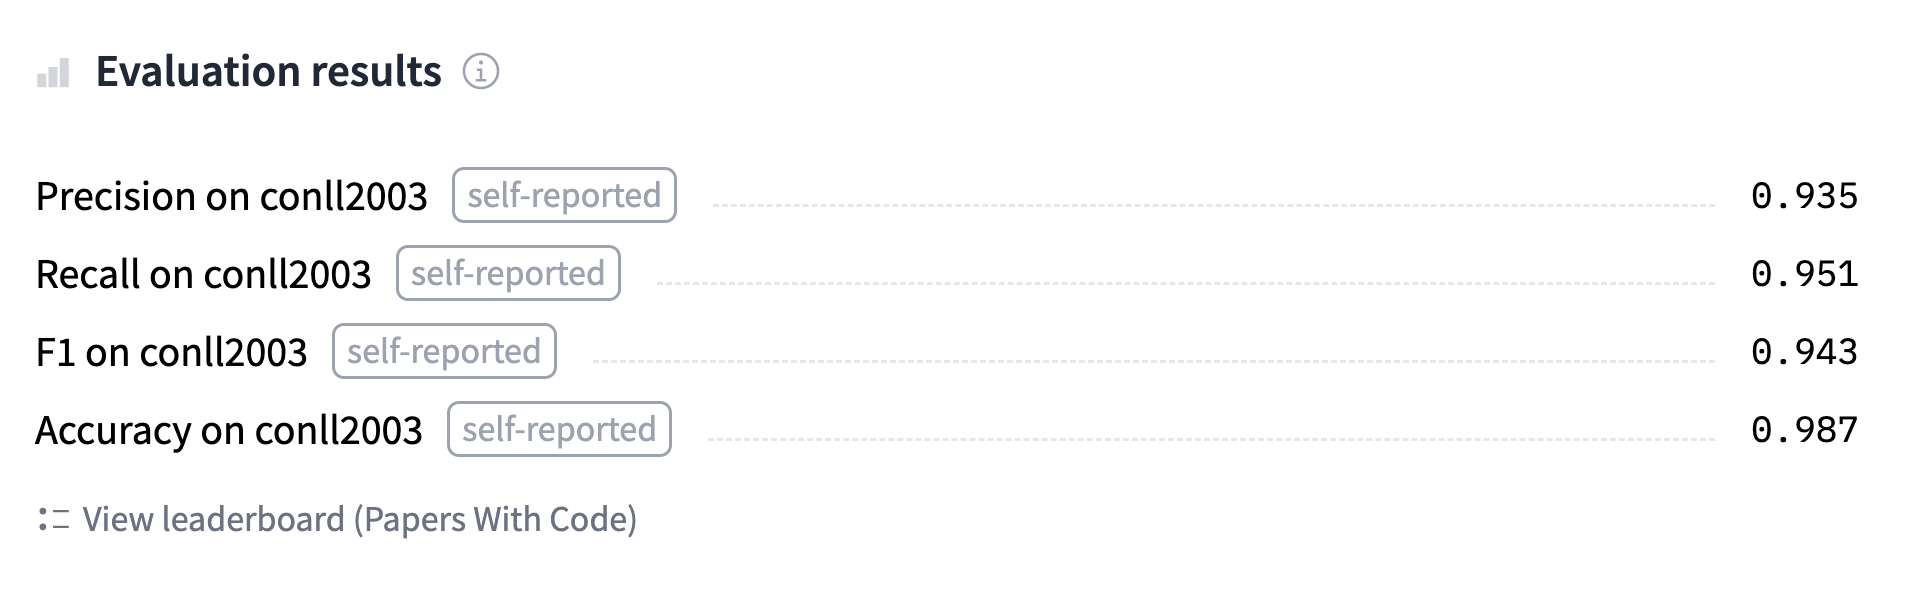
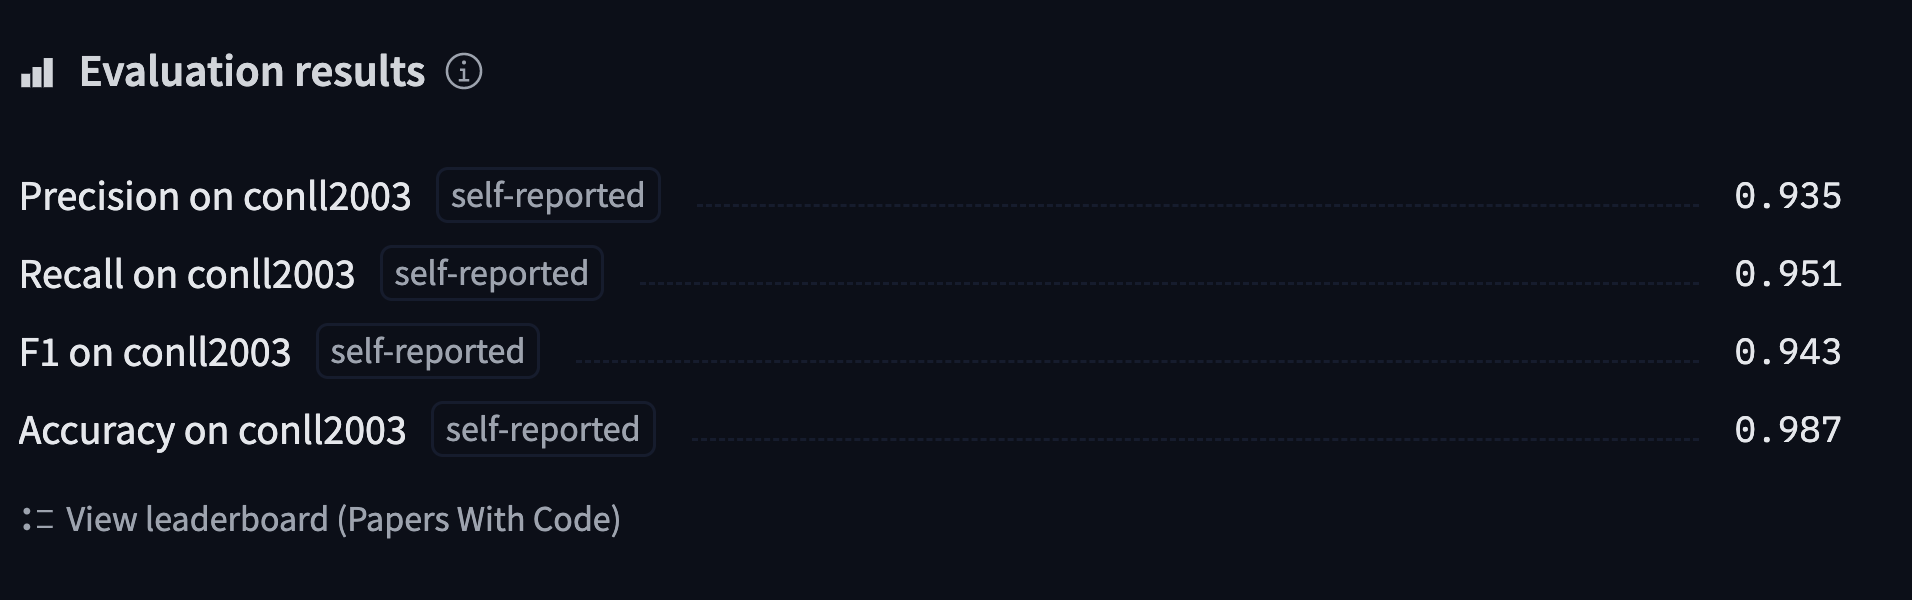
The Trainer also drafts a model card with all the evaluation results and uploads it. At this stage, you can use the inference widget on the Model Hub to test your model and share it with your friends. You have successfully fine-tuned a model on a token classification task — congratulations!
“火车”还起草了一张包含所有评估结果的模型卡,并将其上传。在此阶段,您可以使用Model Hub上的推理小部件来测试您的模型并将其与您的朋友共享。您已经成功地对令牌分类任务中的模型进行了微调-祝贺您!
If you want to dive a bit more deeply into the training loop, we will now show you how to do the same thing using 🤗 Accelerate.
如果您想更深入地了解训练循环,我们现在将向您展示如何使用🤗Accelerate来做同样的事情。
A custom training loop
定制培训循环
Let’s now take a look at the full training loop, so you can easily customize the parts you need. It will look a lot like what we did in Chapter 3, with a few changes for the evaluation.
现在让我们来看看完整的训练循环,这样您就可以轻松地定制所需的部件。它看起来与我们在第3章中所做的非常相似,只是对评估做了一些更改。
Preparing everything for training
为训练做好一切准备
First we need to build the DataLoaders from our datasets. We’ll reuse our data_collator as a collate_fn and shuffle the training set, but not the validation set:
首先,我们需要从数据集构建DataLoader‘s。我们将重新使用我们的data_Collator作为Collate_fn`,并对训练集进行改组,但不对验证集进行置乱:
1 | |
Next we reinstantiate our model, to make sure we’re not continuing the fine-tuning from before but starting from the BERT pretrained model again:
接下来,我们重新实例化我们的模型,以确保我们不会继续之前的微调,而是再次从Bert预先训练的模型开始:
1 | |
Then we will need an optimizer. We’ll use the classic AdamW, which is like Adam, but with a fix in the way weight decay is applied:
那么我们需要一个优化器。我们将使用经典的AdamW,它类似于Adam,但修复了权重衰减的应用方式:
1 | |
Once we have all those objects, we can send them to the accelerator.prepare() method:
一旦我们拥有了所有这些对象,我们就可以将它们发送到accelerator.preparate()方法:
1 | |
🚨 If you’re training on a TPU, you’ll need to move all the code starting from the cell above into a dedicated training function. See [Chapter 3] for more details.
🚨如果你正在训练一个TPU,你需要把所有从上面的单元开始的代码移到一个专用的训练功能中。有关详细信息,请参阅第3章。
Now that we have sent our train_dataloader to accelerator.prepare(), we can use its length to compute the number of training steps. Remember that we should always do this after preparing the dataloader, as that method will change its length. We use a classic linear schedule from the learning rate to 0:
既然我们已经将Train_dataloader发送到了accelerator.preparate(),我们就可以使用它的长度来计算训练步数了。请记住,我们应该始终在准备数据读取器之后执行此操作,因为该方法将更改其长度。我们使用从学习率到0的经典线性时间表:
1 | |
Lastly, to push our model to the Hub, we will need to create a Repository object in a working folder. First log in to Hugging Face, if you’re not logged in already. We’ll determine the repository name from the model ID we want to give our model (feel free to replace the repo_name with your own choice; it just needs to contain your username, which is what the function get_full_repo_name() does):
最后,为了将我们的模型推送到Hub,我们需要在一个工作文件夹中创建一个Repository对象。如果你还没有登录,请先登录Hugging Face。我们将根据我们想要为我们的模型提供的模型ID来确定存储库名称(您可以随意将repo_name替换为您自己的选择;它只需要包含您的用户名,这就是函数get_Full_repo_name()所做的):
1 | |
1 | |
Then we can clone that repository in a local folder. If it already exists, this local folder should be an existing clone of the repository we are working with:
然后,我们可以在本地文件夹中克隆该存储库。如果它已经存在,则此本地文件夹应该是我们正在使用的存储库的现有克隆:
1 | |
We can now upload anything we save in output_dir by calling the repo.push_to_hub() method. This will help us upload the intermediate models at the end of each epoch.
现在,我们可以通过调用repo.ush_to_Hub()方法上传保存在out_dir中的任何内容。这将帮助我们在每个时代结束时上传中间模型。
Training loop
训练循环
We are now ready to write the full training loop. To simplify its evaluation part, we define this postprocess() function that takes predictions and labels and converts them to lists of strings, like our metric object expects:
我们现在已经准备好编写完整的训练循环。为了简化计算部分,我们定义了这个postprocess()函数,该函数接受预测和标签,并将它们转换为字符串列表,就像我们的metric对象期望的那样:
1 | |
Then we can write the training loop. After defining a progress bar to follow how training goes, the loop has three parts:
然后我们就可以编写训练循环了。在定义了跟踪培训进展情况的进度条后,循环包含三个部分:
- The training in itself, which is the classic iteration over the
train_dataloader, forward pass through the model, then backward pass and optimizer step. - The evaluation, in which there is a novelty after getting the outputs of our model on a batch: since two processes may have padded the inputs and labels to different shapes, we need to use
accelerator.pad_across_processes()to make the predictions and labels the same shape before calling thegather()method. If we don’t do this, the evaluation will either error out or hang forever. Then we send the results tometric.add_batch()and callmetric.compute()once the evaluation loop is over. - Saving and uploading, where we first save the model and the tokenizer, then call
repo.push_to_hub(). Notice that we use the argumentblocking=Falseto tell the 🤗 Hub library to push in an asynchronous process. This way, training continues normally and this (long) instruction is executed in the background.
Here’s the complete code for the training loop:
训练本身是对train_dataloader的经典迭代,它向前遍历模型,然后向后遍历和优化器步骤。评估,其中在批量获得我们的模型的输出后有一种新鲜感:由于两个进程可能已经将输入和标签填充到不同的形状,所以在调用ather()方法之前,我们需要使用accelerator.pad_cross_Process()来进行预测并标记相同的形状。如果我们不这样做,评估要么出错,要么永远挂起。然后我们将结果发送到metric.addBatch(),并在评估循环结束后调用metric.count()。保存并上传,我们首先保存模型和标记器,然后调用repo.ush_to_Hub()。请注意,我们使用参数🤗=False来告诉BLOCKING集线器库推入一个异步进程。这样,训练将正常继续,并在后台执行此(长)指令。以下是训练循环的完整代码:
1 | |
In case this is the first time you’re seeing a model saved with 🤗 Accelerate, let’s take a moment to inspect the three lines of code that go with it:
如果这是您第一次看到使用🤗Accelerate保存的模型,让我们花点时间来检查一下与之配套的三行代码:
1 | |
The first line is self-explanatory: it tells all the processes to wait until everyone is at that stage before continuing. This is to make sure we have the same model in every process before saving. Then we grab the unwrapped_model, which is the base model we defined. The accelerator.prepare() method changes the model to work in distributed training, so it won’t have the save_pretrained() method anymore; the accelerator.unwrap_model() method undoes that step. Lastly, we call save_pretrained() but tell that method to use accelerator.save() instead of torch.save().
第一行是不言而喻的:它告诉所有进程等到每个进程都到了那个阶段再继续。这是为了确保我们在保存之前的每个过程中都有相同的模型。然后,我们获取我们定义的基本模型–UNWARTED_MODEL。accelerator.prepare()方法将模型更改为在分布式训练中工作,因此它将不再有save_preTraded()方法;accelerator.unwire_Model()方法撤消这一步骤。最后,我们调用save_preTraded(),但告诉该方法使用accelerator()而不是torch.save()。
Once this is done, you should have a model that produces results pretty similar to the one trained with the Trainer. You can check the model we trained using this code at huggingface-course/bert-finetuned-ner-accelerate. And if you want to test out any tweaks to the training loop, you can directly implement them by editing the code shown above!
一旦做到这一点,你应该有一个模型,产生的结果非常类似于用‘火车’训练的结果。您可以在huggingface-course/bert-finetuned-ner-accelerate.上使用此代码检查我们训练的模型如果您想测试对训练循环的任何调整,您可以通过编辑上面显示的代码直接实现它们!
Using the fine-tuned model
使用微调的模型
We’ve already shown you how you can use the model we fine-tuned on the Model Hub with the inference widget. To use it locally in a pipeline, you just have to specify the proper model identifier:
我们已经向您展示了如何将我们在Model Hub上微调的模型与推理小部件一起使用。要在Pipeline中本地使用,只需指定正确的型号标识即可:
1 | |
1 | |
Great! Our model is working as well as the default one for this pipeline!
太棒了!我们的模型与此管道的默认模型一样有效!