5-The_Datasets_library-4-Creating_your_own_dataset
中英文对照学习,效果更佳!
原课程链接:https://huggingface.co/course/chapter5/5?fw=pt
Creating your own dataset
创建您自己的数据集

![]()

Sometimes the dataset that you need to build an NLP application doesn’t exist, so you’ll need to create it yourself. In this section we’ll show you how to create a corpus of GitHub issues, which are commonly used to track bugs or features in GitHub repositories. This corpus could be used for various purposes, including:
提问在Studio Lab中打开在Colab中打开有时构建NLP应用程序所需的数据集不存在,因此您需要自己创建它。在本节中,我们将向您展示如何创建GitHub问题语料库,这些问题通常用于跟踪GitHub存储库中的错误或功能。该语料库可用于各种目的,包括:
- Exploring how long it takes to close open issues or pull requests
- Training a multilabel classifier that can tag issues with metadata based on the issue’s description (e.g., “bug,” “enhancement,” or “question”)
- Creating a semantic search engine to find which issues match a user’s query
Here we’ll focus on creating the corpus, and in the next section we’ll tackle the semantic search application. To keep things meta, we’ll use the GitHub issues associated with a popular open source project: 🤗 Datasets! Let’s take a look at how to get the data and explore the information contained in these issues.
探索关闭打开的问题或提取请求需要多长时间训练一个多标签分类器,该分类器可以根据问题的描述(例如,“错误”、“增强”或“问题”)用元数据标记问题创建一个语义搜索引擎来查找哪些问题与用户的查询匹配这里我们将重点放在创建语料库,在下一节我们将处理语义搜索应用程序。为了保持元数据,我们将使用与流行的开源项目:🤗DataSets相关的giHub问题!让我们来看看如何获取数据并探索这些问题中包含的信息。
Getting the data
获取数据
You can find all the issues in 🤗 Datasets by navigating to the repository’s Issues tab. As shown in the following screenshot, at the time of writing there were 331 open issues and 668 closed ones.
您可以通过导航到存储库的问题选项卡来查找🤗数据集中的所有问题。如下面的截图所示,在撰写本文时,有331个未解决的问题和668个已结束的问题。
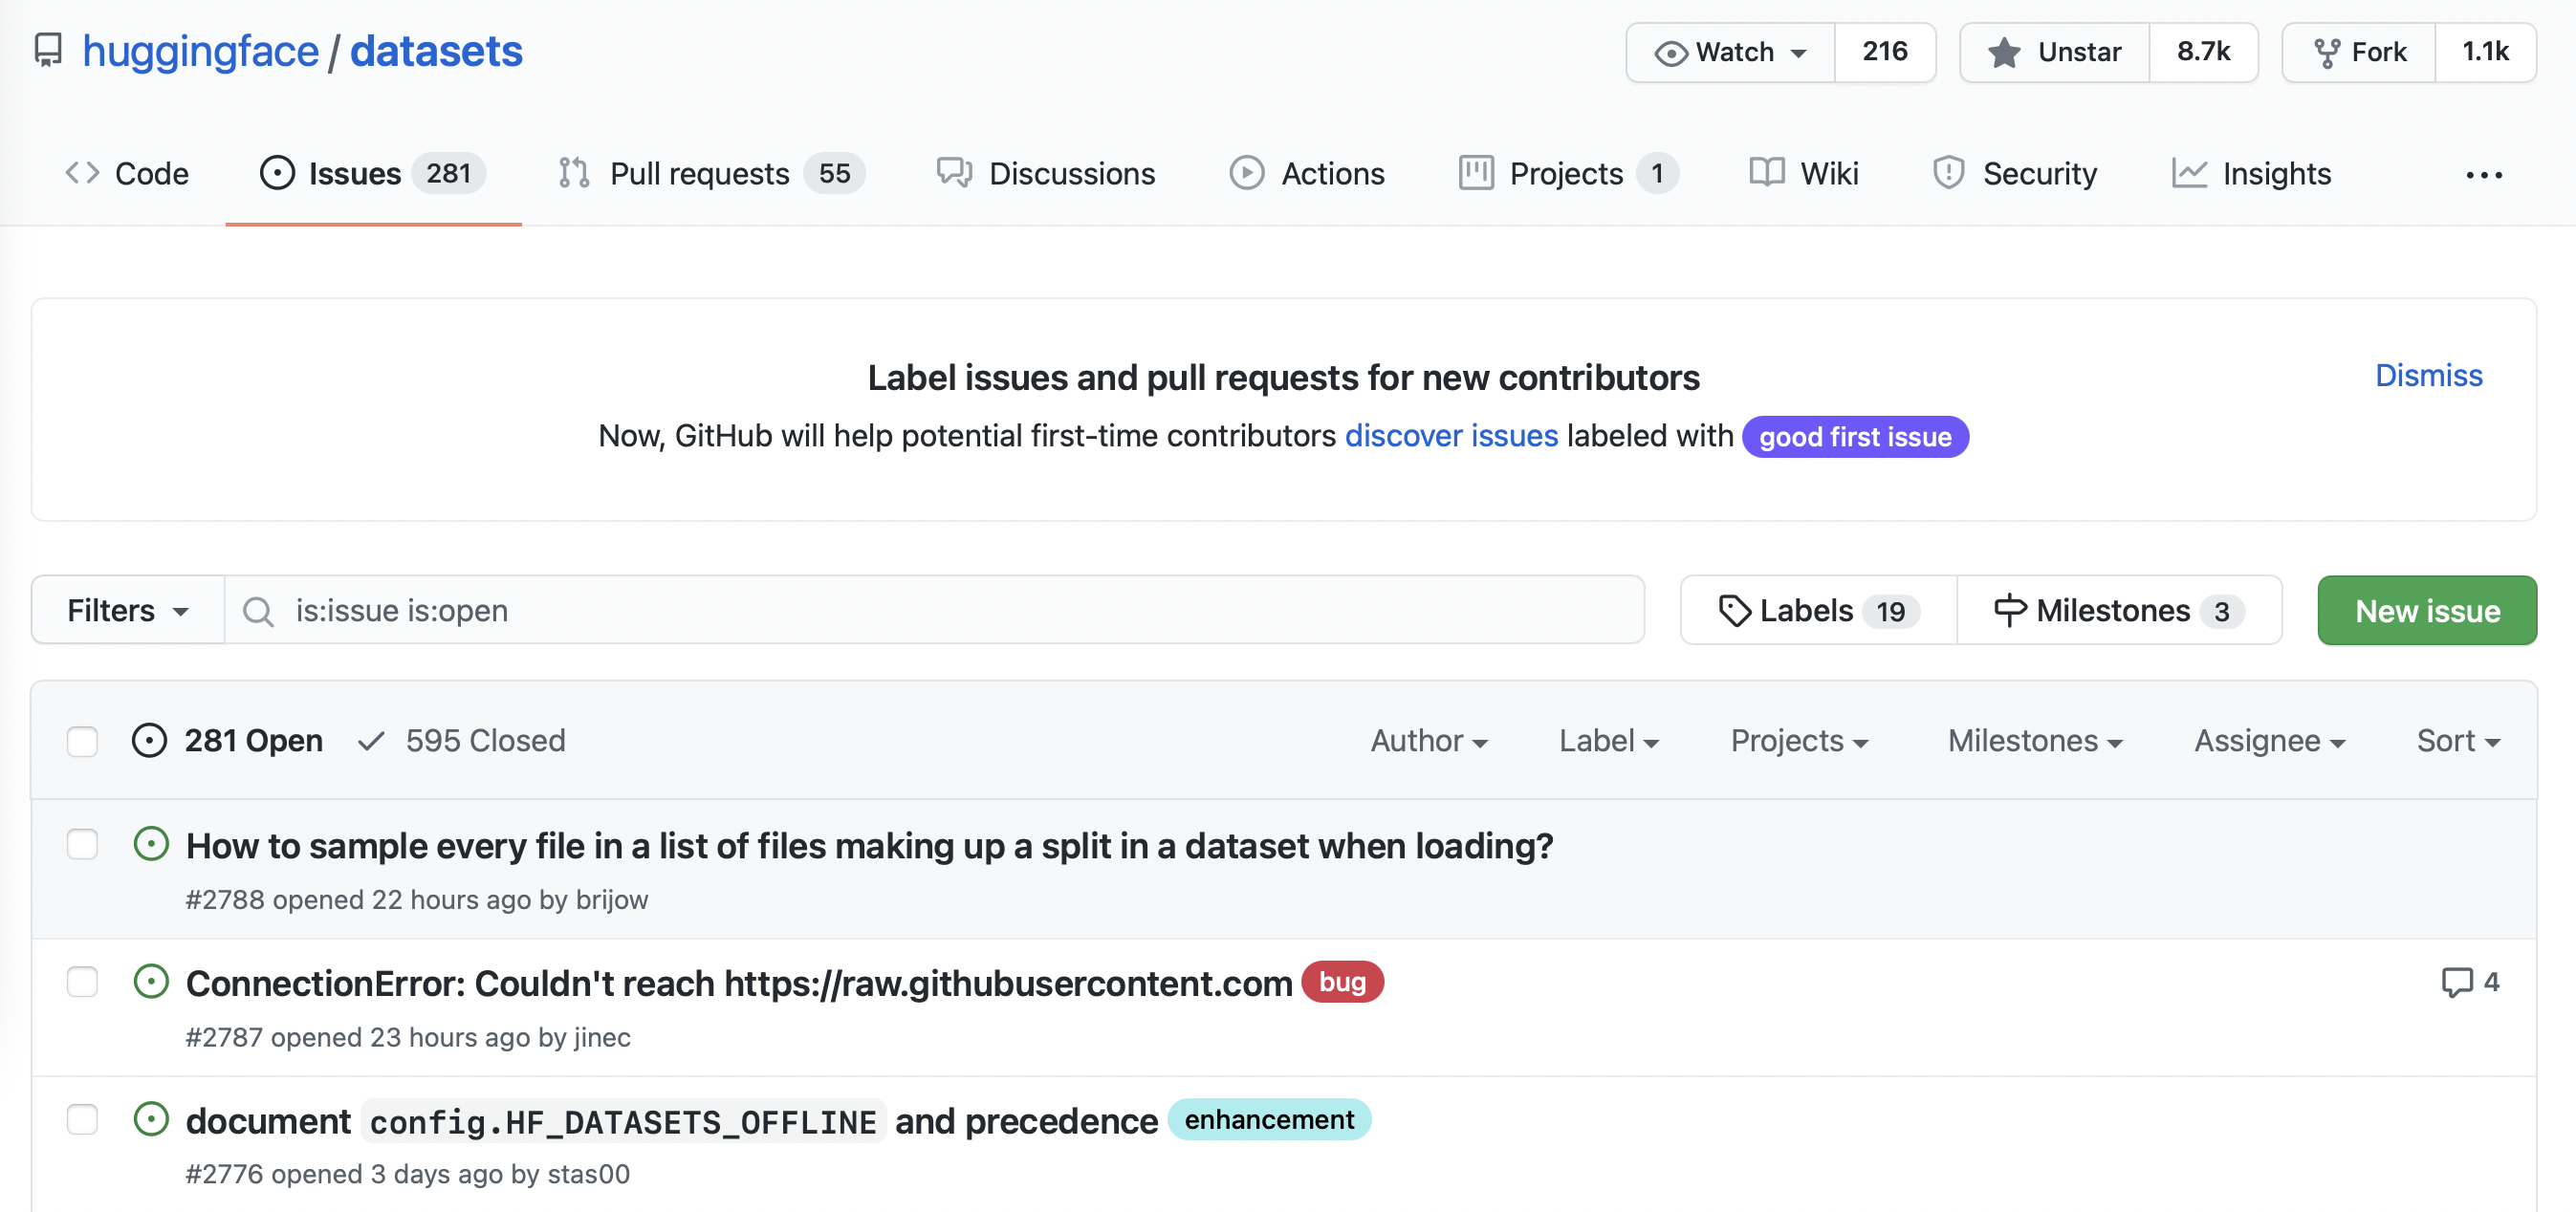
If you click on one of these issues you’ll find it contains a title, a description, and a set of labels that characterize the issue. An example is shown in the screenshot below.
GitHub与🤗数据集相关的问题。如果您单击这些问题中的一个,您会发现它包含一个标题、一个描述和一组描述该问题的标签。下面的屏幕截图显示了一个示例。
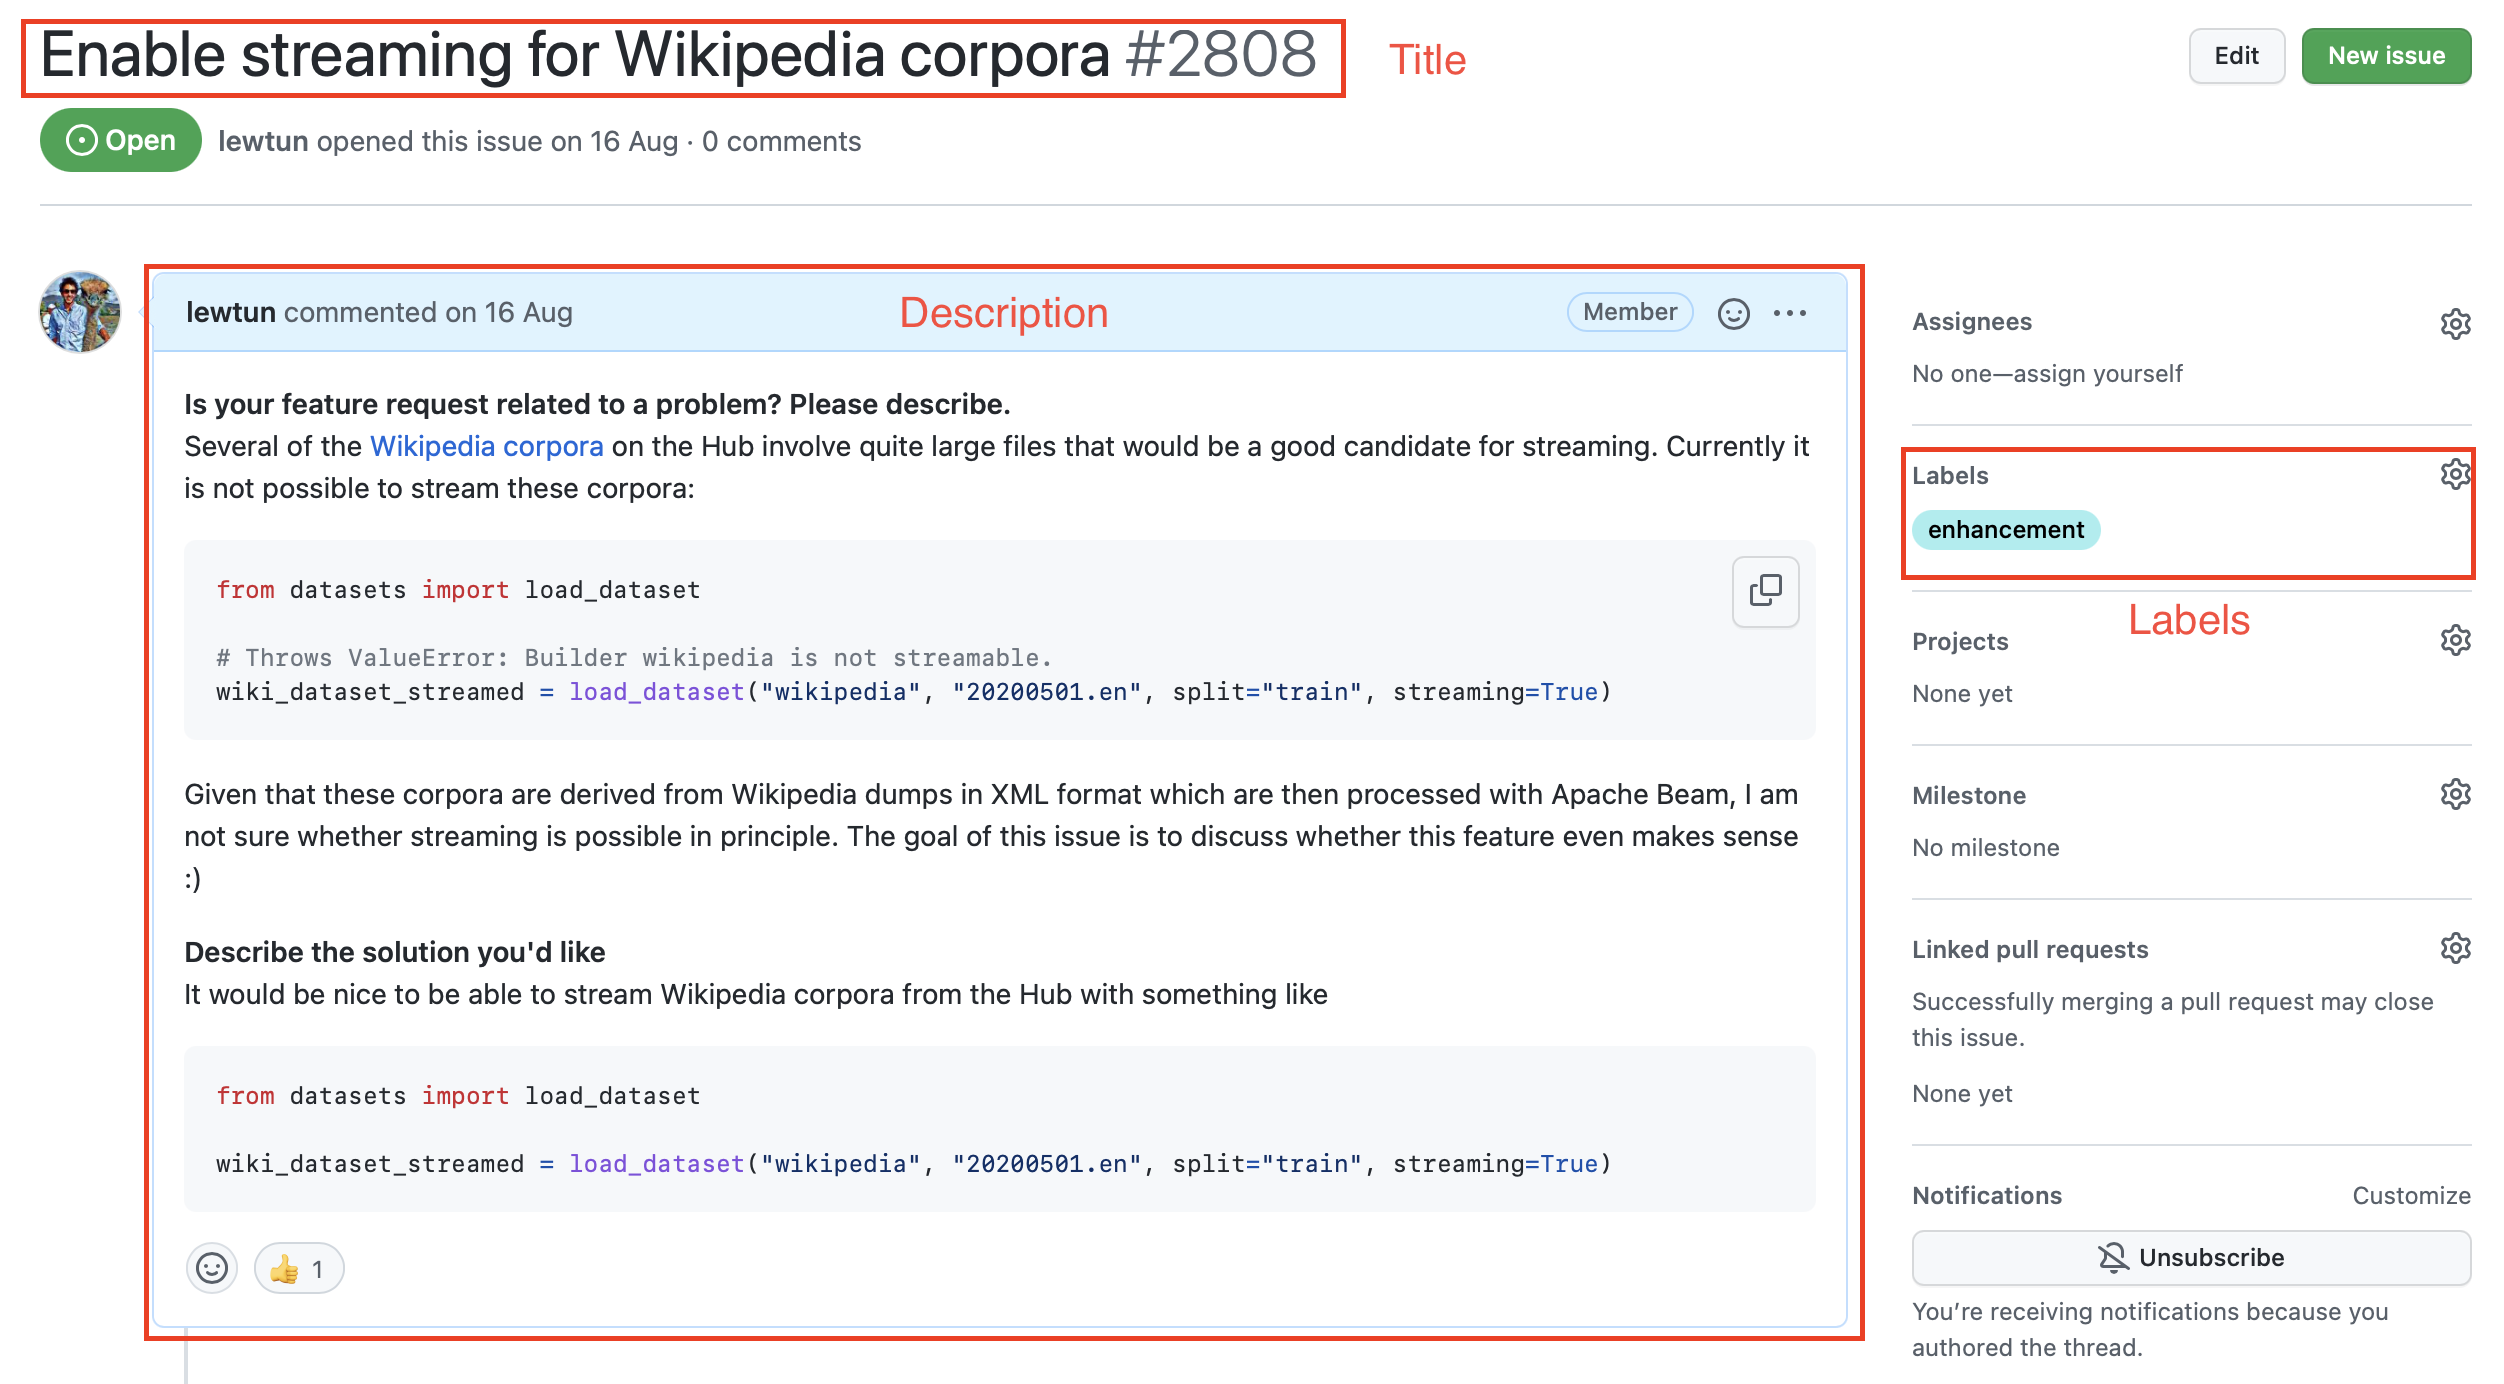
To download all the repository’s issues, we’ll use the GitHub REST API to poll the Issues endpoint. This endpoint returns a list of JSON objects, with each object containing a large number of fields that include the title and description as well as metadata about the status of the issue and so on.
🤗数据集存储库中的一个典型GitHub问题。要下载存储库的所有问题,我们将使用GitHub REST API轮询Issues端点。该端点返回一个JSON对象列表,每个对象包含大量的字段,这些字段包括标题和描述以及有关问题状态的元数据等。
A convenient way to download the issues is via the requests library, which is the standard way for making HTTP requests in Python. You can install the library by running:
下载问题的一种便捷方式是通过quests库,这是在Python中发出HTTP请求的标准方式。您可以通过运行以下命令来安装库:
1 | |
Once the library is installed, you can make GET requests to the Issues endpoint by invoking the requests.get() function. For example, you can run the following command to retrieve the first issue on the first page:
库安装完成后,您可以通过调用quests.get()函数向Issues端点发出GET请求。例如,您可以运行以下命令来检索第一页上的第一期:
1 | |
The response object contains a lot of useful information about the request, including the HTTP status code:
`Response`对象包含了大量关于请求的有用信息,包括HTTP状态码:
1 | |
1 | |
where a 200 status means the request was successful (you can find a list of possible HTTP status codes here). What we are really interested in, though, is the payload, which can be accessed in various formats like bytes, strings, or JSON. Since we know our issues are in JSON format, let’s inspect the payload as follows:
其中,200状态表示请求成功(您可以在这里找到可能的HTTP状态码列表)。然而,我们真正感兴趣的是有效负载,它可以以各种格式访问,如字节、字符串或JSON。既然我们知道我们的问题是JSON格式的,让我们按如下方式检查有效负载:
1 | |
1 | |
Whoa, that’s a lot of information! We can see useful fields like title, body, and number that describe the issue, as well as information about the GitHub user who opened the issue.
哇,信息量可真大啊!我们可以看到tile、body、number等描述该问题的有用字段,以及打开该问题的GitHub用户的信息。
✏️ Try it out! Click on a few of the URLs in the JSON payload above to get a feel for what type of information each GitHub issue is linked to.
✏️试试看吧!点击上面JSON有效负载中的几个URL,以了解每个GitHub问题链接到什么类型的信息。
As described in the GitHub documentation, unauthenticated requests are limited to 60 requests per hour. Although you can increase the per_page query parameter to reduce the number of requests you make, you will still hit the rate limit on any repository that has more than a few thousand issues. So instead, you should follow GitHub’s instructions on creating a personal access token so that you can boost the rate limit to 5,000 requests per hour. Once you have your token, you can include it as part of the request header:
如GitHub文档中所述,未经身份验证的请求被限制为每小时60个请求。虽然您可以增加per_page查询参数以减少您发出的请求数,但对于任何超过几千个问题的存储库,您仍然会达到速率限制。因此,你应该按照GitHub的指示创建个人访问令牌,这样你就可以将速率限制提高到每小时5000个请求。获得令牌后,您可以将其作为请求标头的一部分包括在内:
1 | |
⚠️ Do not share a notebook with your GITHUB_TOKEN pasted in it. We recommend you delete the last cell once you have executed it to avoid leaking this information accidentally. Even better, store the token in a .env file and use the python-dotenv library to load it automatically for you as an environment variable.
⚠️请勿共享粘贴了GITHUB_TOKEN‘的笔记本。我们建议您在执行完最后一个单元格后将其删除,以避免意外泄漏此信息。更棒的是,将令牌存储在.env文件中,并使用python-dotenv`库自动将其作为环境变量加载。
Now that we have our access token, let’s create a function that can download all the issues from a GitHub repository:
现在我们有了访问令牌,让我们创建一个函数,该函数可以从GitHub存储库中下载所有问题:
1 | |
Now when we call fetch_issues() it will download all the issues in batches to avoid exceeding GitHub’s limit on the number of requests per hour; the result will be stored in a repository_name-issues.jsonl file, where each line is a JSON object the represents an issue. Let’s use this function to grab all the issues from 🤗 Datasets:
现在,当我们调用Fetch_Issues()时,它将批量下载所有问题,以避免超过GitHub每小时请求数的限制;结果将存储在仓库名称-Issues.jsonl文件中,其中每行都是一个JSON对象,表示一个问题。让我们使用此函数从🤗数据集中获取所有问题:
1 | |
Once the issues are downloaded we can load them locally using our newfound skills from section 2:
下载问题后,我们可以使用第2节中介绍的新技能在本地加载它们:
1 | |
1 | |
Great, we’ve created our first dataset from scratch! But why are there several thousand issues when the Issues tab of the 🤗 Datasets repository only shows around 1,000 issues in total 🤔? As described in the GitHub documentation, that’s because we’ve downloaded all the pull requests as well:
太好了,我们已经从头开始创建了第一个数据集!但是,当🤗数据集存储库的Issues选项卡仅显示总计🤔约1,000个问题时,为什么会有数千个问题?正如GitHub文档中所述,这是因为我们已经下载了所有的Pull请求:
GitHub’s REST API v3 considers every pull request an issue, but not every issue is a pull request. For this reason, “Issues” endpoints may return both issues and pull requests in the response. You can identify pull requests by the
pull_requestkey. Be aware that theidof a pull request returned from “Issues” endpoints will be an issue id.GitHub的rest API v3认为每个拉请求都是问题,但并不是每个问题都是拉请求。因此,“问题”端点可能在响应中同时返回问题和拉请求。您可以通过
Pull_Request键来识别拉流请求。需要注意的是,Issues端点返回的拉流请求的id为Issue id。
Since the contents of issues and pull requests are quite different, let’s do some minor preprocessing to enable us to distinguish between them.
由于问题请求和拉请求的内容有很大的不同,所以让我们做一些较小的预处理,以使我们能够区分它们。
Cleaning up the data
清理数据
The above snippet from GitHub’s documentation tells us that the pull_request column can be used to differentiate between issues and pull requests. Let’s look at a random sample to see what the difference is. As we did in section 3, we’ll chain Dataset.shuffle() and Dataset.select() to create a random sample and then zip the html_url and pull_request columns so we can compare the various URLs:
上面摘自GitHub文档的片段告诉我们,可以使用Pull_Request列来区分问题和拉取请求。让我们看一个随机样本,看看有什么不同。正如我们在第3节中所做的,我们将链接Dataset.shashffle()和Dataset.select()以创建一个随机样本,然后压缩html_url和ull_quest列,以便我们可以比较各种URL:
1 | |
1 | |
Here we can see that each pull request is associated with various URLs, while ordinary issues have a None entry. We can use this distinction to create a new is_pull_request column that checks whether the pull_request field is None or not:
这里我们可以看到,每个拉流请求都关联了不同的URL,而普通问题有一个None‘条目。我们可以使用这个区别来创建一个新的is_ull_quest列,用于检查ull_quest字段是否为None`:
1 | |
✏️ Try it out! Calculate the average time it takes to close issues in 🤗 Datasets. You may find the Dataset.filter() function useful to filter out the pull requests and open issues, and you can use the Dataset.set_format() function to convert the dataset to a DataFrame so you can easily manipulate the created_at and closed_at timestamps. For bonus points, calculate the average time it takes to close pull requests.
✏️试试看吧!计算关闭🤗数据集中的问题的平均时间。您可能会发现Dataset.Filter()函数对于过滤拉取请求和未决问题很有用,您可以使用Dataset.set_Format()函数将数据集转换为DataFrame,这样您就可以轻松地操作Created_at和losed_at时间戳。对于奖励积分,计算关闭拉式请求所需的平均时间。
Although we could proceed to further clean up the dataset by dropping or renaming some columns, it is generally a good practice to keep the dataset as “raw” as possible at this stage so that it can be easily used in multiple applications.
虽然我们可以通过删除或重命名某些列来进一步清理数据集,但在此阶段,通常最好将数据集保持为“原始”,以便可以在多个应用程序中轻松使用。
Before we push our dataset to the Hugging Face Hub, let’s deal with one thing that’s missing from it: the comments associated with each issue and pull request. We’ll add them next with — you guessed it — the GitHub REST API!
在我们将我们的数据集推送到Hugging Face中心之前,让我们先处理一下其中缺失的一件事:与每个问题和拉请求相关的评论。接下来,我们将使用GitHub rest API添加它们!
Augmenting the dataset
扩充数据集
As shown in the following screenshot, the comments associated with an issue or pull request provide a rich source of information, especially if we’re interested in building a search engine to answer user queries about the library.
如下面的屏幕截图所示,与问题或拉入请求相关联的评论提供了丰富的信息来源,特别是当我们有兴趣构建搜索引擎来回答用户关于库的查询时。
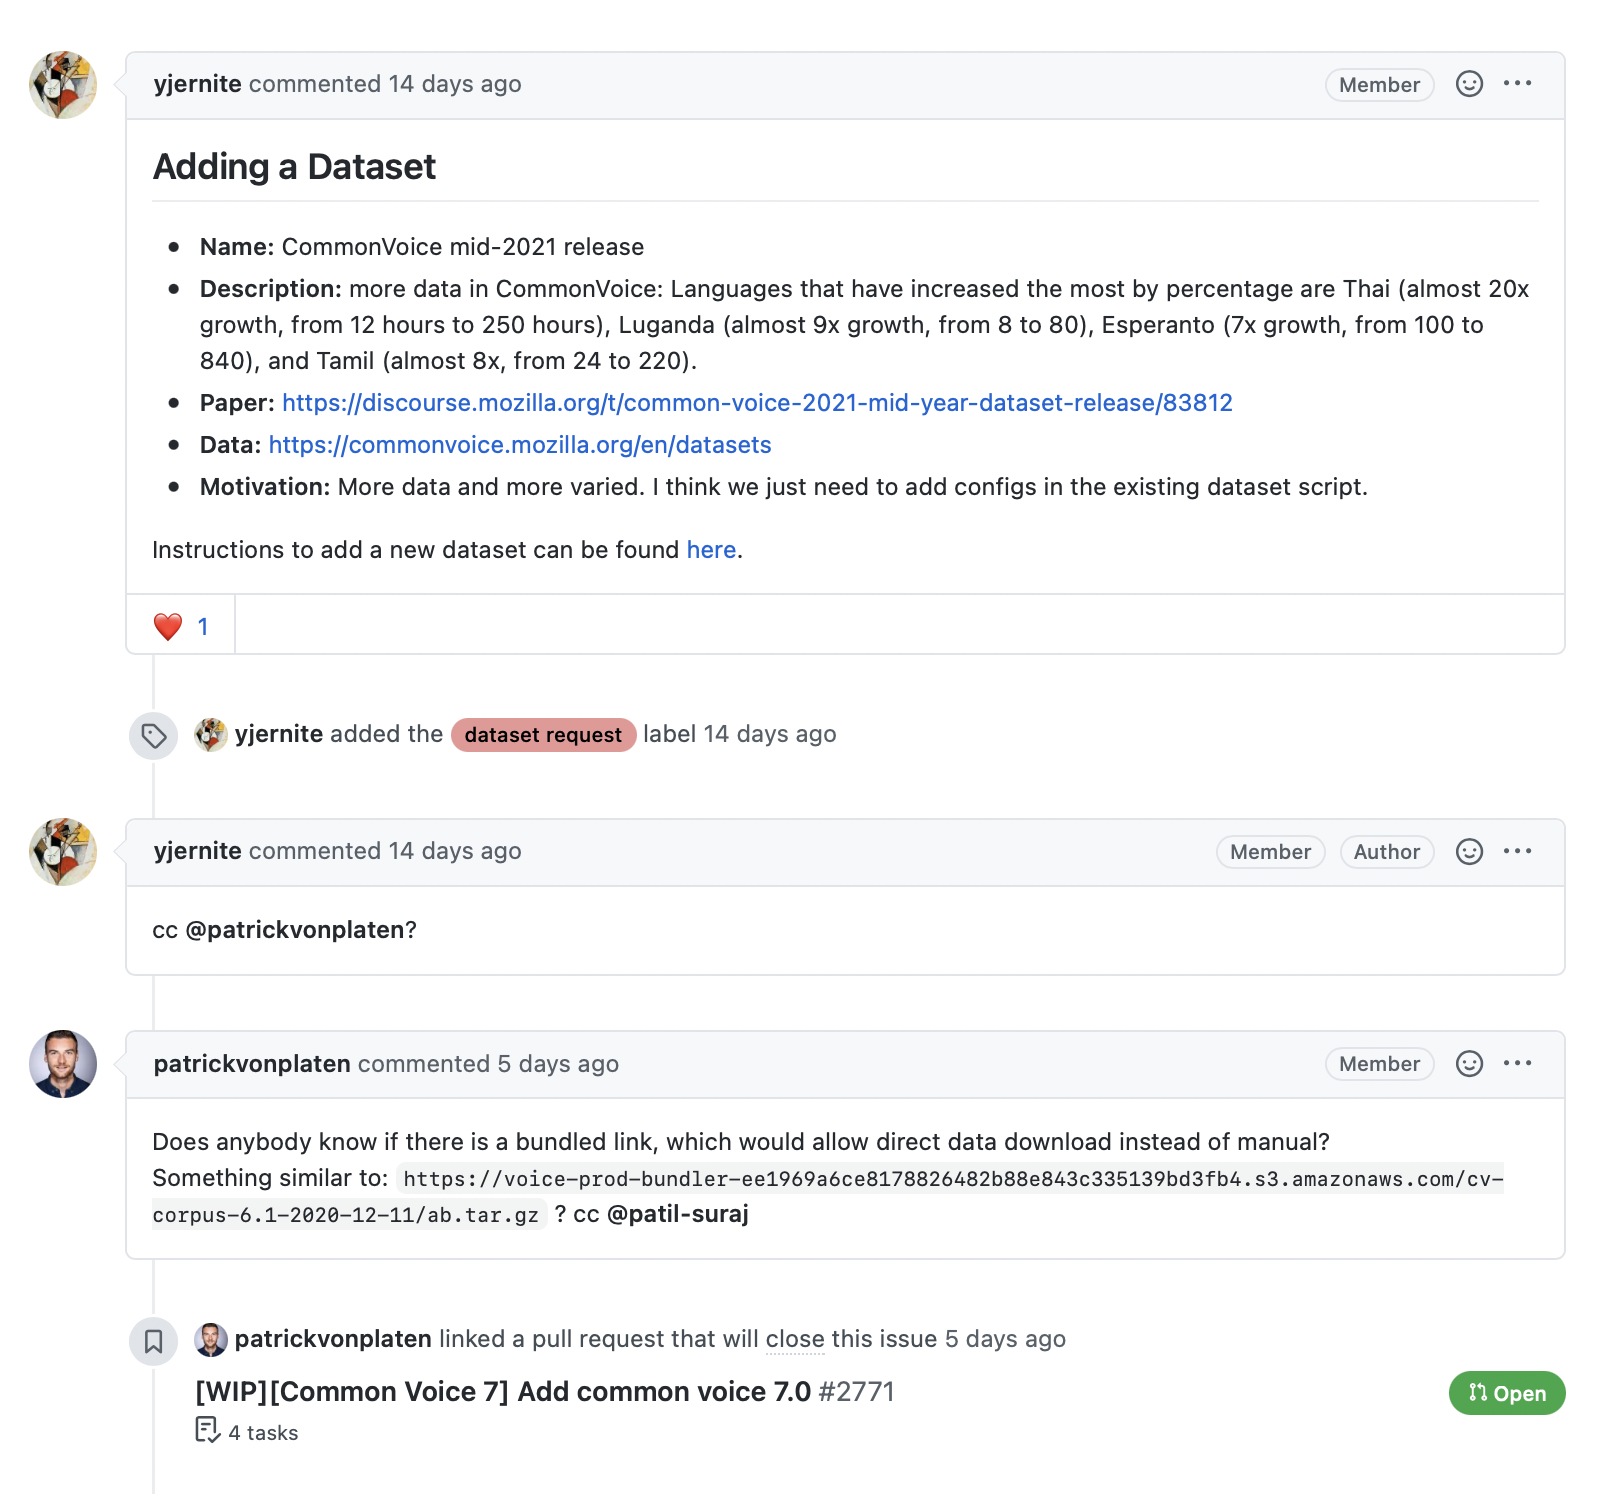
The GitHub REST API provides a Comments endpoint that returns all the comments associated with an issue number. Let’s test the endpoint to see what it returns:
与有关🤗数据集的问题相关的备注。GitHub REST API提供了一个Comments端点,该端点返回与问题号关联的所有评论。让我们测试终结点,看看它返回什么:
1 | |
1 | |
We can see that the comment is stored in the body field, so let’s write a simple function that returns all the comments associated with an issue by picking out the body contents for each element in response.json():
我们可以看到,评论存储在body字段中,所以让我们编写一个简单的函数,通过为ponse.json()中的每个元素选择body内容来返回与问题关联的所有评论:
1 | |
1 | |
This looks good, so let’s use Dataset.map() to add a new comments column to each issue in our dataset:
这看起来不错,所以让我们使用Dataset.map()为我们的数据集中的每个问题添加一个新的Comments列:
1 | |
The final step is to push our dataset to the Hub. Let’s take a look at how we can do that.
最后一步是将我们的数据集推送到Hub。让我们来看看我们如何做到这一点。
Uploading the dataset to the Hugging Face Hub
将数据集上传到Hugging Face中心
Now that we have our augmented dataset, it’s time to push it to the Hub so we can share it with the community! Uploading a dataset is very simple: just like models and tokenizers from 🤗 Transformers, we can use a push_to_hub() method to push a dataset. To do that we need an authentication token, which can be obtained by first logging into the Hugging Face Hub with the notebook_login() function:
现在我们有了增强的数据集,是时候将其推送到Hub,以便我们可以与社区共享它!上传数据集非常简单:就像🤗Transformers中的模型和标记器一样,我们可以使用Push_to_Hub()‘方法来推送数据集。为此,我们需要一个身份验证令牌,该令牌可以通过使用note book_login()`函数首先登录到Hugging Face中心来获得:
1 | |
This will create a widget where you can enter your username and password, and an API token will be saved in ~/.huggingface/token. If you’re running the code in a terminal, you can log in via the CLI instead:
这将创建一个小部件,您可以在其中输入您的用户名和密码,并且API令牌将保存在~/.huggingFaces/Token中。如果您在终端中运行代码,则可以通过CLI登录:
1 | |
Once we’ve done this, we can upload our dataset by running:
完成此操作后,我们可以通过运行以下命令来上传数据集:
1 | |
From here, anyone can download the dataset by simply providing load_dataset() with the repository ID as the path argument:
从这里,任何人都可以下载数据集,只需提供Load_DataSet(),并将存储库ID作为path参数:
1 | |
1 | |
Cool, we’ve pushed our dataset to the Hub and it’s available for others to use! There’s just one important thing left to do: adding a dataset card that explains how the corpus was created and provides other useful information for the community.
酷,我们已经将我们的数据集推送到Hub,其他人可以使用它!只剩下一件重要的事情要做:添加一个数据集卡,解释语料库是如何创建的,并为社区提供其他有用的信息。
💡 You can also upload a dataset to the Hugging Face Hub directly from the terminal by using huggingface-cli and a bit of Git magic. See the 🤗 Datasets guide for details on how to do this.
💡你也可以通过`HuggingFace-CLI‘和一点Git魔法,直接从终端将数据集上传到Hugging Face中心。有关如何执行此操作的详细信息,请参阅🤗数据集指南。
Creating a dataset card
创建数据集卡
Well-documented datasets are more likely to be useful to others (including your future self!), as they provide the context to enable users to decide whether the dataset is relevant to their task and to evaluate any potential biases in or risks associated with using the dataset.
记录良好的数据集更有可能对其他人(包括您未来的自己!)有用,因为它们提供了上下文,使用户能够确定数据集是否与他们的任务相关,并评估使用数据集时的任何潜在偏见或风险。
On the Hugging Face Hub, this information is stored in each dataset repository’s README.md file. There are two main steps you should take before creating this file:
在Hugging Face中心上,这些信息存储在每个数据集存储库的Readme.md文件中。在创建此文件之前,您应该执行两个主要步骤:
- Use the
datasets-taggingapplication to create metadata tags in YAML format. These tags are used for a variety of search features on the Hugging Face Hub and ensure your dataset can be easily found by members of the community. Since we have created a custom dataset here, you’ll need to clone thedatasets-taggingrepository and run the application locally. Here’s what the interface looks like:
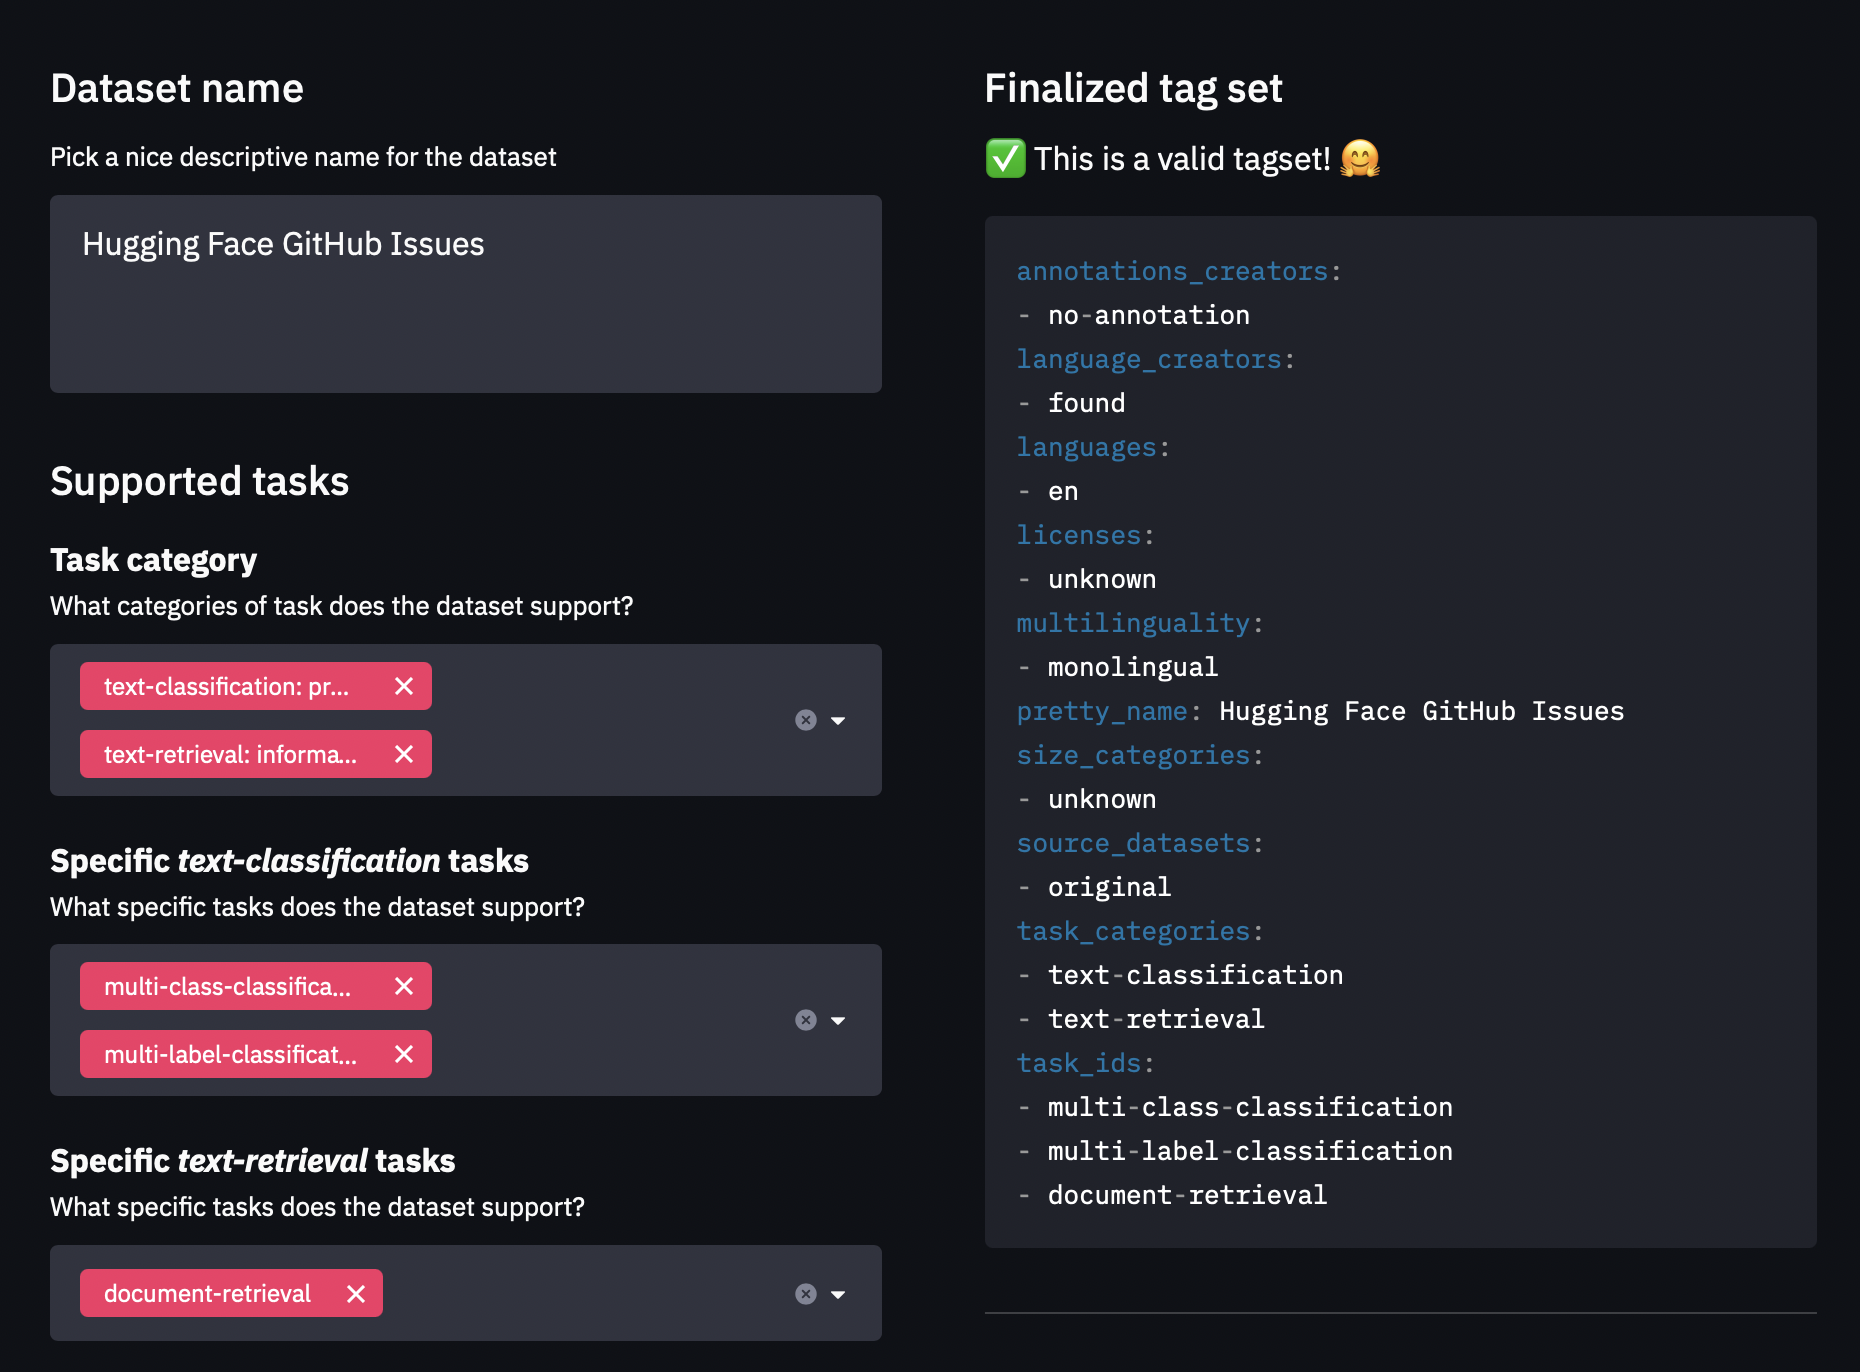
2. Read the 🤗 Datasets guide on creating informative dataset cards and use it as a template.
使用数据集-标签应用程序创建YAML格式的元数据标签。这些标签用于Hugging Face中心的各种搜索功能,并确保社区成员可以轻松找到您的数据集。由于我们在这里创建了一个自定义数据集,因此您需要克隆数据集-标签存储库并在本地运行应用程序。该接口如下所示:Dataets-tagging接口。2.阅读有关创建信息丰富的数据集卡的🤗数据集指南,并将其用作模板。
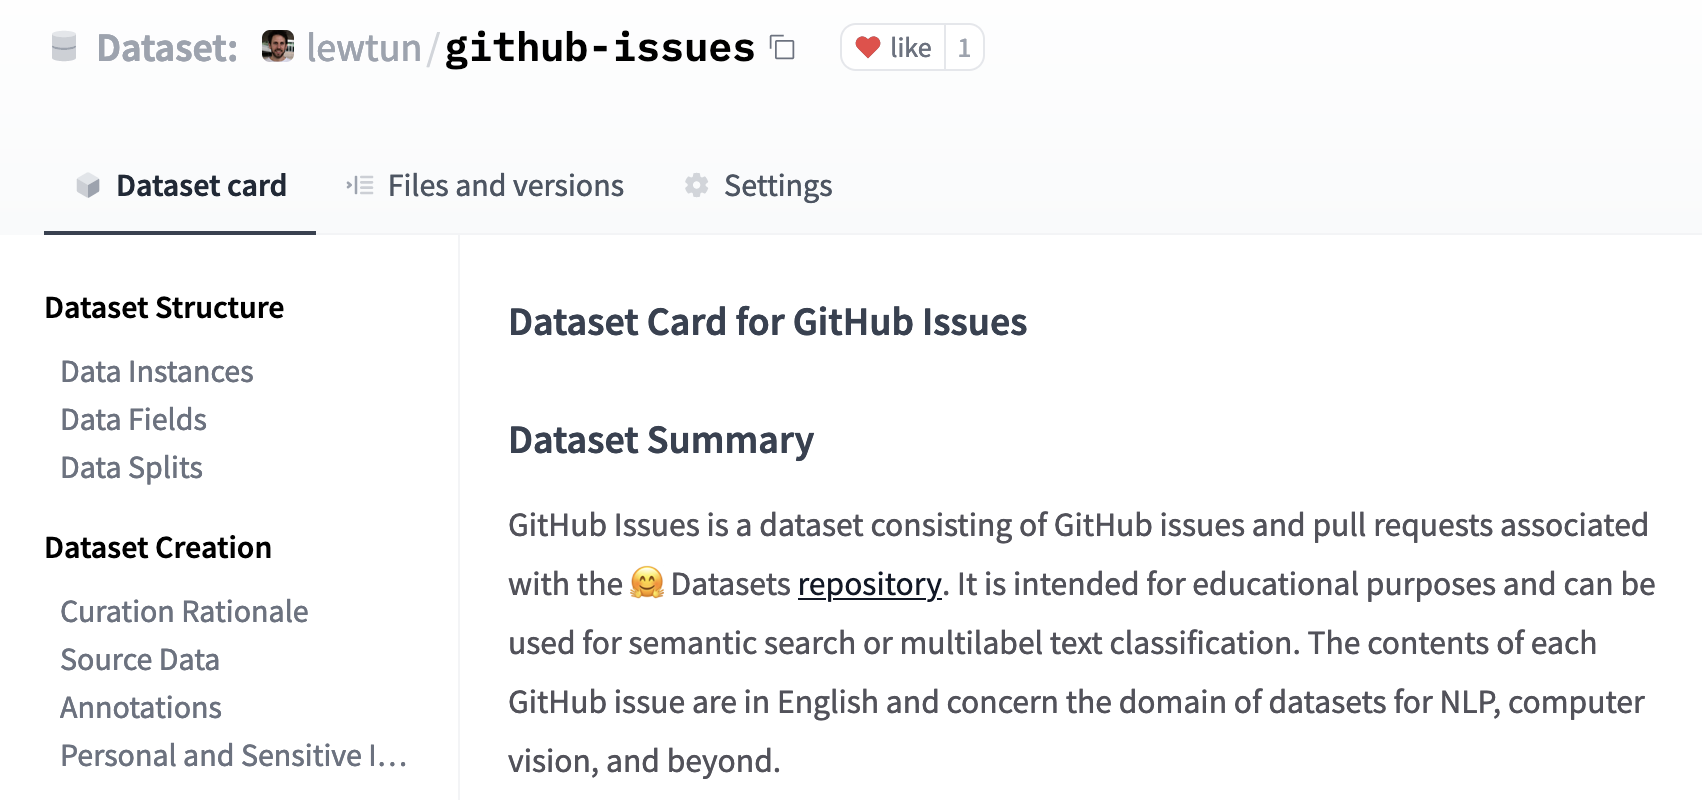
You can create the README.md file directly on the Hub, and you can find a template dataset card in the lewtun/github-issues dataset repository. A screenshot of the filled-out dataset card is shown below.
您可以直接在Hub上创建Readme.md文件,您可以在lewtun/giHub-Issues数据集库中找到模板数据集卡。已填写的数据集卡的屏幕截图如下所示。
✏️ Try it out! Use the dataset-tagging application and 🤗 Datasets guide to complete the README.md file for your GitHub issues dataset.
数据集卡。✏️试试看吧!使用DataSet-Tagging应用程序和🤗数据集指南为您的GitHub问题数据集完成Readme.md文件。
That’s it! We’ve seen in this section that creating a good dataset can be quite involved, but fortunately uploading it and sharing it with the community is not. In the next section we’ll use our new dataset to create a semantic search engine with 🤗 Datasets that can match questions to the most relevant issues and comments.
就这样!我们在这一节中已经看到,创建一个好的数据集可能非常复杂,但幸运的是,上传并与社区共享它并不是很重要。在下一节中,我们将使用我们的新数据集创建一个具有🤗数据集的语义搜索引擎,该数据集可以将问题与最相关的问题和评论匹配。
✏️ Try it out! Go through the steps we took in this section to create a dataset of GitHub issues for your favorite open source library (pick something other than 🤗 Datasets, of course!). For bonus points, fine-tune a multilabel classifier to predict the tags present in the labels field.
✏️试试看吧!按照我们在本节中所做的步骤,为您最喜欢的开源库创建GitHub问题的数据集(当然,请选择🤗数据集以外的其他数据集)。对于加分,微调多标签分类器以预测Labels字段中存在的标签。