4-Sharing_models_and_tokenizers-2-Sharing_pretrained_models
中英文对照学习,效果更佳!
原课程链接:https://huggingface.co/course/chapter4/3?fw=pt
Sharing pretrained models
共享预先训练好的模型

![]()

In the steps below, we’ll take a look at the easiest ways to share pretrained models to the 🤗 Hub. There are tools and utilities available that make it simple to share and update models directly on the Hub, which we will explore below.
在工作室实验室的Colab Open中提出问题在以下步骤中,我们将了解将预先培训的模型共享到🤗中心的最简单方法。有一些工具和实用程序可以简化直接在Hub上共享和更新模型的过程,我们将在下面进行探索。
We encourage all users that train models to contribute by sharing them with the community — sharing models, even when trained on very specific datasets, will help others, saving them time and compute resources and providing access to useful trained artifacts. In turn, you can benefit from the work that others have done!
我们鼓励所有训练模型的用户通过与社区共享模型共享来做出贡献-即使在非常特定的数据集上进行培训,也将帮助其他人,节省他们的时间和计算资源,并提供访问有用的经过培训的构件的途径。反过来,你也可以从别人所做的工作中受益!
There are three ways to go about creating new model repositories:
创建新的模型存储库有三种方法:
- Using the
push_to_hubAPI - Using the
huggingface_hubPython library - Using the web interface
Once you’ve created a repository, you can upload files to it via git and git-lfs. We’ll walk you through creating model repositories and uploading files to them in the following sections.
使用ush_to_hub接口使用huggingfacehubPython库使用Web界面一旦创建了存储库,就可以通过git和git-lfs上传文件。在接下来的几节中,我们将指导您创建模型存储库并将文件上传到其中。
Using the push_to_hub API
使用ush_to_hub接口
The simplest way to upload files to the Hub is by leveraging the push_to_hub API.
上传文件到Hub最简单的方式是使用ush_to_hub接口。
Before going further, you’ll need to generate an authentication token so that the huggingface_hub API knows who you are and what namespaces you have write access to. Make sure you are in an environment where you have transformers installed (see [Setup]). If you are in a notebook, you can use the following function to login:
在进一步操作之前,您需要生成一个身份验证令牌,以便huggingfacehubAPI知道您是谁以及您拥有哪些名称空间的写入权限。确保您所在的环境中安装了Transformer(请参阅安装程序)。如果您使用的是笔记本电脑,则可以使用以下功能登录:
1 | |
In a terminal, you can run:
在终端中,您可以运行:
1 | |
In both cases, you should be prompted for your username and password, which are the same ones you use to log in to the Hub. If you do not have a Hub profile yet, you should create one here.
在这两种情况下,都应该提示您输入用户名和密码,这与您登录Hub时使用的用户名和密码相同。如果您还没有集线器配置文件,则应在此处创建一个。
Great! You now have your authentication token stored in your cache folder. Let’s create some repositories!
太棒了!现在,您已将身份验证令牌存储在缓存文件夹中。让我们创建一些存储库!
If you have played around with the Trainer API to train a model, the easiest way to upload it to the Hub is to set push_to_hub=True when you define your TrainingArguments:
如果您已经尝试过Traine接口来训练模型,上传到Hub的最简单的方法就是在定义TrainingArguments时设置PUSH_TO_HUB=True:
1 | |
When you call trainer.train(), the Trainer will then upload your model to the Hub each time it is saved (here every epoch) in a repository in your namespace. That repository will be named like the output directory you picked (here bert-finetuned-mrpc) but you can choose a different name with hub_model_id = "a_different_name".
当您调用traine.ran()时,当您的模型每次(这里是每个纪元)保存在您命名空间中的存储库中时,Traine会将您的模型上传到Hub。该存储库的名称将与您选择的输出目录相同(此处为bert-finetuned-mrpc),但您可以使用Hub_Model_id=“a_Different_name”来选择不同的名称。
To upload you model to an organization you are a member of, just pass it with hub_model_id = "my_organization/my_repo_name".
要将您的模型上传到您所属的组织,只需使用Hub_Model_id=“MY_ORGANITY/MY_REPO_NAME”传递。
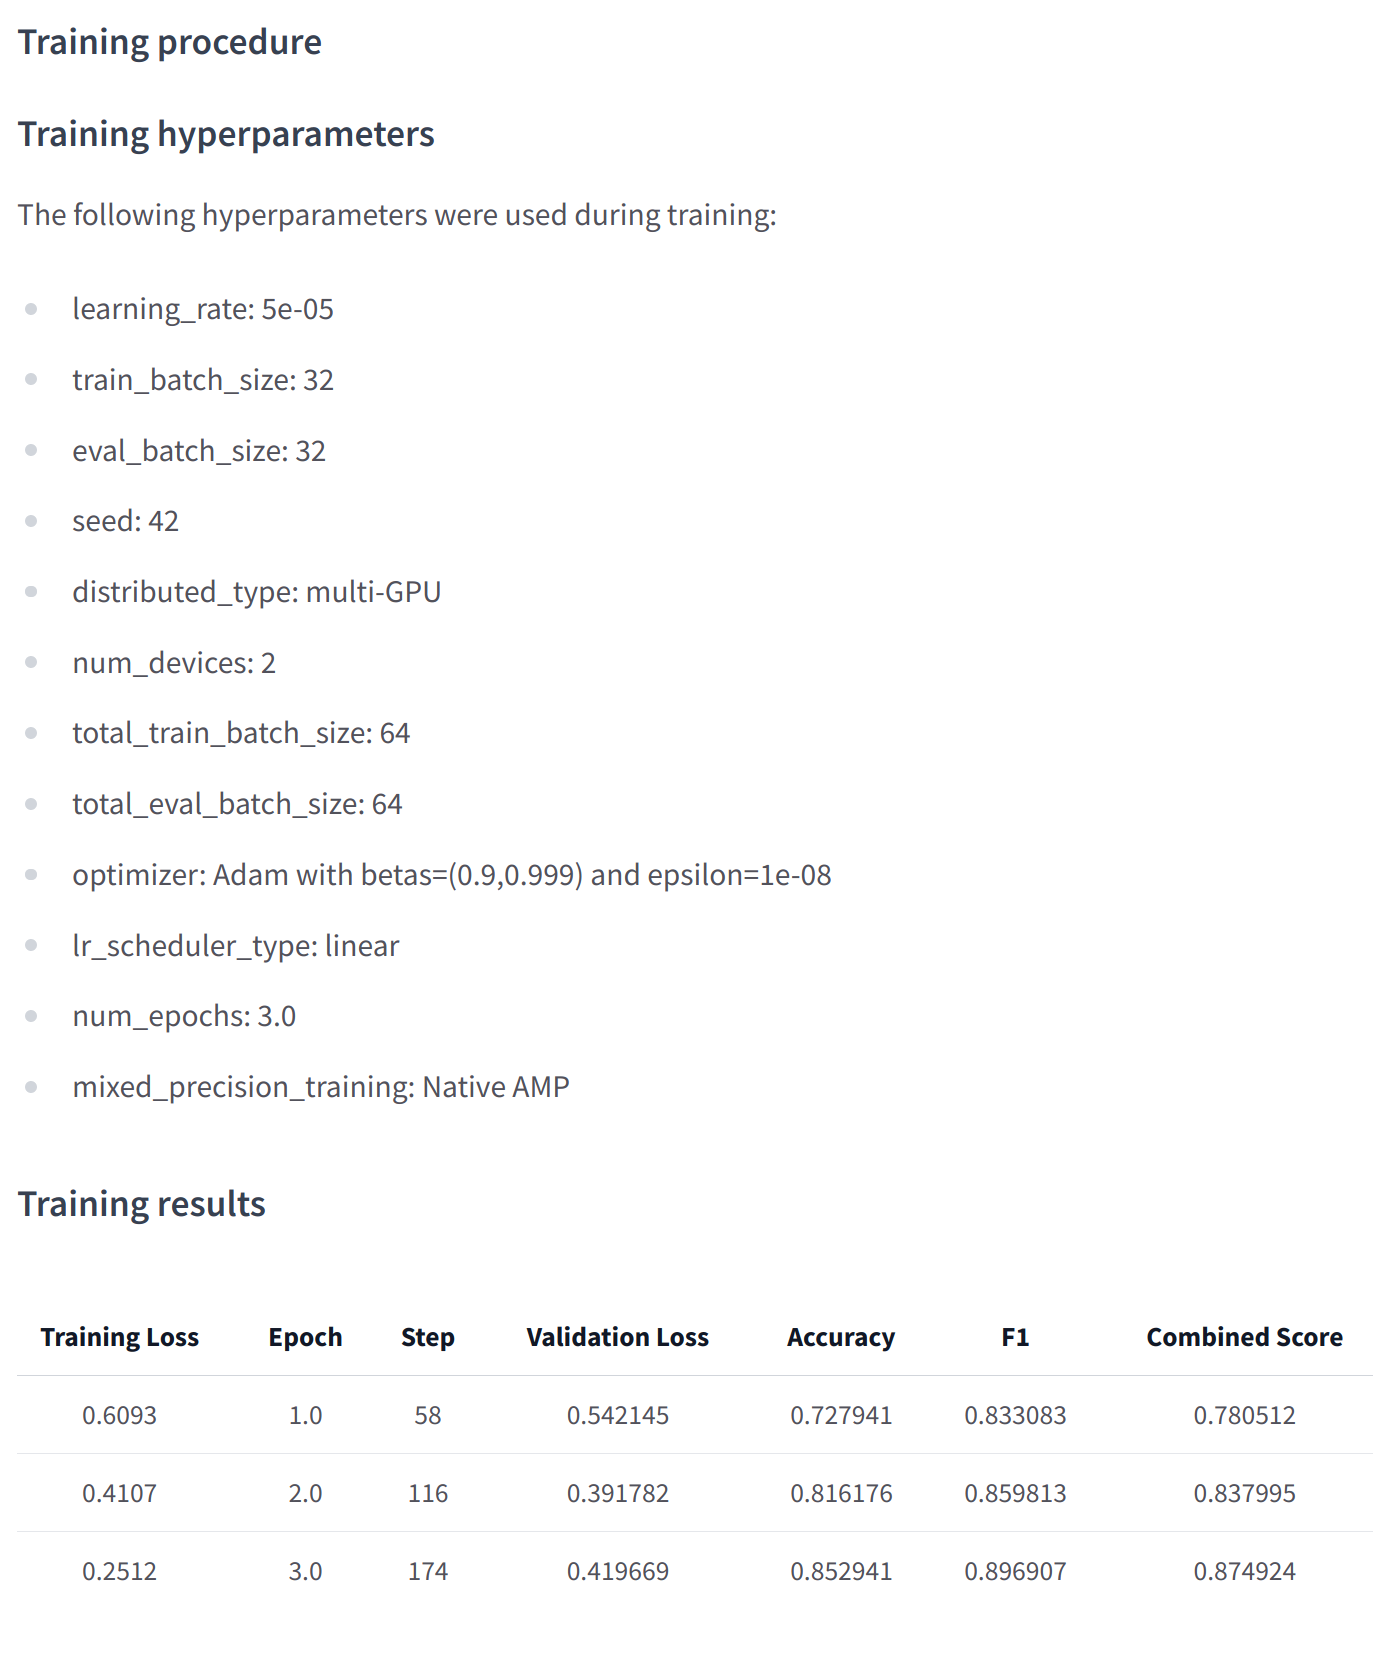
Once your training is finished, you should do a final trainer.push_to_hub() to upload the last version of your model. It will also generate a model card with all the relevant metadata, reporting the hyperparameters used and the evaluation results! Here is an example of the content you might find in a such a model card:
培训结束后,您应该执行最后的traine.ush_to_Hub()以上传模型的最新版本。它还将生成包含所有相关元数据的模型卡,报告使用的超参数和评估结果!以下是您可能会在这样一张模型卡中找到的内容的示例:
At a lower level, accessing the Model Hub can be done directly on models, tokenizers, and configuration objects via their push_to_hub() method. This method takes care of both the repository creation and pushing the model and tokenizer files directly to the repository. No manual handling is required, unlike with the API we’ll see below.
自动生成的模型卡片的示例。在较低级别,可以通过模型、令牌器和配置对象的`Push_to_Hub()‘方法直接访问Model Hub。该方法负责存储库的创建以及将模型和标记器文件直接推送到存储库。与我们将在下面看到的API不同,不需要手动处理。
To get an idea of how it works, let’s first initialize a model and a tokenizer:
为了了解它的工作原理,让我们首先初始化一个模型和一个标记器:
1 | |
You’re free to do whatever you want with these — add tokens to the tokenizer, train the model, fine-tune it. Once you’re happy with the resulting model, weights, and tokenizer, you can leverage the push_to_hub() method directly available on the model object:
您可以自由地使用这些工具做任何您想做的事情–向令牌器添加令牌、训练模型、对其进行微调。一旦您对生成的模型、权重和标记器感到满意,您就可以利用Model对象上直接可用的ush_to_Hub()方法:
1 | |
This will create the new repository dummy-model in your profile, and populate it with your model files.
Do the same with the tokenizer, so that all the files are now available in this repository:
这将在您的配置文件中创建新的存储库ummy-Model,并使用您的模型文件填充它。对标记器执行相同的操作,这样所有文件现在都可以在此存储库中使用:
1 | |
If you belong to an organization, simply specify the organization argument to upload to that organization’s namespace:
如果您属于某个组织,只需指定Organation参数即可上传到该组织的命名空间:
1 | |
If you wish to use a specific Hugging Face token, you’re free to specify it to the push_to_hub() method as well:
如果您希望使用特定的Hugging Face令牌,您也可以自由地将其指定给ush_to_Hub()方法:
1 | |
Now head to the Model Hub to find your newly uploaded model: https://huggingface.co/user-or-organization/dummy-model.
现在前往Model Hub找到您新上传的模型:https://huggingface.co/user-or-organization/dummy-model.
Click on the “Files and versions” tab, and you should see the files visible in the following screenshot:
点击“文件和版本”标签,你应该会看到文件在下面的截图中可见:
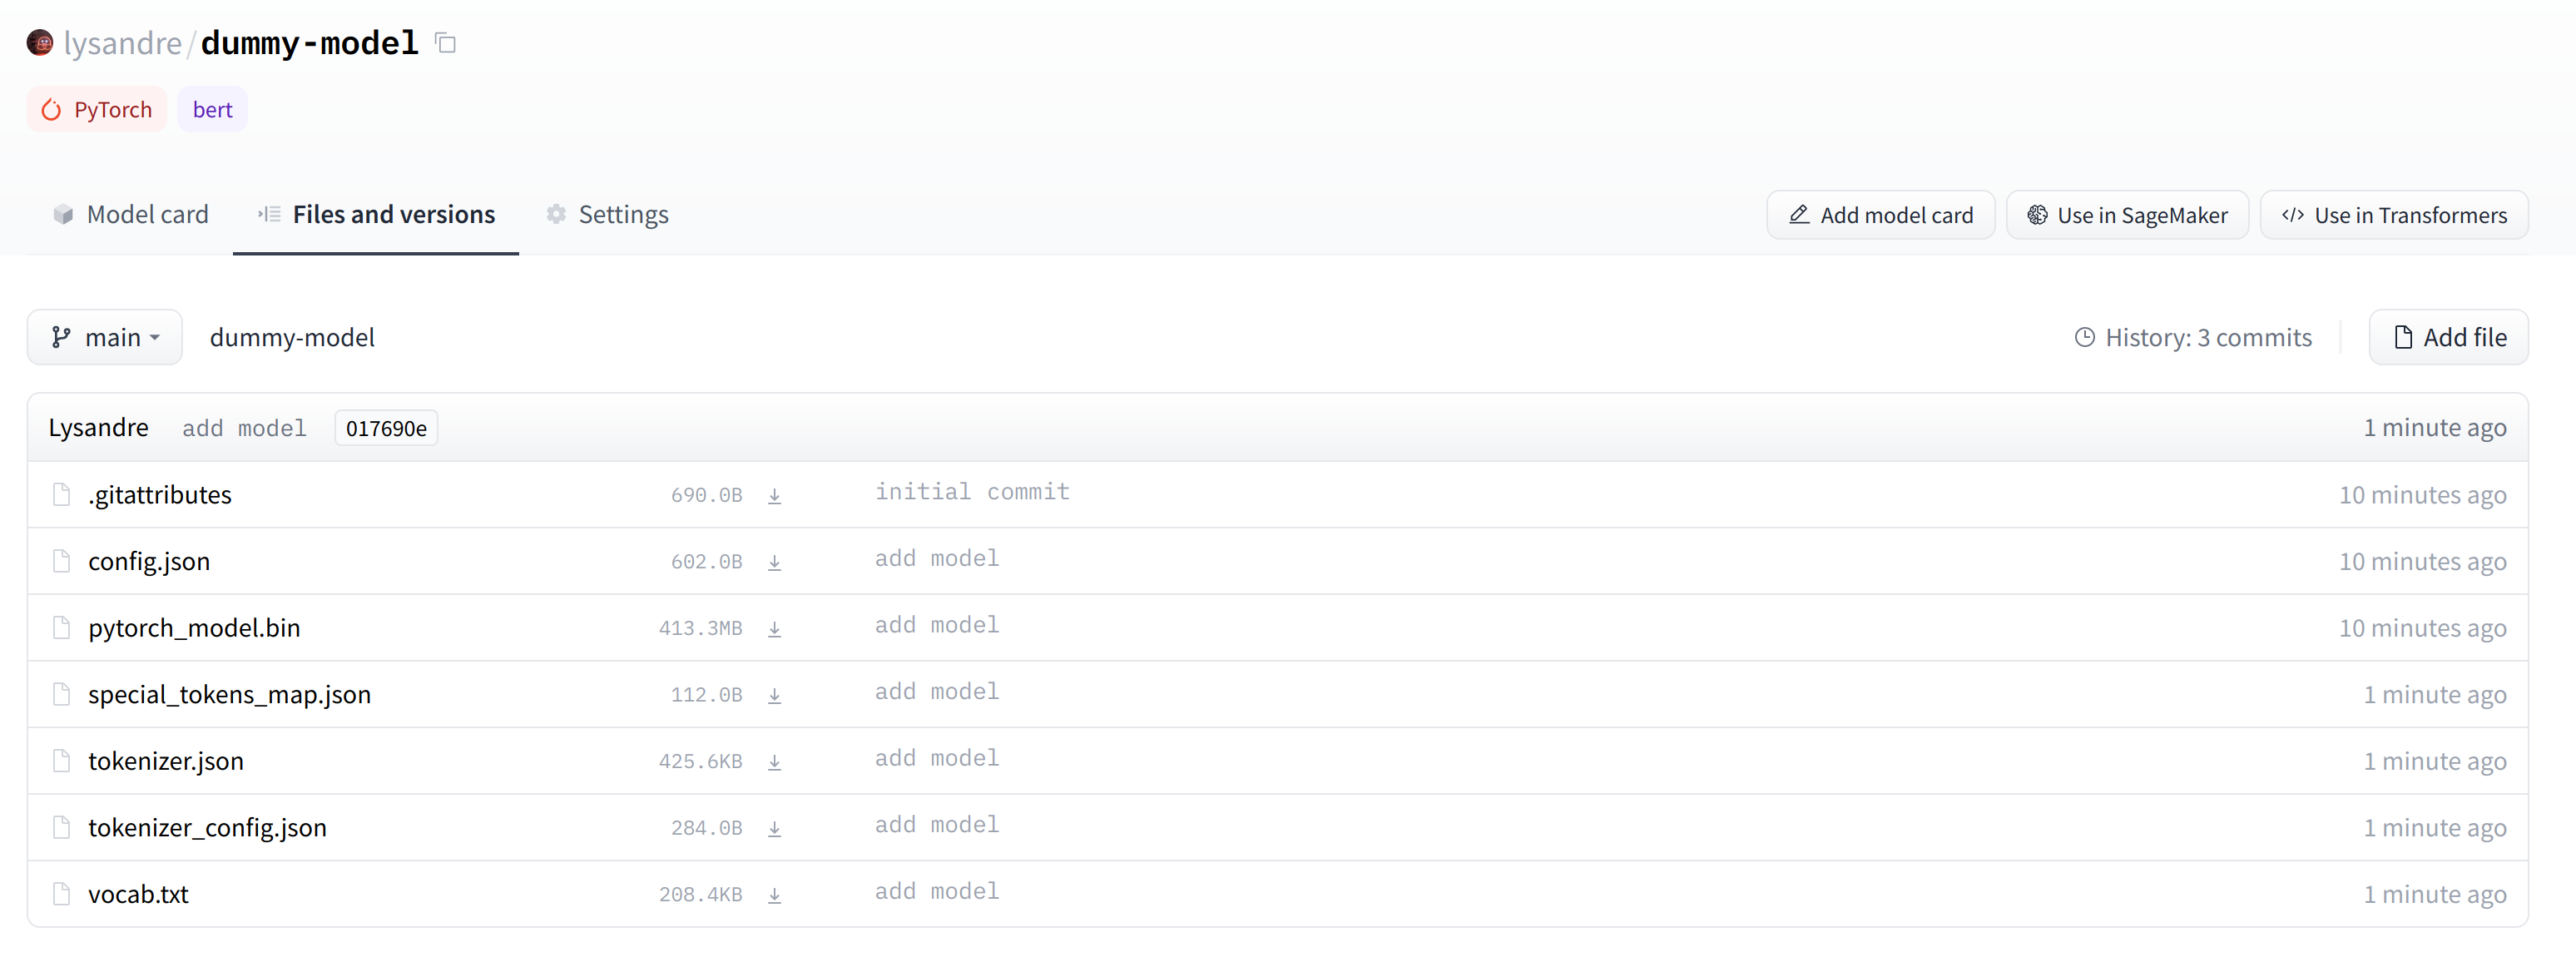
✏️ Try it out! Take the model and tokenizer associated with the bert-base-cased checkpoint and upload them to a repo in your namespace using the push_to_hub() method. Double-check that the repo appears properly on your page before deleting it.
包含记号赋值器和模型文件的虚拟模型。✏️试试看吧!获取bert-base-case检查点关联的模型和标记器,并使用ush_to_Hub()方法将它们上传到您的命名空间中的repo。在删除该回购之前,请仔细检查该回购是否正确显示在页面上。
As you’ve seen, the push_to_hub() method accepts several arguments, making it possible to upload to a specific repository or organization namespace, or to use a different API token. We recommend you take a look at the method specification available directly in the 🤗 Transformers documentation to get an idea of what is possible.
正如您所看到的,ush_to_Hub()方法接受几个参数,从而可以上传到特定的存储库或组织名称空间,或者使用不同的API令牌。我们建议您查看🤗Transformers文档中直接提供的方法规范,以了解可能发生的情况。
The push_to_hub() method is backed by the huggingface_hub Python package, which offers a direct API to the Hugging Face Hub. It’s integrated within 🤗 Transformers and several other machine learning libraries, like allenlp. Although we focus on the 🤗 Transformers integration in this chapter, integrating it into your own code or library is simple.
`ush_to_Hub()方法由huggingfacehubPython包支持,该包提供了对Hugging FaceHub的直接API。它集成在🤗Transformer和其他几个机器学习库中,比如allenlp`。尽管我们在本章中重点介绍了🤗Transformer的集成,但将其集成到您自己的代码或库中很简单。
Jump to the last section to see how to upload files to your newly created repository!
跳到最后一节,看看如何将文件上传到新创建的存储库!
Using the huggingface_hub Python library
使用huggingfacehubPython库
The huggingface_hub Python library is a package which offers a set of tools for the model and datasets hubs. It provides simple methods and classes for common tasks like
getting information about repositories on the hub and managing them. It provides simple APIs that work on top of git to manage those repositories’ content and to integrate the Hub
in your projects and libraries.
`huggingfacehub`Python库是一个包,它为模型和数据集中心提供了一组工具。它为常见任务提供了简单的方法和类,比如获取关于集线器上的存储库的信息并对其进行管理。它提供了简单的API,这些API在Git之上工作,以管理这些存储库的内容,并将Hub集成到您的项目和库中。
Similarly to using the push_to_hub API, this will require you to have your API token saved in your cache. In order to do this, you will need to use the login command from the CLI, as mentioned in the previous section (again, make sure to prepend these commands with the ! character if running in Google Colab):
与使用ush_to_hub接口类似,这需要您将API令牌保存在缓存中。为此,您需要在CLI中使用login命令,如上一节所述(同样,如果在Google Colab中运行,请确保在这些命令前面加上!字符):
1 | |
The huggingface_hub package offers several methods and classes which are useful for our purpose. Firstly, there are a few methods to manage repository creation, deletion, and others:
`huggingfacehub`包提供了几个对我们的目的有用的方法和类。首先,有几种方法可以管理存储库的创建、删除和其他操作:
1 | |
Additionally, it offers the very powerful Repository class to manage a local repository. We will explore these methods and that class in the next few section to understand how to leverage them.
此外,它还提供了非常强大的Repository类来管理本地存储库。在接下来的几节中,我们将探索这些方法和该类,以了解如何利用它们。
The create_repo method can be used to create a new repository on the hub:
可以使用Create_repo方法在Hub上创建新的仓库:
1 | |
This will create the repository dummy-model in your namespace. If you like, you can specify which organization the repository should belong to using the organization argument:
这将在您的命名空间中创建存储库Dummy-Model。如果您愿意,可以使用Organation参数指定存储库应属于哪个组织:
1 | |
This will create the dummy-model repository in the huggingface namespace, assuming you belong to that organization.
Other arguments which may be useful are:
这将在huggingface命名空间中创建huggingface存储库,假设您属于该组织。其他可能有用的论据包括:
private, in order to specify if the repository should be visible from others or not.token, if you would like to override the token stored in your cache by a given token.repo_type, if you would like to create adatasetor aspaceinstead of a model. Accepted values are"dataset"and"space".
Once the repository is created, we should add files to it! Jump to the next section to see the three ways this can be handled.
`Priate,以指定存储库是否对其他人可见。token,如果您想要用给定的令牌覆盖存储在缓存中的令牌。repo_type,如果您想要创建数据集或space而不是模型。接受的值是“数据集”和“空间”`。一旦创建了存储库,我们就应该向其中添加文件!跳到下一节,看看这三种处理方法。
Using the web interface
使用Web界面
The web interface offers tools to manage repositories directly in the Hub. Using the interface, you can easily create repositories, add files (even large ones!), explore models, visualize diffs, and much more.
Web界面提供了直接在Hub中管理存储库的工具。使用该界面,您可以轻松地创建存储库、添加文件(即使是大文件!)、浏览模型、可视化差异,等等。
To create a new repository, visit huggingface.co/new:
要创建新的存储库,请访问huggingface.co/new:
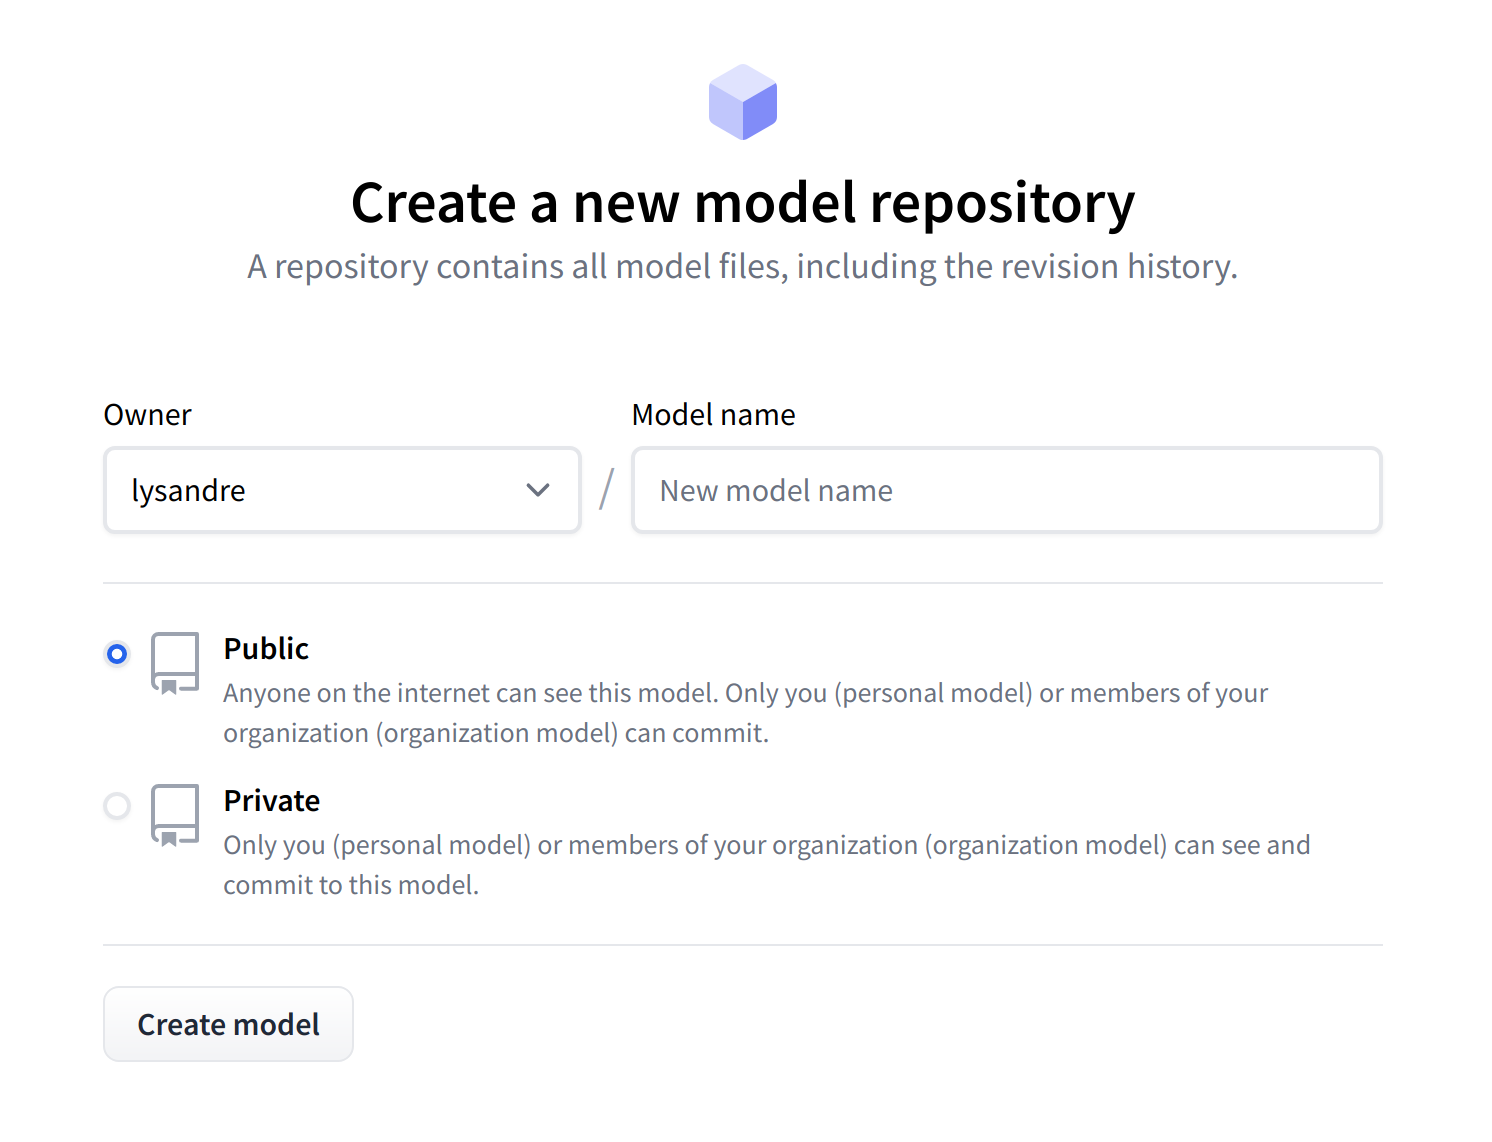
First, specify the owner of the repository: this can be either you or any of the organizations you’re affiliated with. If you choose an organization, the model will be featured on the organization’s page and every member of the organization will have the ability to contribute to the repository.
显示用于创建新模型存储库的模型的页面。首先,指定存储库的所有者:这可以是您,也可以是您所属的任何组织。如果您选择一个组织,该模型将出现在该组织的页面上,并且该组织的每个成员都将有能力向存储库做出贡献。
Next, enter your model’s name. This will also be the name of the repository. Finally, you can specify whether you want your model to be public or private. Private models are hidden from public view.
接下来,输入您的模特的名字。这也将是存储库的名称。最后,您可以指定您希望您的模型是公共的还是私有的。私人模特被隐藏在公众视线之外。
After creating your model repository, you should see a page like this:
创建模型存储库后,您应该会看到如下所示的页面:
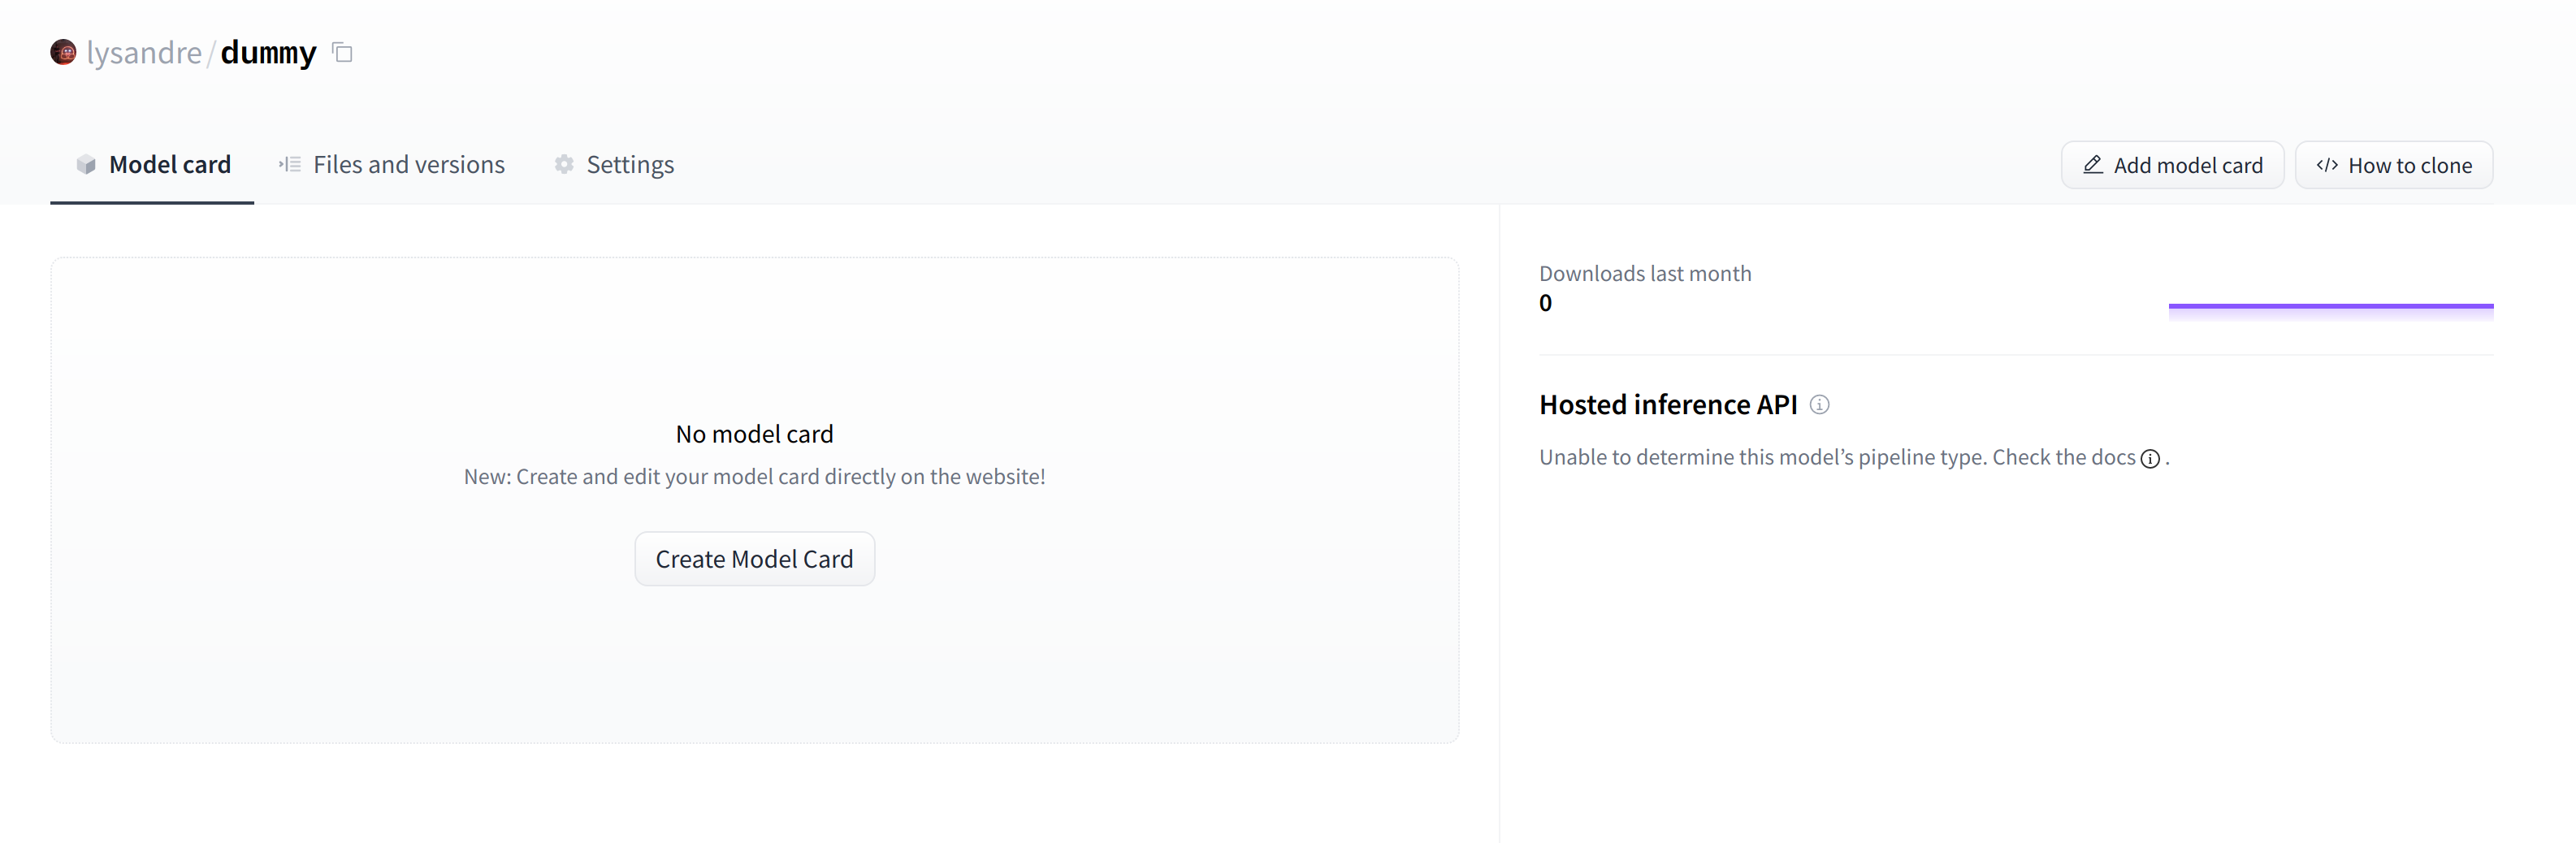
This is where your model will be hosted. To start populating it, you can add a README file directly from the web interface.
创建新的存储库后出现空的模型页。这是您的模型将托管的位置。要开始填充它,您可以直接从Web界面添加自述文件。
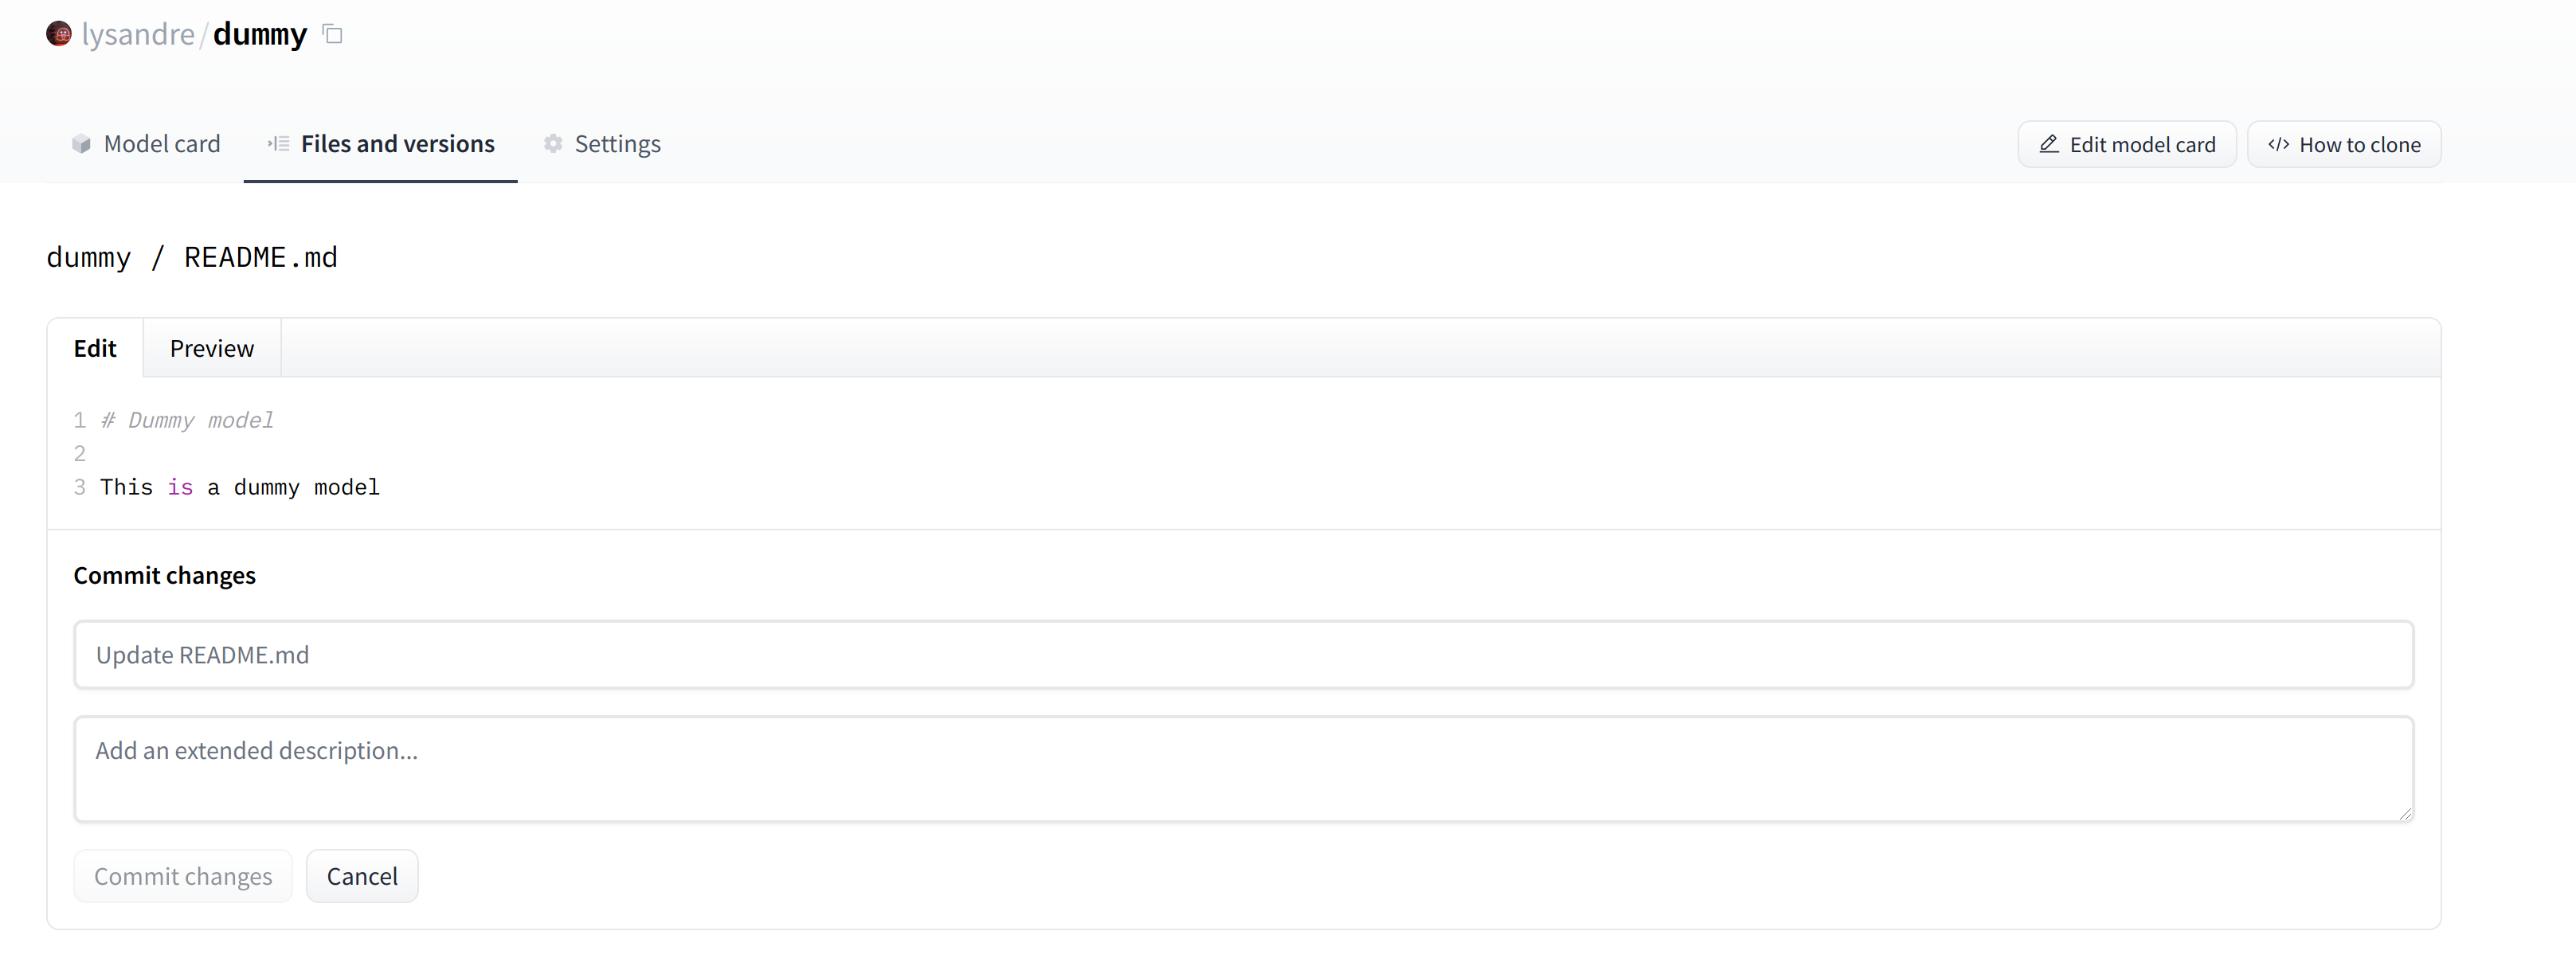
The README file is in Markdown — feel free to go wild with it! The third part of this chapter is dedicated to building a model card. These are of prime importance in bringing value to your model, as they’re where you tell others what it can do.
显示降价功能的自述文件。自述文件是Markdown格式的–尽情享受吧!本章的第三部分致力于构建一张模型卡。这些对于为您的模型带来价值是至关重要的,因为它们是您告诉其他人它可以做什么的地方。
If you look at the “Files and versions” tab, you’ll see that there aren’t many files there yet — just the README.md you just created and the .gitattributes file that keeps track of large files.
如果您查看“Files and Versions”选项卡,您会发现那里还没有多少文件–只有您刚刚创建的Readme.md和跟踪大文件的.gittributes文件。
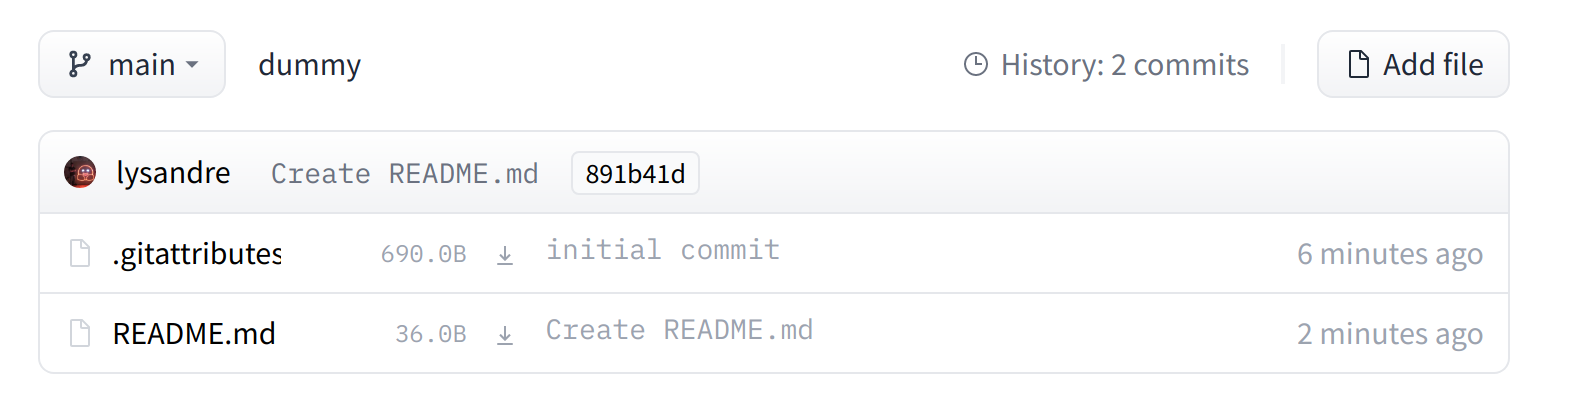
We’ll take a look at how to add some new files next.
“文件和版本”选项卡仅显示.gittributes和Readme.md文件。接下来,我们将看看如何添加一些新文件。
Uploading the model files
上传模型文件
The system to manage files on the Hugging Face Hub is based on git for regular files, and git-lfs (which stands for Git Large File Storage) for larger files.
在Hugging Face中心上管理文件的系统是基于Git来管理普通文件,Git-LFS(Git大文件存储)来管理更大的文件。
In the next section, we go over three different ways of uploading files to the Hub: through huggingface_hub and through git commands.
在下一节中,我们将介绍三种不同的上传文件到Hub的方式:通过huggingfacehub和通过git命令。
The upload_file approach
`Upload_File`方法
Using upload_file does not require git and git-lfs to be installed on your system. It pushes files directly to the 🤗 Hub using HTTP POST requests. A limitation of this approach is that it doesn’t handle files that are larger than 5GB in size.
If your files are larger than 5GB, please follow the two other methods detailed below.
使用UPLOAD_FILE不需要在您的系统上安装GIT和GIT-LFS。它使用HTTPPOST请求将文件直接推送到🤗Hub。这种方法的一个限制是它不能处理大小超过5 GB的文件。如果您的文件大于5 GB,请遵循下面详细说明的另外两种方法。
The API may be used as follows:
本接口的使用方法如下:
1 | |
This will upload the file config.json available at <path_to_file> to the root of the repository as config.json, to the dummy-model repository.
Other arguments which may be useful are:
这会将位于<PATH_TO_FILE>的文件config.json上传到存储库的根目录config.json,即ummy-Model存储库。其他可能有用的论据包括:
token, if you would like to override the token stored in your cache by a given token.repo_type, if you would like to upload to adatasetor aspaceinstead of a model. Accepted values are"dataset"and"space".
如果您想要用给定的令牌覆盖缓存中存储的令牌,则为token。如果您希望上传到数据集或space而不是模型,则为repo_type。可接受的值为“数据集”和“空间”。
The Repository class
`Repository`类
The Repository class manages a local repository in a git-like manner. It abstracts most of the pain points one may have with git to provide all features that we require.
`Repository`类以类似于Git的方式管理本地存储库。它抽象了Git可能存在的大部分痛点,以提供我们所需的所有功能。
Using this class requires having git and git-lfs installed, so make sure you have git-lfs installed (see here for installation instructions) and set up before you begin.
使用这个类需要安装Git和Git-LFS,所以在开始之前,请确保您已经安装了Git-LFS(请参阅此处的安装说明)并进行了设置。
In order to start playing around with the repository we have just created, we can start by initialising it into a local folder by cloning the remote repository:
为了开始使用我们刚刚创建的存储库,我们可以通过克隆远程存储库将其初始化为本地文件夹:
1 | |
This created the folder <path_to_dummy_folder> in our working directory. This folder only contains the .gitattributes file as that’s the only file created when instantiating the repository through create_repo.
这将在我们的工作目录中创建文件夹<Path_to_Dummy_Folders>。该文件夹仅包含.git属性文件,因为这是通过Create_repo实例化存储库时创建的唯一文件。
From this point on, we may leverage several of the traditional git methods:
从这一点开始,我们可以利用几种传统的GIT方法:
1 | |
And others! We recommend taking a look at the Repository documentation available here for an overview of all available methods.
还有其他人!我们建议查看此处提供的Repository文档,以了解所有可用方法的概述。
At present, we have a model and a tokenizer that we would like to push to the hub. We have successfully cloned the repository, we can therefore save the files within that repository.
目前,我们有一个模型和一个令牌器,我们想要推送到Hub上。我们已经成功地克隆了存储库,因此可以将文件保存在该存储库中。
We first make sure that our local clone is up to date by pulling the latest changes:
我们首先通过获取最新更改来确保本地克隆是最新的:
1 | |
Once that is done, we save the model and tokenizer files:
完成后,我们保存模型和记号赋值器文件:
1 | |
The <path_to_dummy_folder> now contains all the model and tokenizer files. We follow the usual git workflow by adding files to the staging area, committing them and pushing them to the hub:
`
1 | |
Congratulations! You just pushed your first files on the hub.
祝贺你!你刚刚把你的第一批文件放到了中心。
The git-based approach
基于Git的方法
This is the very barebones approach to uploading files: we’ll do so with git and git-lfs directly. Most of the difficulty is abstracted away by previous approaches, but there are a few caveats with the following method so we’ll follow a more complex use-case.
这是一种非常简单的上传文件的方法:我们将直接使用git和git-lfs进行上传。大多数困难都被以前的方法抽象出来了,但是下面的方法有一些警告,所以我们将遵循一个更复杂的用例。
Using this class requires having git and git-lfs installed, so make sure you have git-lfs installed (see here for installation instructions) and set up before you begin.
使用这个类需要安装Git和Git-LFS,所以在开始之前,请确保您已经安装了Git-LFS(请参阅此处的安装说明)并进行了设置。
First start by initializing git-lfs:
首先,初始化git-lfs:
1 | |
1 | |
Once that’s done, the first step is to clone your model repository:
完成后,第一步是克隆您的模型存储库:
1 | |
My username is lysandre and I’ve used the model name dummy, so for me the command ends up looking like the following:
我的用户名是lysandre,并且我使用的模型名是ummy,所以对我来说,该命令的结尾如下所示:
1 | |
I now have a folder named dummy in my working directory. I can cd into the folder and have a look at the contents:
现在,我的工作目录中有一个名为Dummy的文件夹。我可以cd进入文件夹,看看里面的内容:
1 | |
1 | |
If you just created your repository using Hugging Face Hub’s create_repo method, this folder should only contain a hidden .gitattributes file. If you followed the instructions in the previous section to create a repository using the web interface, the folder should contain a single README.md file alongside the hidden .gitattributes file, as shown here.
如果您刚刚使用Hugging Face Hub的Create_repo方法创建了您的存储库,则该文件夹应该只包含一个隐藏的.git属性文件。如果您按照上一节中的说明使用Web界面创建了存储库,则该文件夹应包含一个Readme.md文件以及隐藏的.git属性文件,如下所示。
Adding a regular-sized file, such as a configuration file, a vocabulary file, or basically any file under a few megabytes, is done exactly as one would do it in any git-based system. However, bigger files must be registered through git-lfs in order to push them to huggingface.co.
添加常规大小的文件(如配置文件、词汇表文件或基本上小于几兆字节的任何文件)的操作与在任何基于GIT的系统中完全相同。然而,较大的文件必须通过git-lFS注册,才能将其推送到huggingface.co。
Let’s go back to Python for a bit to generate a model and tokenizer that we’d like to commit to our dummy repository:
让我们回过头来看一下Python,以生成我们想要提交到虚拟存储库的模型和记号赋值器:
1 | |
Now that we’ve saved some model and tokenizer artifacts, let’s take another look at the dummy folder:
现在我们已经保存了一些模型和记号赋值器构件,让我们再看一看这个虚拟文件夹:
1 | |
1 | |
If you look at the file sizes (for example, with ls -lh), you should see that the model state dict file (pytorch_model.bin) is the only outlier, at more than 400 MB.
如果您查看文件大小(例如,使用ls-lh),您应该会看到模型状态dict文件(pytorch_Model.bin)是唯一的异常值,超过400MB。
✏️ When creating the repository from the web interface, the .gitattributes file is automatically set up to consider files with certain extensions, such as .bin and .h5, as large files, and git-lfs will track them with no necessary setup on your side.
✏️从Web界面创建存储库时,.gittributes文件将自动设置为将具有特定扩展名的文件(如.bin和.h5)视为大文件,并且GIT-LFS将跟踪它们,而无需在您一侧进行必要的设置。
We can now go ahead and proceed like we would usually do with traditional Git repositories. We can add all the files to Git’s staging environment using the git add command:
我们现在可以继续进行,就像我们通常使用传统的Git存储库一样。我们可以使用git add命令将所有文件添加到Git的临时环境中:
1 | |
We can then have a look at the files that are currently staged:
然后,我们可以查看当前暂存的文件:
1 | |
1 | |
Similarly, we can make sure that git-lfs is tracking the correct files by using its status command:
同样,我们可以通过使用其status命令来确保git-LFS跟踪正确的文件:
1 | |
1 | |
We can see that all files have Git as a handler, except pytorch_model.bin and sentencepiece.bpe.model, which have LFS. Great!
我们可以看到,所有的文件都有Git作为处理程序,除了pytorch_mod.bin和senencepece.bpe.model之外,它们都有LFS。太棒了!
Let’s proceed to the final steps, committing and pushing to the huggingface.co remote repository:
让我们继续执行最后几步,提交并推送到huggingface.co远程存储库:
1 | |
1 | |
Pushing can take a bit of time, depending on the speed of your internet connection and the size of your files:
推送可能需要一些时间,具体取决于您的互联网连接速度和文件大小:
1 | |
1 | |
If we take a look at the model repository when this is finished, we can see all the recently added files:
如果我们在完成此操作后查看模型存储库,我们可以看到最近添加的所有文件:
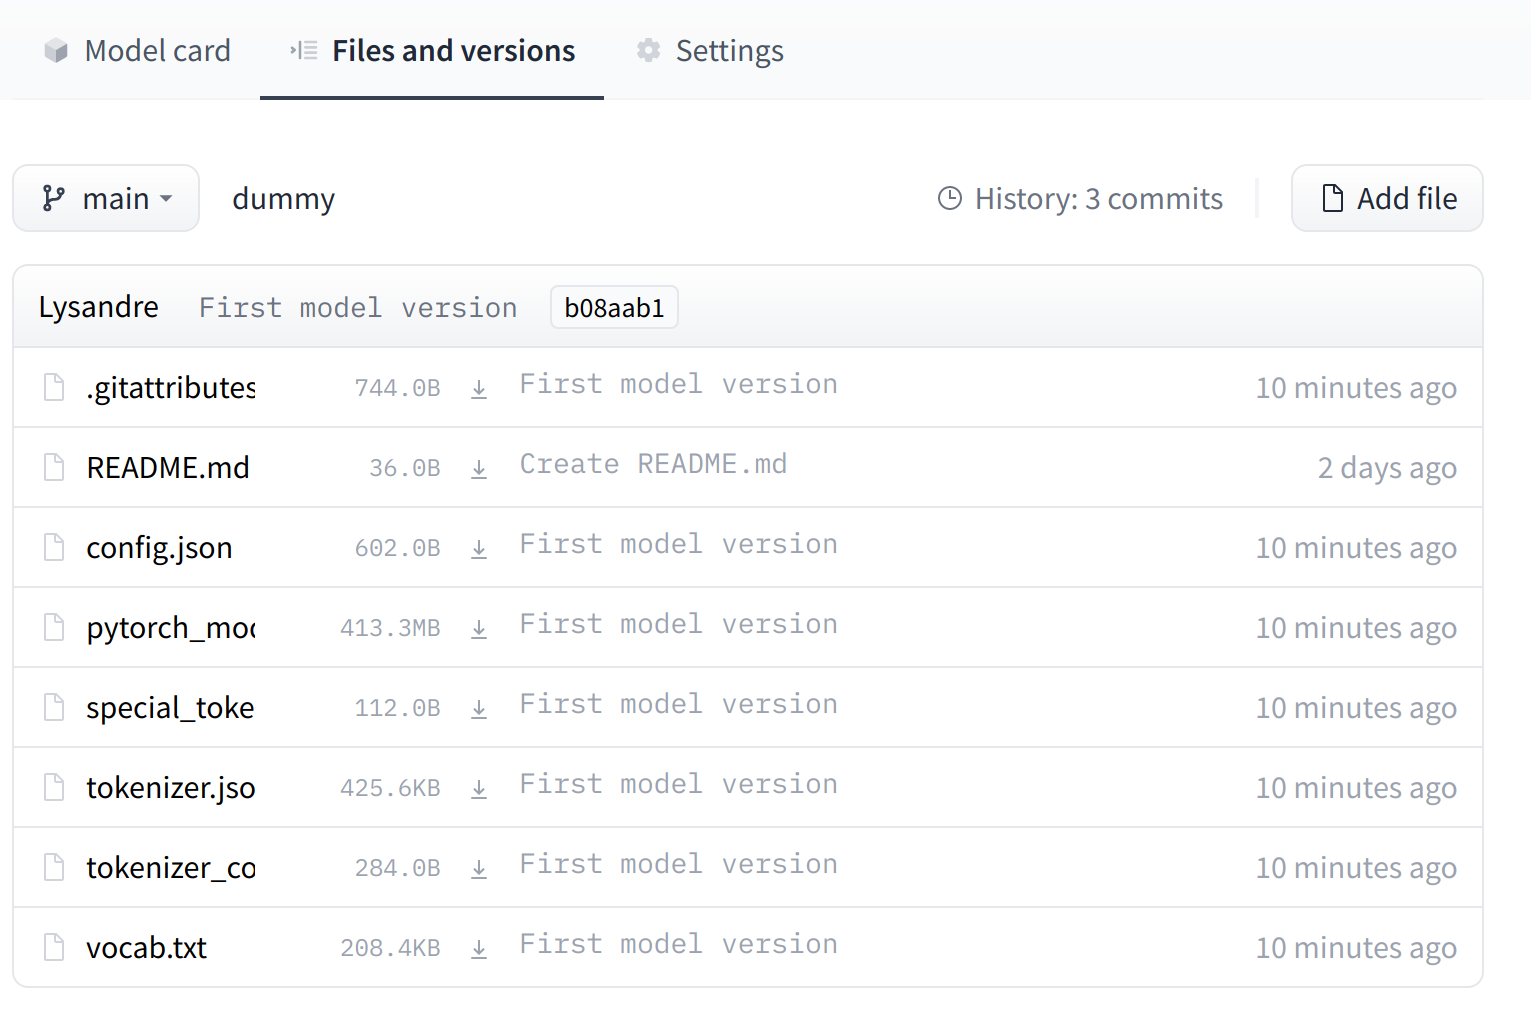
The UI allows you to explore the model files and commits and to see the diff introduced by each commit:
“文件和版本”选项卡现在包含所有最近上传的文件。用户界面允许您浏览模型文件和提交,并查看每次提交带来的差异:
由最近的提交引入的差异。