H7-Unit_4-Policy_Gradient_with_PyTorch-F5-on
中英文对照学习,效果更佳!
原课程链接:https://huggingface.co/deep-rl-course/unit8/hands-on-cleanrl?fw=pt
Hands on
亲身实践

![]()
在Colab中公开提问
Now that we studied the theory behind Reinforce, you’re ready to code your Reinforce agent with PyTorch. And you’ll test its robustness using CartPole-v1 and PixelCopter,.
既然我们已经学习了加强背后的理论,您就可以使用PyTorch编写您的增强剂了。您将使用CartPole-v1和PixelCopter测试其健壮性。
You’ll then be able to iterate and improve this implementation for more advanced environments.
然后,您将能够在更高级的环境中迭代和改进此实现。

To validate this hands-on for the certification process, you need to push your trained models to the Hub.
环境要验证认证流程的实际操作,您需要将经过培训的模型推送到中心。
- Get a result of >= 350 for
Cartpole-v1. - Get a result of >= 5 for
PixelCopter.
To find your result, go to the leaderboard and find your model, the result = mean_reward - std of reward. If you don’t see your model on the leaderboard, go at the bottom of the leaderboard page and click on the refresh button.
`Cartole-v1的结果为>=350。PixelCopter`的结果为>=5。要找到您的结果,请转到排行榜并找到您的模型,结果=Mean_Reward-奖励标准。如果您在排行榜上看不到您的模型,请转到排行榜页面底部并单击刷新按钮。
If you don’t find your model, go to the bottom of the page and click on the refresh button.
如果您没有找到您的模型,请转到页面底部并单击刷新按钮。
For more information about the certification process, check this section 👉 https://huggingface.co/deep-rl-course/en/unit0/introduction#certification-process
有关认证过程的更多信息,请查看https://huggingface.co/deep-rl-course/en/unit0/introduction#certification-process👉这一节
And you can check your progress here 👉 https://huggingface.co/spaces/ThomasSimonini/Check-my-progress-Deep-RL-Course
您可以在https://huggingface.co/spaces/ThomasSimonini/Check-my-progress-Deep-RL-Course👉此处查看您的进度
To start the hands-on click on Open In Colab button 👇 :
要开始动手操作,请单击以可乐打开按钮👇:
![]()
在Colab开业
Unit 4: Code your first Deep Reinforcement Learning Algorithm with PyTorch: Reinforce. And test its robustness 💪
单元4:编写您的第一个深度强化学习算法的代码,使用PyTorch:Readence。并测试其健壮性💪
In this notebook, you’ll code your first Deep Reinforcement Learning algorithm from scratch: Reinforce (also called Monte Carlo Policy Gradient).
缩略图在本笔记本中,您将从头开始编写您的第一个深度强化学习算法:增强(也称为蒙特卡罗策略梯度)。
Reinforce is a Policy-based method: a Deep Reinforcement Learning algorithm that tries to optimize the policy directly without using an action-value function.
强化是一种基于策略的方法:一种深度强化学习算法,它试图直接优化策略,而不使用动作值函数。
More precisely, Reinforce is a Policy-gradient method, a subclass of Policy-based methods that aims to optimize the policy directly by estimating the weights of the optimal policy using gradient ascent.
更准确地说,加强是一种策略梯度方法,它是基于策略的方法的一个子类,旨在通过使用梯度上升估计最优策略的权重来直接优化策略。
To test its robustness, we’re going to train it in 2 different simple environments:
为了测试它的健壮性,我们将在两个不同的简单环境中对其进行训练:
- Cartpole-v1
- PixelcopterEnv
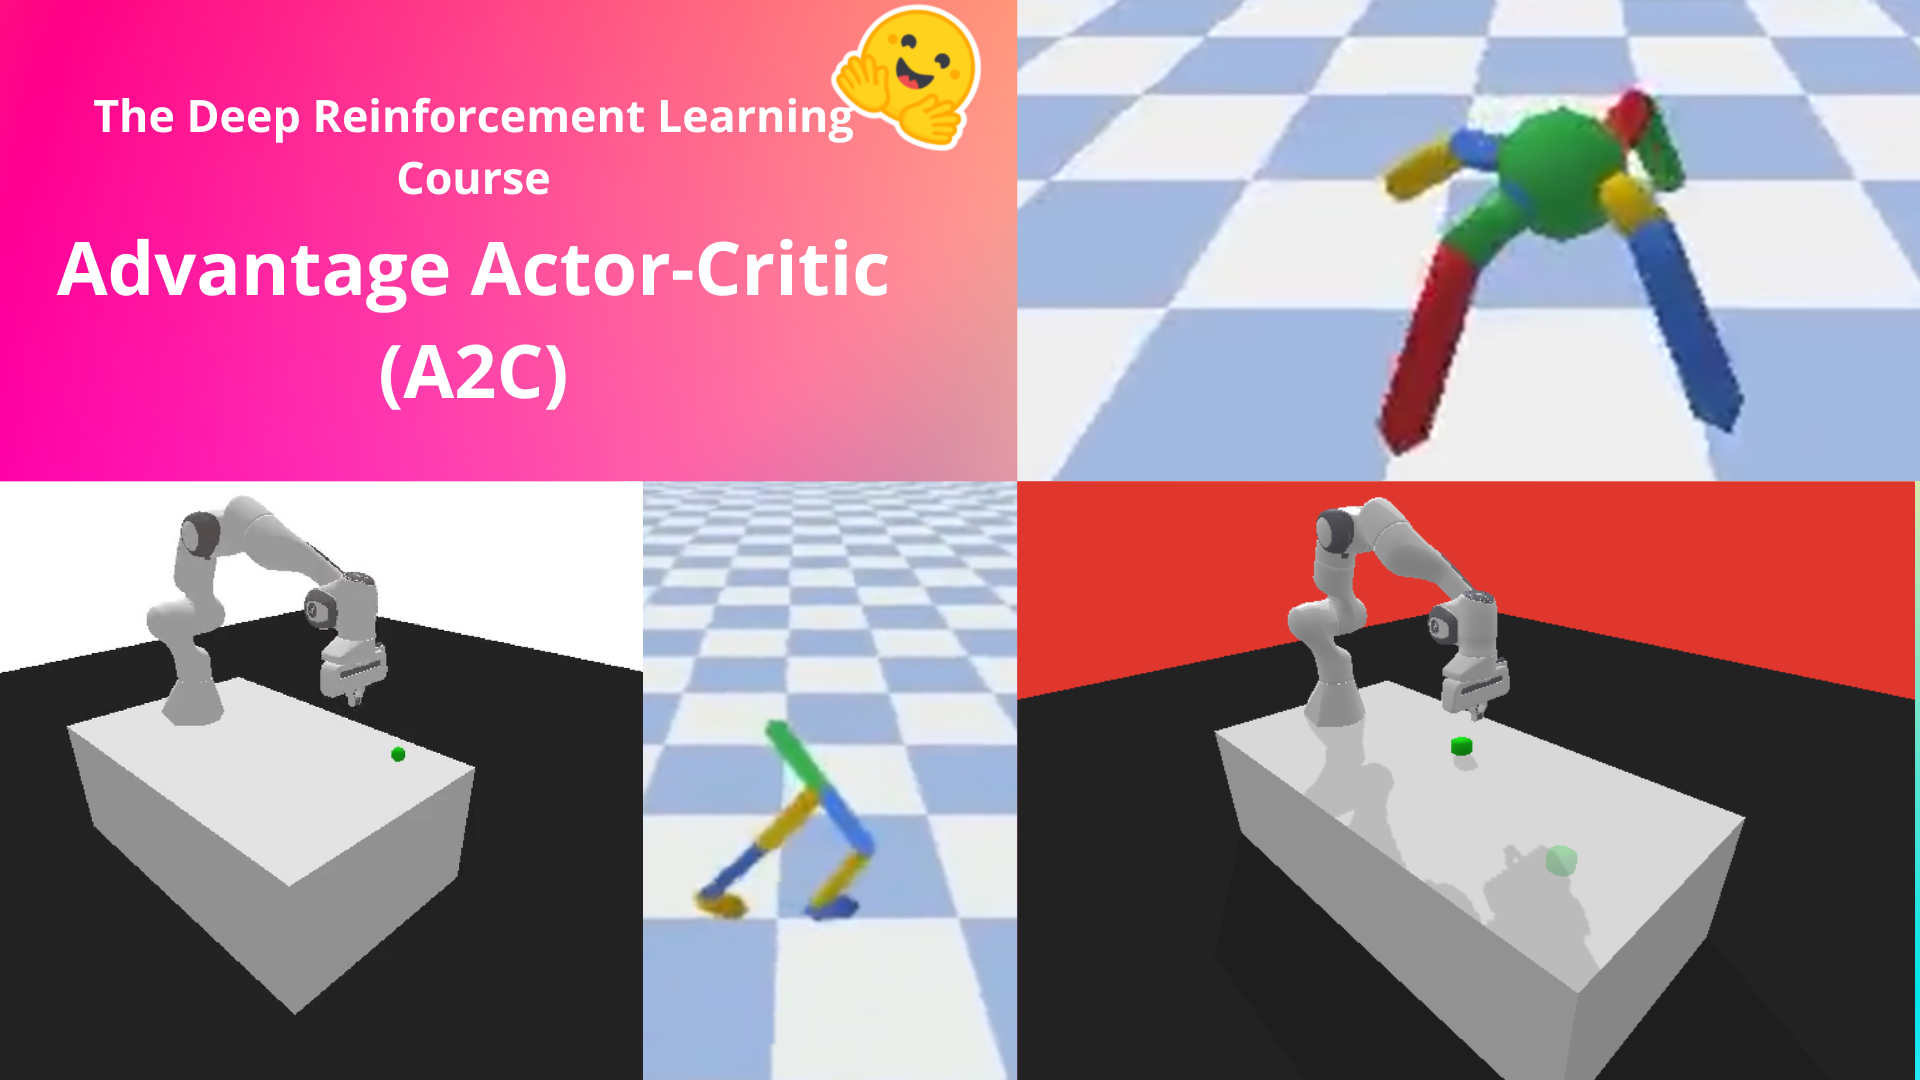
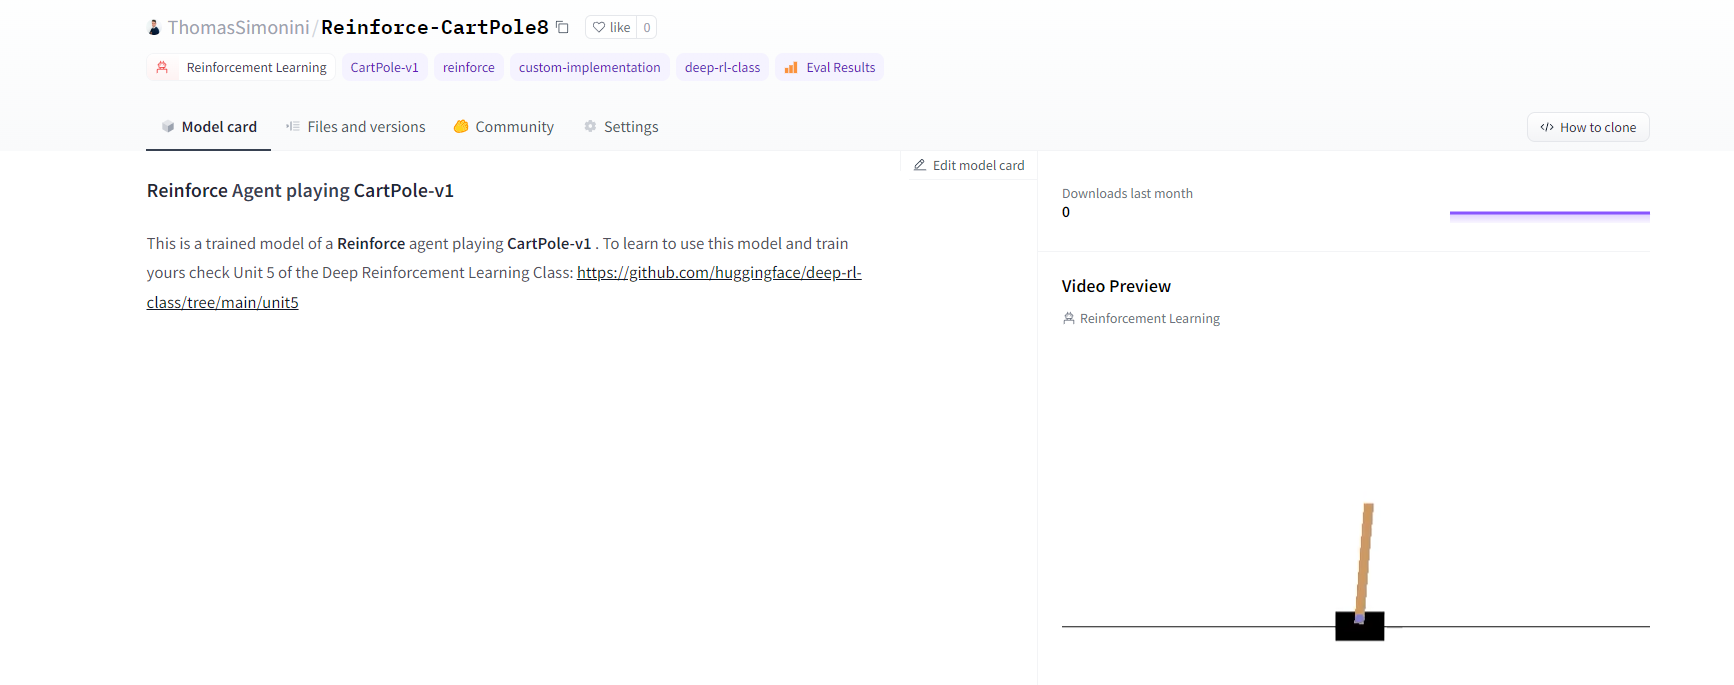
⬇️ Here is an example of what you will achieve at the end of this notebook. ⬇️
CartPole-v1PixelcopterEnv⬇️这里是一个示例,说明您将在本笔记本结束时实现的目标。⬇️
环境
🎮 Environments:
🎮环境:
📚 RL-Library:
CartPole-v1PixelCopter📚RL-库:
- Python
- PyTorch
We’re constantly trying to improve our tutorials, so if you find some issues in this notebook, please open an issue on the GitHub Repo.
我们一直在努力改进我们的教程,所以如果你在这个笔记本上发现了一些问题,请在GitHub Repo上打开一个问题。
Objectives of this notebook 🏆
此笔记本电脑🏆的目标
At the end of the notebook, you will:
在笔记本结尾处,您将:
- Be able to code from scratch a Reinforce algorithm using PyTorch.
- Be able to test the robustness of your agent using simple environments.
- Be able to push your trained agent to the Hub with a nice video replay and an evaluation score 🔥.
Prerequisites 🏗️
能够使用PyTorch从头开始编写增强算法。能够使用简单的环境测试代理的健壮性。能够通过良好的视频回放和评估分数🔥将训练有素的代理推送到中心。Prerequisites🏗️
Before diving into the notebook, you need to:
在深入研究笔记本之前,您需要:
🔲 📚 Study Policy Gradients by reading Unit 4
🔲📚通过阅读单元4研究政策梯度
Let’s code Reinforce algorithm from scratch 🔥
让我们从头开始编写增强算法🔥
An advice 💡
An Advisment💡
It’s better to run this colab in a copy on your Google Drive, so that if it timeouts you still have the saved notebook on your Google Drive and do not need to fill everything from scratch.
最好是在你的Google Drive上以副本的形式运行这个CoLab,这样如果它超时,你仍然可以在Google Drive上保存保存的笔记本,而不需要从头开始填充所有东西。
To do that you can either do Ctrl + S or File > Save a copy in Google Drive.
要做到这一点,你可以按Ctrl+S或`文件>在Google Drive中保存副本。
Set the GPU 💪
设置图形处理器💪
- To accelerate the agent’s training, we’ll use a GPU. To do that, go to
Runtime > Change Runtime type
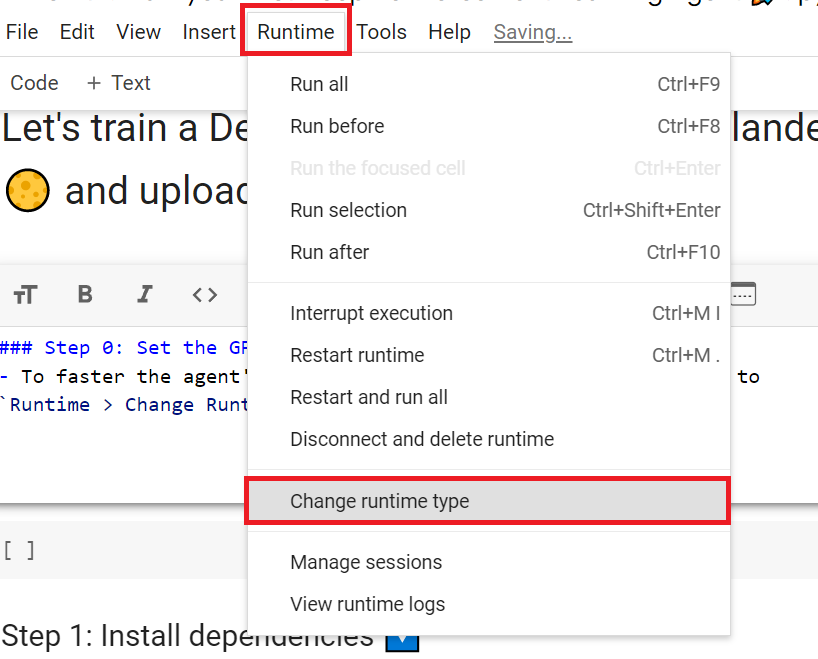
为了加快工程师的培训,我们将使用GPU。为此,请转到运行时>更改运行时类型GPU步骤1
Hardware Accelerator > GPU
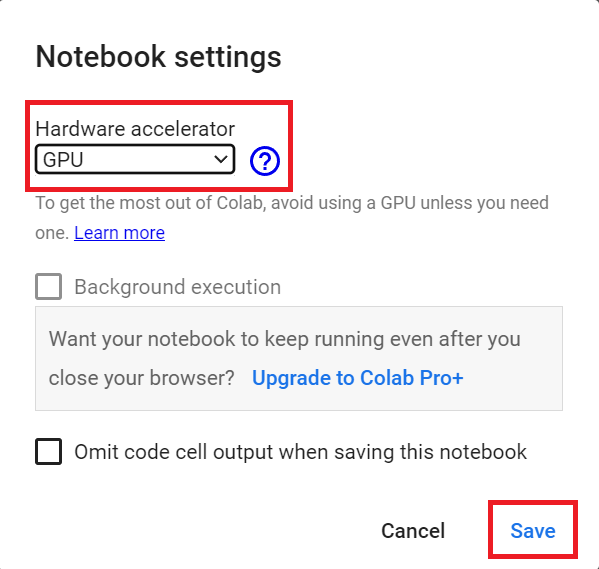
`硬件加速器>GPU`GPU步骤2
Create a virtual display 🖥
创建虚拟显示🖥
During the notebook, we’ll need to generate a replay video. To do so, with colab, we need to have a virtual screen to be able to render the environment (and thus record the frames).
在笔记本期间,我们需要生成一个回放视频。要做到这一点,使用CoLab,我们需要一个虚拟屏幕来渲染环境(并因此记录帧)。
Hence the following cell will install the librairies and create and run a virtual screen 🖥
因此,下面的单元将安装库并创建和运行虚拟屏幕🖥
1 | |
1 | |
Install the dependencies 🔽
安装依赖项🔽
The first step is to install the dependencies. We’ll install multiple ones:
第一步是安装依赖项。我们将安装多个:
gymgym-games: Extra gym environments made with PyGame.huggingface_hub: The Hub works as a central place where anyone can share and explore models and datasets. It has versioning, metrics, visualizations, and other features that will allow you to easily collaborate with others.
You can see here all the Reinforce models available 👉 https://huggingface.co/models?other=reinforce
`体操``健身房-游戏:使用PyGame.HuggingFace_Hub`创建额外的健身房环境:Hub是一个中心,任何人都可以在这里分享和探索模型和数据集。它具有版本控制、指标、可视化和其他功能,使您可以轻松地与其他人协作。您可以在此处看到所有可用的增强模型https://huggingface.co/models?other=reinforce👉
And you can find all the Deep Reinforcement Learning models here 👉 https://huggingface.co/models?pipeline_tag=reinforcement-learning
您可以在https://huggingface.co/models?pipeline_tag=reinforcement-learning👉此处找到所有深度强化学习模型
1 | |
Import the packages 📦
导入包📦
In addition to import the installed libraries, we also import:
除了导入已安装的库之外,我们还导入:
imageio: A library that will help us to generate a replay video
1 | |
Check if we have a GPU
`Imageio`:一个帮助我们生成回放视频的库检查我们是否有GPU
- Let’s check if we have a GPU
- If it’s the case you should see
device:cuda0
1 | |
1 | |
We’re now ready to implement our Reinforce algorithm 🔥
让我们检查一下是否有图形用户界面。如果是这样,您应该看到`Device:cuda0‘我们现在已经准备好实现我们的增强算法🔥了
First agent: Playing CartPole-v1 🤖
第一个代理:玩CartPole-v1🤖
Create the CartPole environment and understand how it works
创建CartPole环境并了解其工作原理
The environment 🎮
The Environment🎮(环境指南)
Why do we use a simple environment like CartPole-v1?
为什么我们要使用像CartPole-v1这样简单的环境?
As explained in Reinforcement Learning Tips and Tricks, when you implement your agent from scratch, you need to be sure that it works correctly and find bugs with easy environments before going deeper as finding bugs will be much easier in simple environments.
正如强化学习提示和技巧中所解释的那样,当您从头开始实现代理时,您需要确保它正确工作,并在轻松的环境中找到错误,然后再深入,因为在简单的环境中查找错误会容易得多。
Try to have some “sign of life” on toy problems
试着在玩具问题上有一些“生命的迹象”
Validate the implementation by making it run on harder and harder envs (you can compare results against the RL zoo). You usually need to run hyperparameter optimization for that step.
通过使其在越来越难的环境下运行来验证实现(您可以将结果与RL ZOO进行比较)。您通常需要为该步骤运行超参数优化。
The CartPole-v1 environment
CartPole-v1环境
A pole is attached by an un-actuated joint to a cart, which moves along a frictionless track. The pendulum is placed upright on the cart and the goal is to balance the pole by applying forces in the left and right direction on the cart.
一根杆子通过一个非致动关节连接到一辆小车上,小车沿着一条无摩擦的轨道移动。摆被竖直地放在手推车上,目标是通过在手推车上向左和向右施加力来平衡杆子。
So, we start with CartPole-v1. The goal is to push the cart left or right so that the pole stays in the equilibrium.
因此,我们从CartPole-v1开始。目标是向左或向右推动手推车,使杆子保持平衡。
The episode ends if:
如果出现以下情况,本期节目将结束:
- The pole Angle is greater than ±12°
- Cart Position is greater than ±2.4
- Episode length is greater than 500
We get a reward 💰 of +1 every timestep the Pole stays in the equilibrium.
极点角度大于±12°,手推车位置大于±2.4集长度大于500,每一步极点保持平衡,奖励💰为+1。
1 | |
1 | |
1 | |
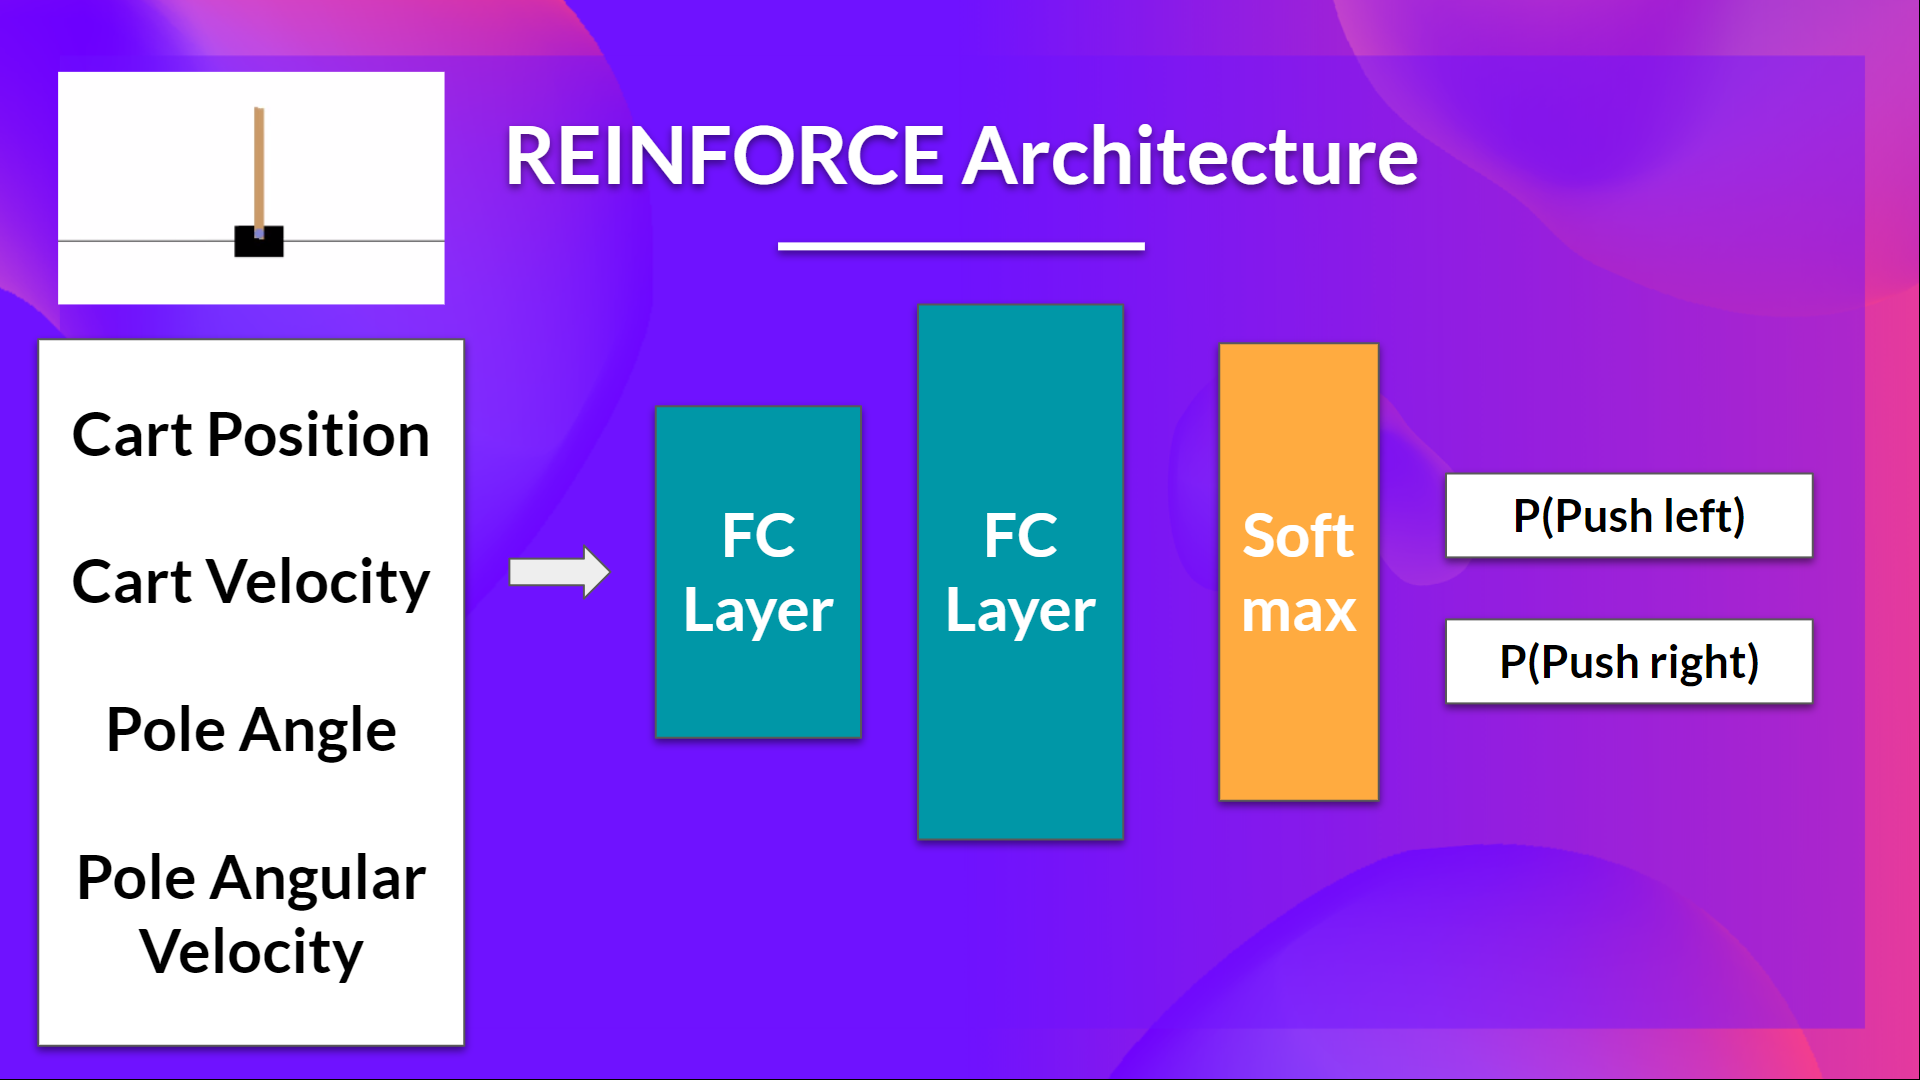
Let’s build the Reinforce Architecture
让我们建造加固建筑
This implementation is based on three implementations:
此实施基于三个实施:
- PyTorch official Reinforcement Learning example
- Udacity Reinforce
- Improvement of the integration by Chris1nexus
So we want:
PyTorch官方强化学习示例Udacity Reinforce改进了Chris1nexus Reinforce的集成,因此我们希望:
- Two fully connected layers (fc1 and fc2).
- Using ReLU as activation function of fc1
- Using Softmax to output a probability distribution over actions
1 | |
Solution
两个完全连接的层(fc1和fc2)。使用relu作为fc1的激活函数使用Softmax输出动作的概率分布解决方案
1 | |
I make a mistake, can you guess where?
我弄错了,你能猜到哪里吗?
- To find out let’s make a forward pass:
1 | |
- Here we see that the error says
ValueError: The value argument to log_prob must be a Tensor - It means that
actioninm.log_prob(action)must be a Tensor but it’s not. - Do you know why? Check the act function and try to see why it does not work.
Advice 💡: Something is wrong in this implementation. Remember that we act function we want to sample an action from the probability distribution over actions.
为了找出答案,让我们进行一次向前传递:在这里,我们看到错误是ValueError:log_prob的值参数必须是张量这意味着m.log_prob(Action)中的action必须是张量,但它不是。你知道为什么吗?检查ACT函数,并尝试了解其不工作的原因。💡顾问:此实现中有问题。记住,我们动作函数,我们想要从动作的概率分布中抽样一个动作。
(Real) Solution
(实际)解决方案
1 | |
By using CartPole, it was easier to debug since we know that the bug comes from our integration and not from our simple environment.
通过使用CartPole,调试变得更容易,因为我们知道错误来自于我们的集成,而不是来自我们简单的环境。
- Since we want to sample an action from the probability distribution over actions, we can’t use
action = np.argmax(m)since it will always output the action that have the highest probability. - We need to replace with
action = m.sample()that will sample an action from the probability distribution P(.|s)
Let’s build the Reinforce Training Algorithm
由于我们要从动作的概率分布中对动作进行采样,因此不能使用Action=np.argmax(M),因为它总是输出概率最高的动作。我们需要替换为将从概率分布P(.|s)中对动作进行采样的Action=m.Sample()。让我们构建增强训练算法
This is the Reinforce algorithm pseudocode: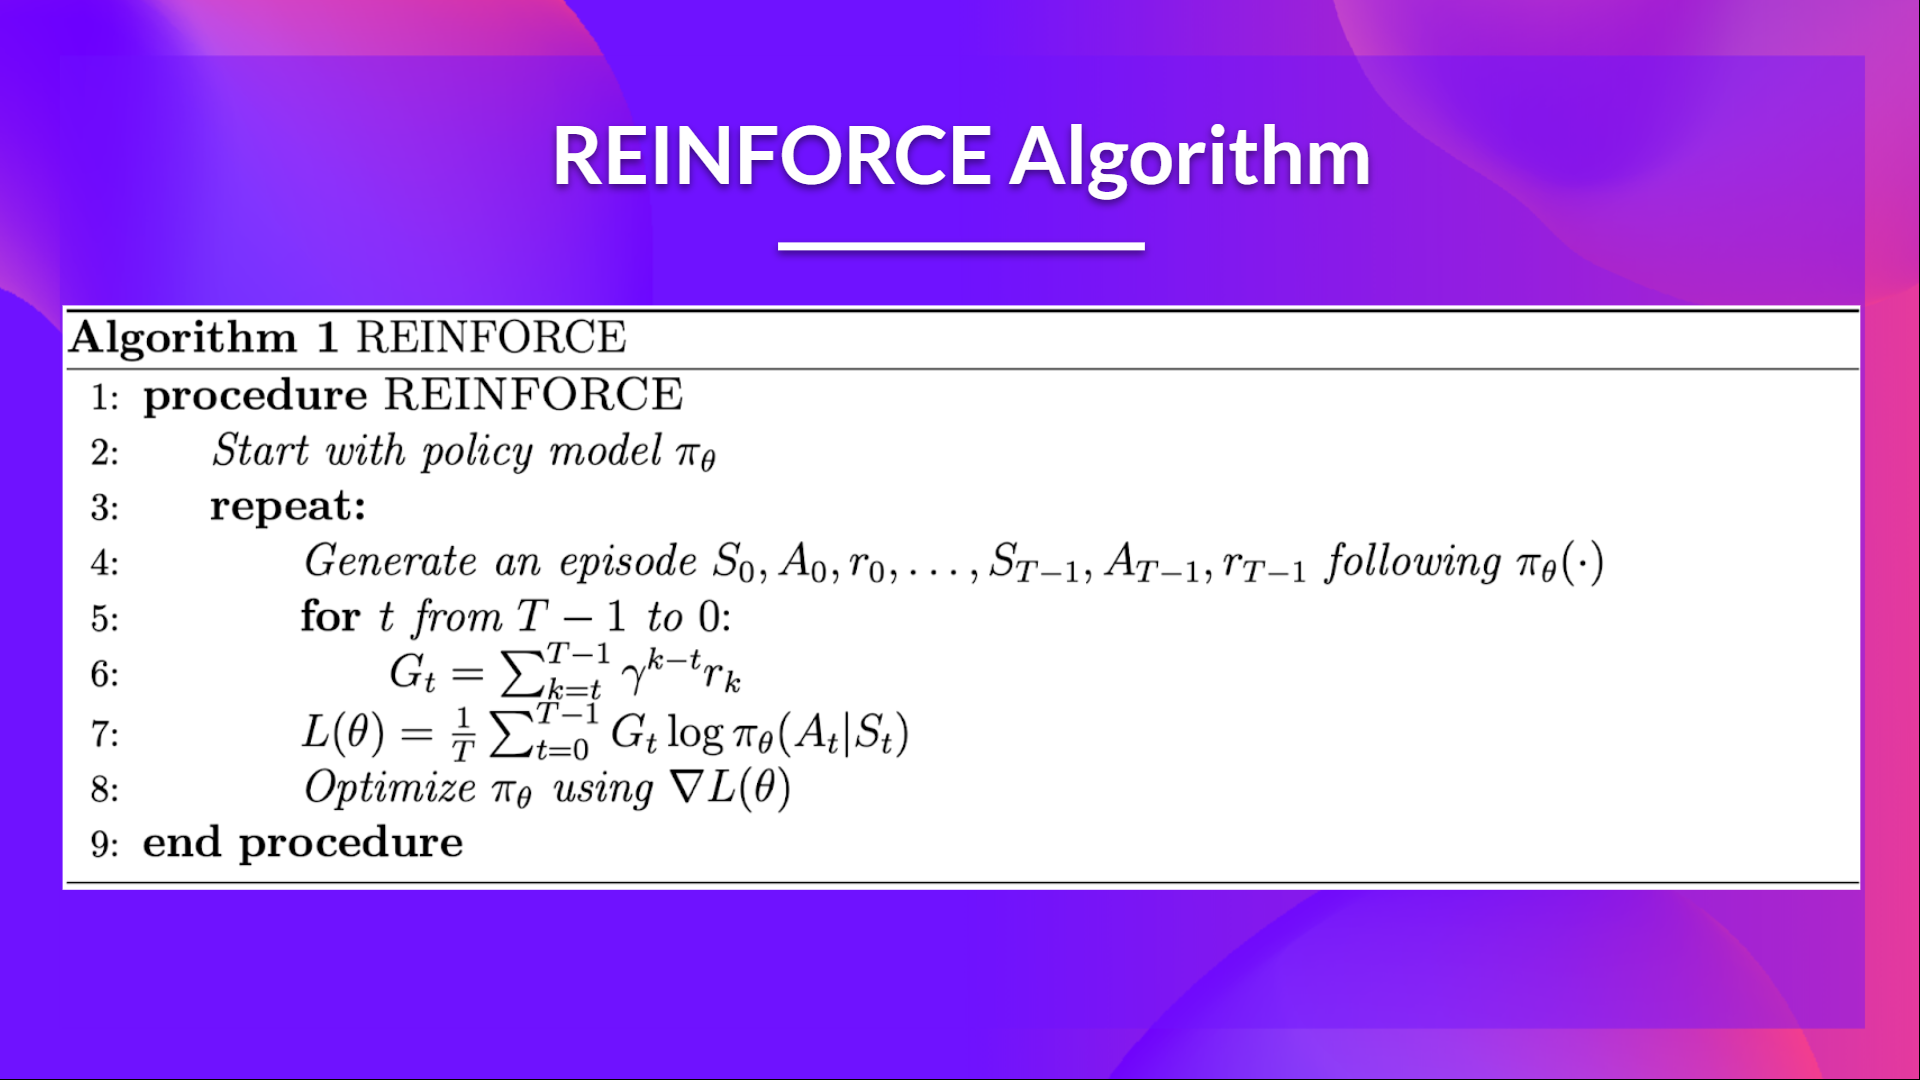
这是增强算法伪代码:策略梯度伪代码
- When we calculate the return Gt (line 6), we see that we calculate the sum of discounted rewards starting at timestep t.
- Why? Because our policy should only reinforce actions on the basis of the consequences: so rewards obtained before taking an action are useless (since they were not because of the action), only the ones that come after the action matters.
- Before coding this you should read this section don’t let the past distract you that explains why we use reward-to-go policy gradient.
We use an interesting technique coded by Chris1nexus to compute the return at each timestep efficiently. The comments explained the procedure. Don’t hesitate also to check the PR explanation
But overall the idea is to compute the return at each timestep efficiently.
当我们计算回报GT(第6行)时,我们看到我们计算的是从时间步长t开始的贴现奖励的总和。为什么?因为我们的政策应该只根据后果来强化行动:所以在采取行动之前获得的奖励是无用的(因为它们不是因为行动),只有行动之后的奖励才是重要的。在编写这篇文章之前,你应该阅读这一节,不要让过去分散你的注意力,这解释了为什么我们使用即付即付政策梯度。我们使用了一种由Chris1nexx编码的有趣的技术来有效地计算每个时间步的回报。评论解释了这一程序。不要犹豫,也要检查公关解释,但总的来说,我们的想法是有效地计算每个时间步的回报。
The second question you may ask is why do we minimize the loss? Did you talk about Gradient Ascent, not Gradient Descent?
你可能会问的第二个问题是,为什么我们要将损失降到最低?你说的是梯度上升,而不是梯度下降吗?
- We want to maximize our utility function $J(\theta)$, but in PyTorch and TensorFlow, it’s better to minimize an objective function.
- So let’s say we want to reinforce action 3 at a certain timestep. Before training this action P is 0.25.
- So we want to modify thetatheta theta such that πθ(a3∣s;θ)>0.25\pi_\theta(a_3|s; \theta) > 0.25 πθ(a3∣s;θ)>0.25
- Because all P must sum to 1, max piθ(a3∣s;θ)pi_\theta(a_3|s; \theta)piθ(a3∣s;θ) will minimize other action probability.
- So we should tell PyTorch to min 1−πθ(a3∣s;θ)1 - \pi_\theta(a_3|s; \theta)1−πθ(a3∣s;θ).
- This loss function approaches 0 as πθ(a3∣s;θ)\pi_\theta(a_3|s; \theta)πθ(a3∣s;θ) nears 1.
- So we are encouraging the gradient to max πθ(a3∣s;θ)\pi_\theta(a_3|s; \theta)πθ(a3∣s;θ)
1 | |
Solution
我们希望最大化我们的效用函数$J(\theta)$,但在PyTorch和TensorFlow中,最好是最小化一个目标函数。由于所有P的和必须等于1,∣(A3∣s;−)pi_\theta(A3|s;θ),所以我们应该告诉πθtoθπθpiθθ(A3∣s;θθ;πθ)。−(A3∣s;πθθ)1-\pi_\theta(a_3|s;\theta)1πθπθθ(A3πθs;θ)。当πθ(A3πθs;θ)接近1时,此损失函数接近0。因此,我们鼓励梯度到最大解(A3∣s;πθθ)\pi_\theta(a_3|s;\theta)πθ(A3πθs;θ
1 | |
Train it
训练它
- We’re now ready to train our agent.
- But first, we define a variable containing all the training hyperparameters.
- You can change the training parameters (and should 😉)
1 | |
1 | |
1 | |
Define evaluation method 📝
我们现在已经准备好培训我们的代理。但首先,我们定义一个包含所有培训超参数的变量。您可以更改培训参数(以及是否应该😉)定义评估方法📝
- Here we define the evaluation method that we’re going to use to test our Reinforce agent.
1 | |
Evaluate our agent 📈
在这里,我们定义了将用于测试我们的增强剂的评估方法。评估我们的增强剂📈
1 | |
Publish our trained model on the Hub 🔥
在中心🔥上发布我们训练过的模型
Now that we saw we got good results after the training, we can publish our trained model on the hub 🤗 with one line of code.
Here’s an example of a Model Card:
现在我们看到培训后获得了很好的结果,我们可以用一行代码在HUB🤗上发布我们训练过的模型。以下是一个模型卡的示例:
Push to the Hub
推送至中心
Do not modify this code
请勿修改此代码
1 | |
1 | |
1 | |
By using push_to_hub you evaluate, record a replay, generate a model card of your agent and push it to the Hub.
通过使用`ush_to_hub‘,您可以评估、录制回放、生成您的经纪人的模板卡并将其推送到Hub。
This way:
这条路:
- You can showcase our work 🔥
- You can visualize your agent playing 👀
- You can share with the community an agent that others can use 💾
- You can access a leaderboard 🏆 to see how well your agent is performing compared to your classmates 👉 https://huggingface.co/spaces/huggingface-projects/Deep-Reinforcement-Learning-Leaderboard
To be able to share your model with the community there are three more steps to follow:
您可以展示我们的工作🔥您可以可视化您的代理玩👀您可以与社区共享其他人可以使用的代理💾您可以访问排行榜🏆以查看您的代理与您的同学相比表现如何👉您可以与社区共享您的模型您还需要遵循三个步骤:
1️⃣ (If it’s not already done) create an account to HF ➡ https://huggingface.co/join
1到HF https://huggingface.co/join的️➡⃣(如果尚未完成)创建帐户
2️⃣ Sign in and then, you need to store your authentication token from the Hugging Face website.
2️⃣登录,然后,您需要存储来自Hugging Face网站的身份验证令牌。
- Create a new token (https://huggingface.co/settings/tokens) with write role
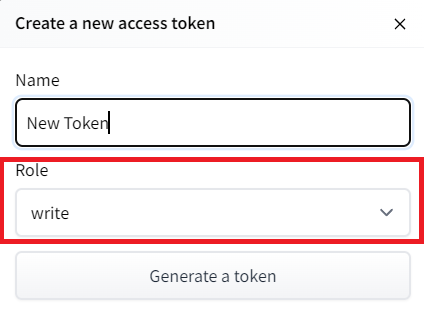
创建新令牌(具有写角色的https://huggingface.co/settings/tokens)创建HF令牌
1 | |
If you don’t want to use a Google Colab or a Jupyter Notebook, you need to use this command instead: huggingface-cli login (or login)
如果你不想使用Google Colab或Jupyter笔记本,你需要使用以下命令:huggingfacecli login(或login)
3️⃣ We’re now ready to push our trained agent to the 🤗 Hub 🔥 using package_to_hub() function
3️集线器我们现在可以使用🤗_to_🔥()函数将我们训练有素的代理推送到⃣集线器
1 | |
Now that we try the robustness of our implementation, let’s try a more complex environment: PixelCopter 🚁
现在我们尝试了实现的健壮性,让我们尝试一个更复杂的环境:PixelCopter🚁
Second agent: PixelCopter 🚁
第二名经纪人:PixelCopter🚁
Study the PixelCopter environment 👀
PixelCopter环境👀的研究
1 | |
1 | |
1 | |
The observation space (7) 👀:
环境文件观测空间(7)👀:
- player y position
- player velocity
- player distance to floor
- player distance to ceiling
- next block x distance to player
- next blocks top y location
- next blocks bottom y location
The action space(2) 🎮:
球员y位置球员速度球员到地板或球员到天花板的距离下一个拦网到球员的距离下一个拦网顶部y位置下一个拦网底部y位置动作空间(2)🎮:
- Up
- Down
The reward function 💰:
UpDown奖励函数💰:
- For each vertical block it passes through it gains a positive reward of +1. Each time a terminal state reached it receives a negative reward of -1.
Define the new Policy 🧠
对于它通过的每个垂直区块,它获得+1的正奖励。每次到达终端状态时,它获得负奖励-1。定义新的策略🧠
- We need to have a deeper neural network since the environment is more complex
1 | |
Solution
我们需要更深入的神经网络,因为环境更复杂解决方案
1 | |
Define the hyperparameters ⚙️
定义超级参数⚙️
- Because this environment is more complex.
- Especially for the hidden size, we need more neurons.
1 | |
Train it
因为这个环境更复杂。特别是对于隐藏的大小,我们需要更多的神经元。训练它
- We’re now ready to train our agent 🔥.
1 | |
1 | |
Publish our trained model on the Hub 🔥
我们现在准备培训我们的代理🔥。在🔥上发布我们培训过的模型
1 | |
Some additional challenges 🏆
🏆面临的一些额外挑战
The best way to learn is to try things on your own! As you saw, the current agent is not doing great. As a first suggestion, you can train for more steps. But also trying to find better parameters.
学习的最好方法就是自己尝试!如你所见,目前的代理做得不是很好。作为第一个建议,你可以训练更多的步数。但也在努力寻找更好的参数。
In the Leaderboard you will find your agents. Can you get to the top?
在排行榜上,你会找到你的代理人。你能爬到山顶吗?
Here are some ideas to achieve so:
以下是实现这一目标的一些想法:
- Train more steps
- Try different hyperparameters by looking at what your classmates have done 👉 https://huggingface.co/models?other=reinforce
- Push your new trained model on the Hub 🔥
- Improving the implementation for more complex environments (for instance, what about changing the network to a Convolutional Neural Network to handle
frames as observation)?
Congrats on finishing this unit! There was a lot of information.
And congrats on finishing the tutorial. You’ve just coded your first Deep Reinforcement Learning agent from scratch using PyTorch and shared it on the Hub 🥳.
训练更多步骤尝试不同的超参数,看看你的同学在https://huggingface.co/models?other=reinforcePush👉🔥上新训练的模型为更复杂的环境改进实施情况来尝试不同的超参数(例如,将网络更改为卷积神经网络以将帧作为观测处理)?祝贺完成本单元!有很多信息。并祝贺您完成了本教程。您已经使用PyTorch从头开始编写了第一个深度强化学习代理,并将其共享到中心🥳上。
Don’t hesitate to iterate on this unit by improving the implementation for more complex environments (for instance, what about changing the network to a Convolutional Neural Network to handle
frames as observation)?
毫不犹豫地通过改进更复杂环境的实现来迭代此单元(例如,将网络更改为卷积神经网络以将帧作为观测处理)如何?
In the next unit, we’re going to learn more about Unity MLAgents, by training agents in Unity environments. This way, you will be ready to participate in the AI vs AI challenges where you’ll train your agents
to compete against other agents in a snowball fight and a soccer game.
在下一单元中,我们将通过在Unity环境中培训代理来学习更多关于Unity MLAgents的知识。通过这种方式,你将准备好参加AI VS AI挑战,在那里你将训练你的代理在打雪仗和足球比赛中与其他代理竞争。
Sounds fun? See you next time!
听起来很有趣?下次见!
Finally, we would love to hear what you think of the course and how we can improve it. If you have some feedback then, please 👉 fill this form
最后,我们很想听听您对这门课程的看法,以及我们如何改进它。如果您有任何反馈,请👉填写此表格
See you in Unit 5! 🔥
第5单元见!🔥