E4-Unit_2-Introduction_to_Q_Learning-L11-on
中英文对照学习,效果更佳!
原课程链接:https://huggingface.co/deep-rl-course/unit4/hands-on?fw=pt
Hands-on
亲身实践

![]()
在Colab中公开提问
Now that we studied the Q-Learning algorithm, let’s implement it from scratch and train our Q-Learning agent in two environments:
现在我们学习了Q-Learning算法,让我们从头开始实现它,并在两个环境中训练我们的Q-Learning代理:
- Frozen-Lake-v1 (non-slippery and slippery version) ☃️ : where our agent will need to go from the starting state (S) to the goal state (G) by walking only on frozen tiles (F) and avoiding holes (H).
- An autonomous taxi 🚖 will need to learn to navigate a city to transport its passengers from point A to point B.
Thanks to a leaderboard, you’ll be able to compare your results with other classmates and exchange the best practices to improve your agent’s scores. Who will win the challenge for Unit 2?
冷冻-湖-v1(非滑行版本)☃️:我们的代理只需在冰冻的瓷砖(F)上行走并避免打洞(H),就可以从开始状态(S)快速进入目标状态(G)。自动驾驶出租车🚖将需要学习在城市中导航,将乘客从A点运送到B点。环境由于排行榜,您将能够将您的结果与其他同学比较,并交流最佳实践以提高您的代理的分数。谁将赢得第二单元的挑战?
If you don’t find your model, go to the bottom of the page and click on the refresh button.
如果您没有找到您的模型,请转到页面底部并单击刷新按钮。
To validate this hands-on for the certification process, you need to push your trained Taxi model to the Hub and get a result of >= 4.5.
要验证认证流程的实际操作,您需要将经过培训的Taxi车型推送到中心,并获得>=4.5的结果。
To find your result, go to the leaderboard and find your model, the result = mean_reward - std of reward
要找到您的结果,请转到排行榜并找到您的模型,结果=均值_奖励-奖励的标准
For more information about the certification process, check this section 👉 https://huggingface.co/deep-rl-course/en/unit0/introduction#certification-process
有关认证过程的更多信息,请查看https://huggingface.co/deep-rl-course/en/unit0/introduction#certification-process👉这一节
And you can check your progress here 👉 https://huggingface.co/spaces/ThomasSimonini/Check-my-progress-Deep-RL-Course
您可以在https://huggingface.co/spaces/ThomasSimonini/Check-my-progress-Deep-RL-Course👉此处查看您的进度
To start the hands-on click on Open In Colab button 👇 :
要开始动手操作,请单击以可乐打开按钮👇:
![]()
在Colab开业
Unit 2: Q-Learning with FrozenLake-v1 ⛄ and Taxi-v3 🚕
单元2:使用FrozenLake-v1⛄和Taxi-v3🚕进行Q-学习
In this notebook, you’ll code from scratch your first Reinforcement Learning agent playing FrozenLake ❄️ using Q-Learning, share it to the community, and experiment with different configurations.
单元2缩略图在本笔记本中,您将使用Q-❄️从头开始编写您的第一个强化学习代理来玩冰冻湖学习,并将其分享给社区,并尝试不同的配置。
⬇️ Here is an example of what you will achieve in just a couple of minutes. ⬇️
⬇️这里是您将在短短几分钟内实现的一个示例。⬇️
环境
🎮 Environments:
🎮环境:
📚 RL-Library:
FrozenLake-v1Taxi-v3📚RL-图书馆:
- Python and NumPy
- Gym
We’re constantly trying to improve our tutorials, so if you find some issues in this notebook, please open an issue on the GitHub Repo.
我们一直在努力改进我们的教程,所以如果你在这个笔记本上发现了一些问题,请在GitHub Repo上打开一个问题。
Objectives of this notebook 🏆
此笔记本电脑🏆的目标
At the end of the notebook, you will:
在笔记本结尾处,您将:
- Be able to use Gym, the environment library.
- Be able to code from scratch a Q-Learning agent.
- Be able to push your trained agent and the code to the Hub with a nice video replay and an evaluation score 🔥.
Prerequisites 🏗️
能够使用GYM,环境库。能够从头开始编写Q-Learning代理。能够通过良好的视频回放和评估分数🔥将您培训的代理和代码推送到中心。Prerequisites🏗️
Before diving into the notebook, you need to:
🔲 📚 Study Q-Learning by reading Unit 2 🤗
在开始阅读笔记本之前,你需要:🔲📚研究Q-通过阅读单元2学习🤗
A small recap of Q-Learning
Q-Learning小结
The Q-Learning is the RL algorithm that
Q-学习是RL算法,它
- Trains Q-Function, an action-value function that contains, as internal memory, a Q-table that contains all the state-action pair values.
- Given a state and action, our Q-Function will search into its Q-table the corresponding value.
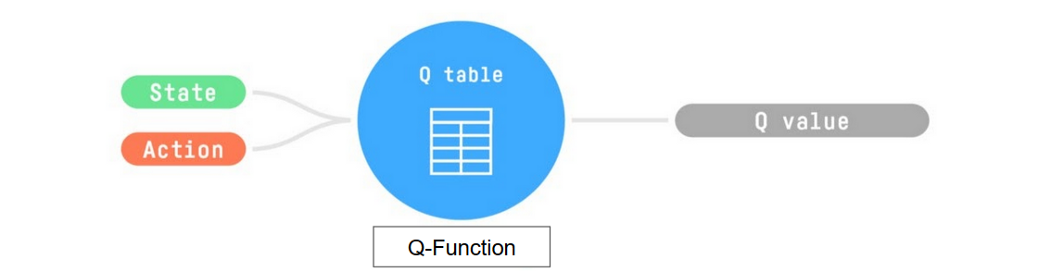
训练Q函数,这是一个动作值函数,它包含一个包含所有状态-动作对值的Q表作为内部存储器。给定一个状态和动作,我们的Q函数将在它的Q表中搜索相应的值。Q函数
- When the training is done,we have an optimal Q-Function, so an optimal Q-Table.
- And if we have an optimal Q-function, we
have an optimal policy,since we know for each state, what is the best action to take.
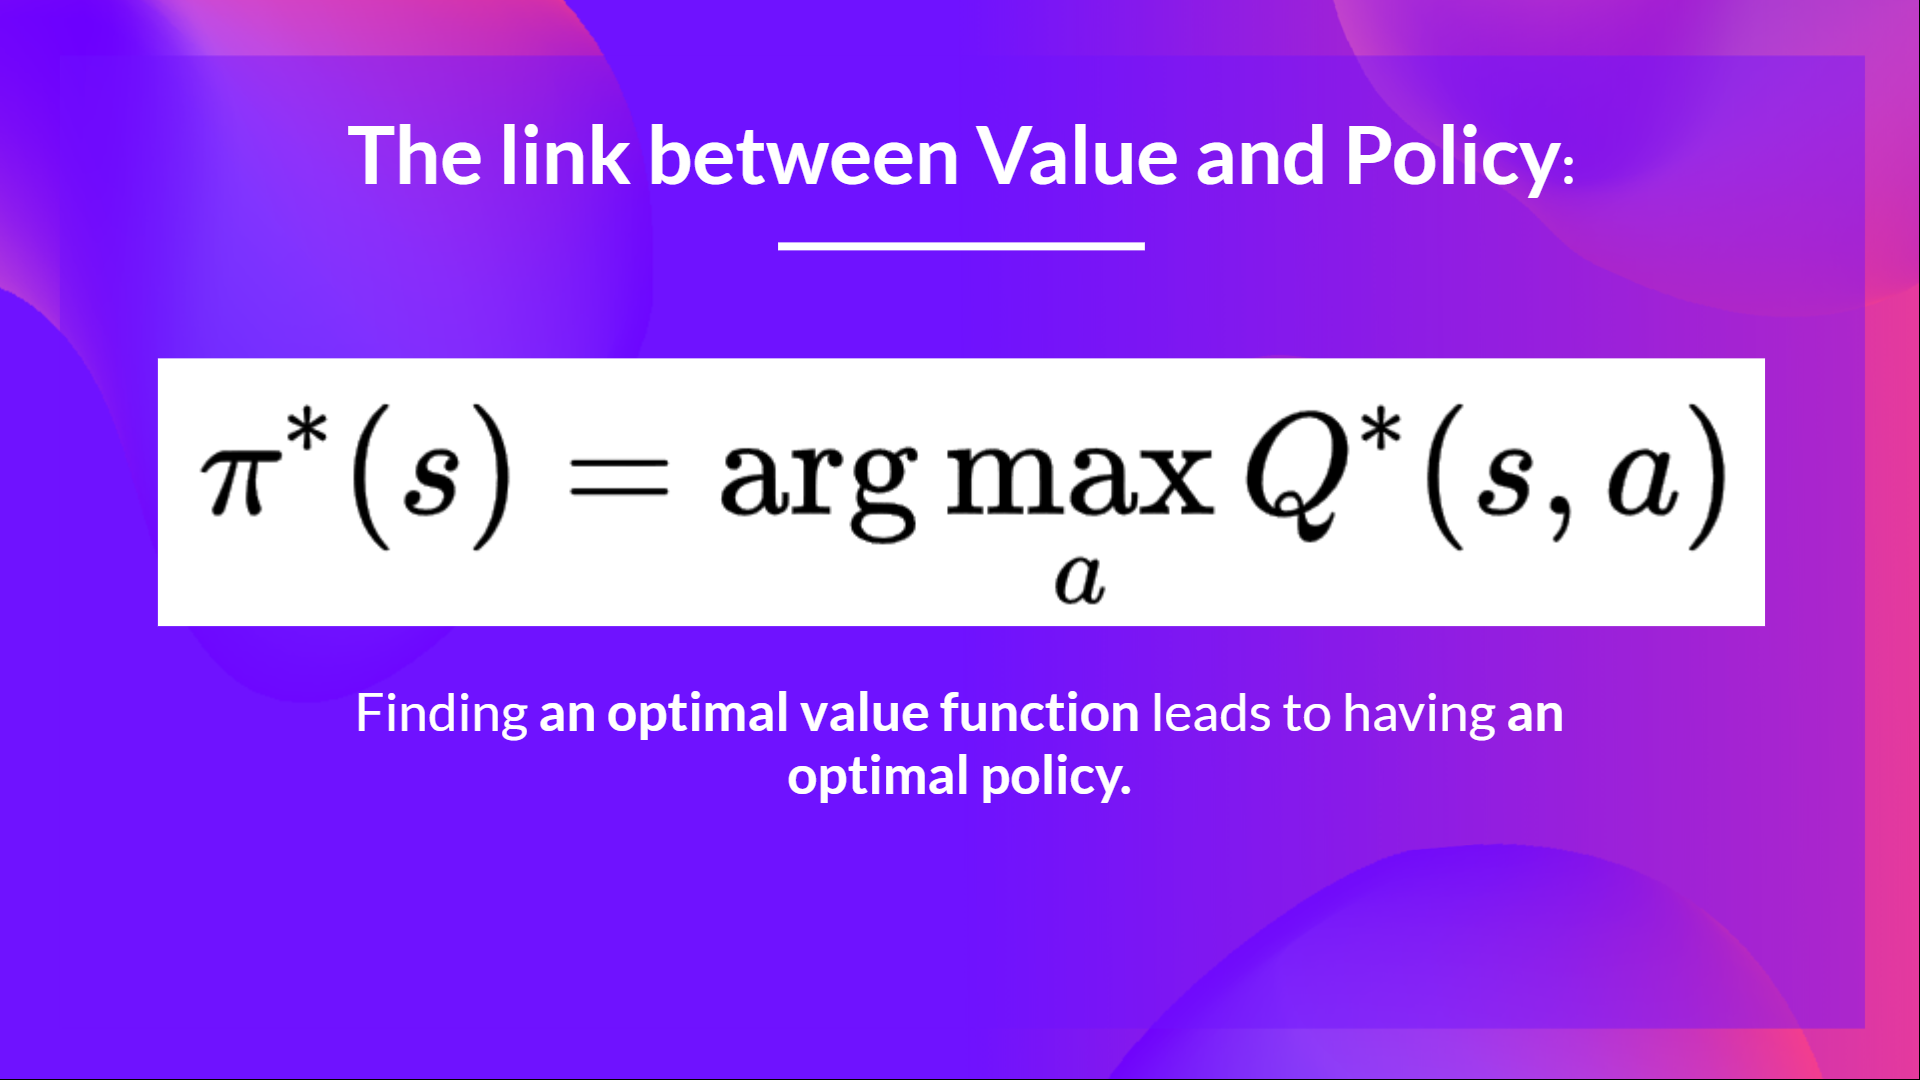
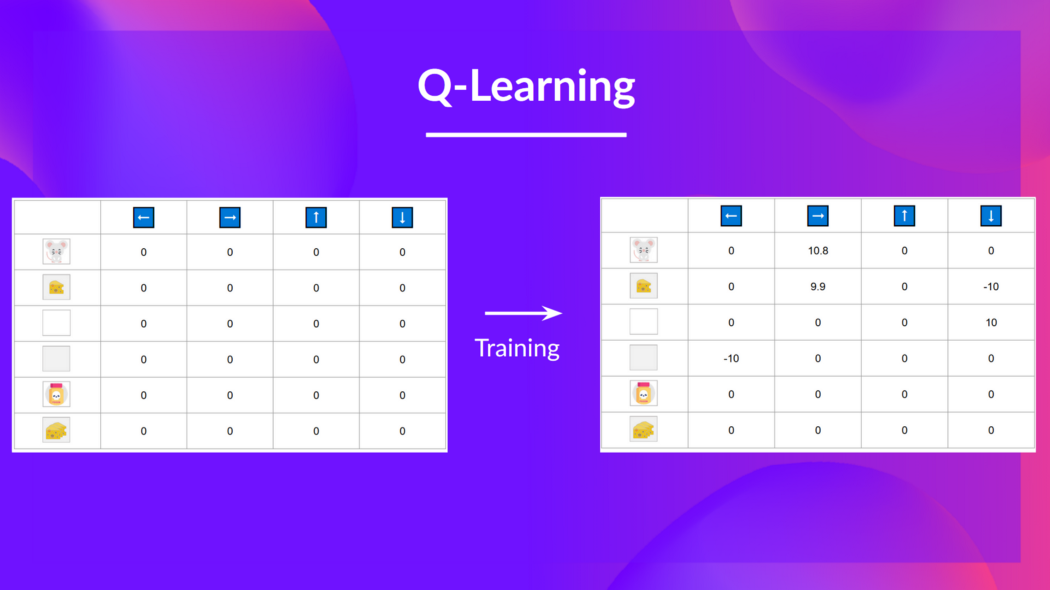
But, in the beginning, our Q-Table is useless since it gives arbitrary value for each state-action pair (most of the time we initialize the Q-Table to 0 values). But, as we’ll explore the environment and update our Q-Table it will give us better and better approximations
当训练完成时,我们有一个最优的Q-函数,也就是一个最优的Q-表。如果我们有一个最优的Q-函数,我们就有了一个最优的策略,因为我们知道对于每个状态,采取什么是最好的行动。链接值策略。但是,在一开始,我们的Q-表是没有用的,因为它给出了每个状态-动作对的任意值。(大多数时候,我们将Q-表初始化为0值)。但是,随着我们继续探索环境并更新我们的Q表,它将给我们越来越好的近似
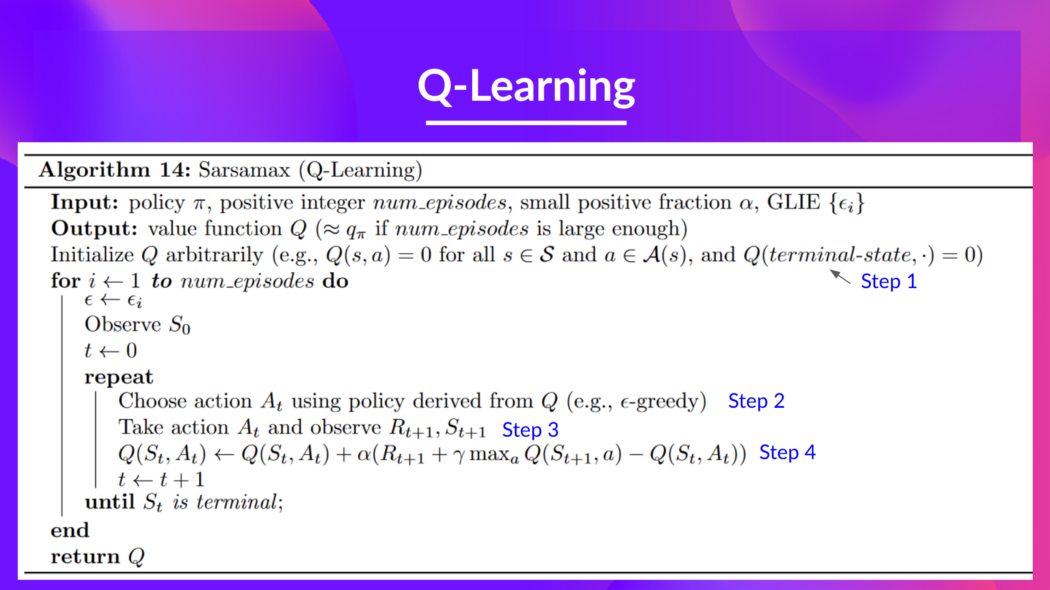
This is the Q-Learning pseudocode:
Q-learning.jpeg这是Q-Learning伪代码:
Q-学习
Let’s code our first Reinforcement Learning algorithm 🚀
让我们编写我们的第一个强化学习算法🚀
Install dependencies and create a virtual display 🔽
安装依赖项并创建虚拟显示🔽
In the notebook, we’ll need to generate a replay video. To do so, with Colab, we need to have a virtual screen to render the environment (and thus record the frames).
在笔记本中,我们需要生成回放视频。要做到这一点,使用Colab,我们需要一个虚拟屏幕来渲染环境(并因此记录帧)。
Hence the following cell will install the libraries and create and run a virtual screen 🖥
因此,下面的单元将安装库并创建和运行虚拟屏幕🖥
We’ll install multiple ones:
我们将安装多个:
gym: Contains the FrozenLake-v1 ⛄ and Taxi-v3 🚕 environments. We usegym==0.24since it contains a nice Taxi-v3 UI version.pygame: Used for the FrozenLake-v1 and Taxi-v3 UI.numpy: Used for handling our Q-table.
The Hugging Face Hub 🤗 works as a central place where anyone can share and explore models and datasets. It has versioning, metrics, visualizations and other features that will allow you to easily collaborate with others.
`gim:包含FrozenLake-v1⛄和Taxi-v3🚕环境。我们使用gym==0.24,因为它包含了一个很好的Taxi-v3 UI版本。pygame:用于FrozenLake-v1和Taxi-v3 UI。numpy`:用于处理我们的Q表。Hugging Face中心🤗是一个中心,任何人都可以在这里分享和浏览模型和数据集。它具有版本控制、指标、可视化和其他功能,使您可以轻松地与其他人协作。
You can see here all the Deep RL models available (if they use Q Learning) 👉 https://huggingface.co/models?other=q-learning
您可以在此处看到所有可用的深度RL型号(如果它们使用Q学习)https://huggingface.co/models?other=q-learning👉
1 | |
1 | |
To make sure the new installed libraries are used, sometimes it’s required to restart the notebook runtime. The next cell will force the runtime to crash, so you’ll need to connect again and run the code starting from here. Thanks for this trick, we will be able to run our virtual screen.
为了确保使用新安装的库,有时需要重新启动笔记本运行时。下一个单元将强制运行时崩溃,因此您需要再次连接并从此处开始运行代码。感谢这个技巧,我们将能够运行我们的虚拟屏幕。
1 | |
1 | |
Import the packages 📦
导入包📦
In addition to the installed libraries, we also use:
除了已安装的库之外,我们还使用:
random: To generate random numbers (that will be useful for epsilon-greedy policy).imageio: To generate a replay video.
1 | |
We’re now ready to code our Q-Learning algorithm 🔥
:生成随机数(这对于贪婪策略很有用)。Imageio:生成回放视频。我们现在准备编写Q-学习算法🔥
Part 1: Frozen Lake ⛄ (non slippery version)
第一部分:冰冻的湖⛄(防滑版本)
Create and understand FrozenLake environment ⛄
创建和理解冰冻湖环境⛄
💡 A good habit when you start to use an environment is to check its documentation
💡当您开始使用一个环境时,一个好习惯是查看它的文档
👉 https://www.gymlibrary.dev/environments/toy_text/frozen_lake/
Https://www.gymlibrary.dev/environments/toy_text/frozen_lake/👉
We’re going to train our Q-Learning agent to navigate from the starting state (S) to the goal state (G) by walking only on frozen tiles (F) and avoid holes (H).
我们将训练我们的Q-Learning代理从开始状态(S)导航到目标状态(G),方法是只在冻结的瓷砖(F)上行走,并避免洞(H)。
We can have two sizes of environment:
我们可以有两种大小的环境:
map_name="4x4": a 4x4 grid versionmap_name="8x8": a 8x8 grid version
The environment has two modes:
`map_name=“4x4”:4x4网格版本map_name=“8x8”`:8x8网格版本环境有两种模式:
is_slippery=False: The agent always moves in the intended direction due to the non-slippery nature of the frozen lake (deterministic).is_slippery=True: The agent may not always move in the intended direction due to the slippery nature of the frozen lake (stochastic).
For now let’s keep it simple with the 4x4 map and non-slippery
`is_skippery=False:由于冰湖的不滑性质(确定性),代理始终在预期的方向上移动。is_skippery=True`:由于冰湖的滑性质(随机),代理可能不总是在预期的方向上移动。现在让我们简单地使用4x4地图和防滑
1 | |
Solution
解
1 | |
You can create your own custom grid like this:
您可以创建自己的自定义格线,如下所示:
1 | |
but we’ll use the default environment for now.
但目前我们将使用默认环境。
Let’s see what the Environment looks like:
让我们看看环境是什么样子的:
1 | |
We see with Observation Space Shape Discrete(16) that the observation is an integer representing the agent’s current position as current_row * nrows + current_col (where both the row and col start at 0).
我们看到,在`观察空间形状离散(16)‘中,观测是一个整数,表示代理的当前位置为CURRENT_ROW*NROWS+CURRENT_COL(其中行和列都从0开始)。
For example, the goal position in the 4x4 map can be calculated as follows: 3 * 4 + 3 = 15. The number of possible observations is dependent on the size of the map. For example, the 4x4 map has 16 possible observations.
例如,4x4地图中的目标位置可以计算如下:3*4+3=15。可能的观测数量取决于地图的大小。例如,4x4地图有16个可能的观测。
For instance, this is what state = 0 looks like:
例如,STATE=0如下所示:

冰川湖
1 | |
The action space (the set of possible actions the agent can take) is discrete with 4 actions available 🎮:
操作空间(代理可以采取的可能操作的集合)是离散的,有4个操作可用🎮:
- 0: GO LEFT
- 1: GO DOWN
- 2: GO RIGHT
- 3: GO UP
Reward function 💰:
0:Go LEFT1:Go DOWN 2:Go RIGHT3:Go UP返回函数💰:
- Reach goal: +1
- Reach hole: 0
- Reach frozen: 0
Create and Initialize the Q-table 🗄️
达到目标:+1到达洞:0到达冻结:0创建并初始化Q表🗄️
(👀 Step 1 of the pseudocode)
It’s time to initialize our Q-table! To know how many rows (states) and columns (actions) to use, we need to know the action and observation space. We already know their values from before, but we’ll want to obtain them programmatically so that our algorithm generalizes for different environments. Gym provides us a way to do that: env.action_space.n and env.observation_space.n
(伪代码的👀第一步)Q-学习是时候初始化我们的Q表了!要知道要使用多少行(状态)和列(动作),我们需要知道动作和观察空间。我们以前已经知道它们的值,但我们希望以编程方式获得它们,以便我们的算法适用于不同的环境。健身房为我们提供了一种方法:env.action_space.n和env.action_space.n
1 | |
1 | |
1 | |
Solution
解
1 | |
1 | |
1 | |
Define the greedy policy 🤖
定义贪婪策略🤖
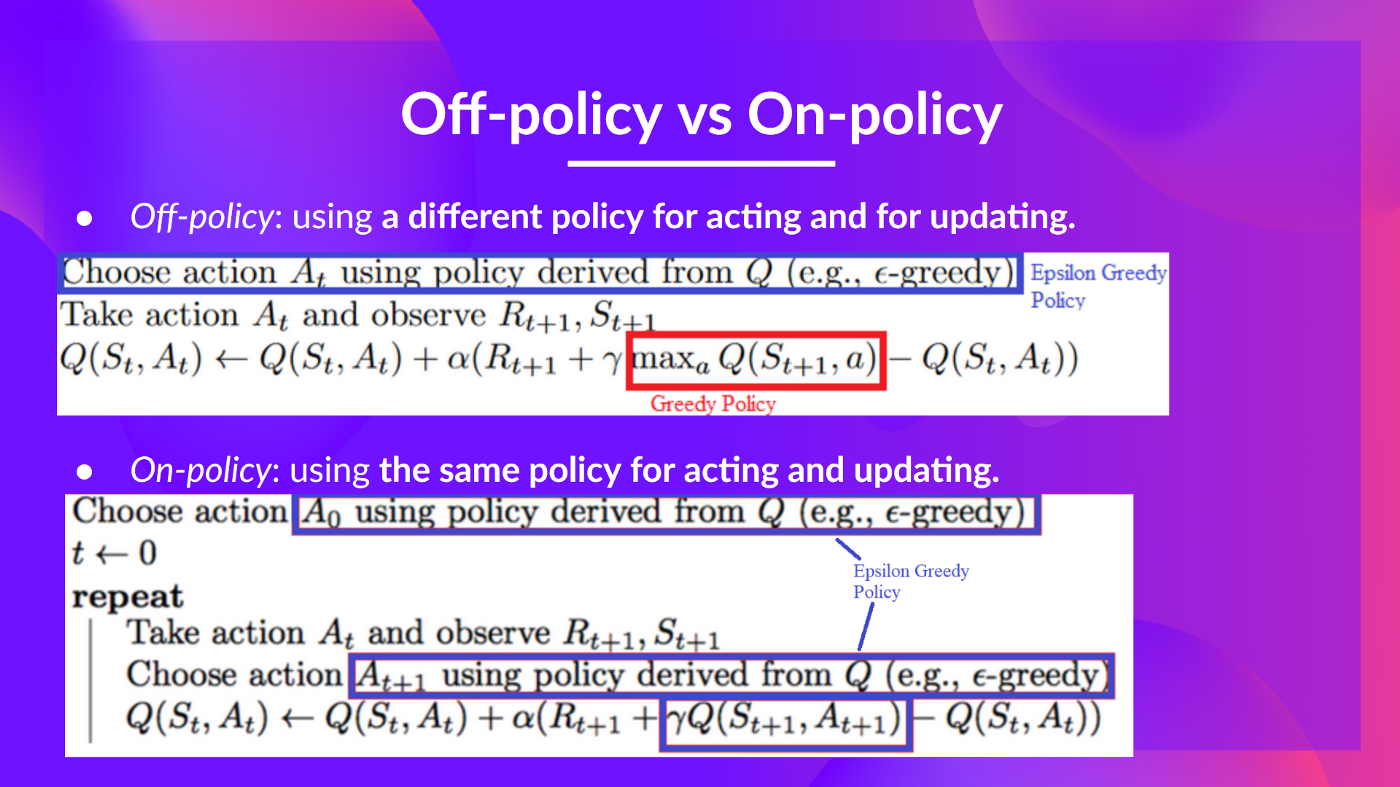
Remember we have two policies since Q-Learning is an off-policy algorithm. This means we’re using a different policy for acting and updating the value function.
请记住,我们有两个策略,因为Q-Learning是一个非策略算法。这意味着我们使用不同的策略来操作和更新Value函数。
- Epsilon-greedy policy (acting policy)
- Greedy-policy (updating policy)
Greedy policy will also be the final policy we’ll have when the Q-learning agent will be trained. The greedy policy is used to select an action from the Q-table.
Epsilon-贪婪策略(代理策略)贪婪策略(更新策略)贪婪策略也将是我们将在训练Q-学习代理时拥有的最终策略。贪婪策略用于从Q表中选择动作。
Q-学习
1 | |
Solution
解
1 | |
##Define the epsilon-greedy policy 🤖
##定义epsilon贪婪策略🤖
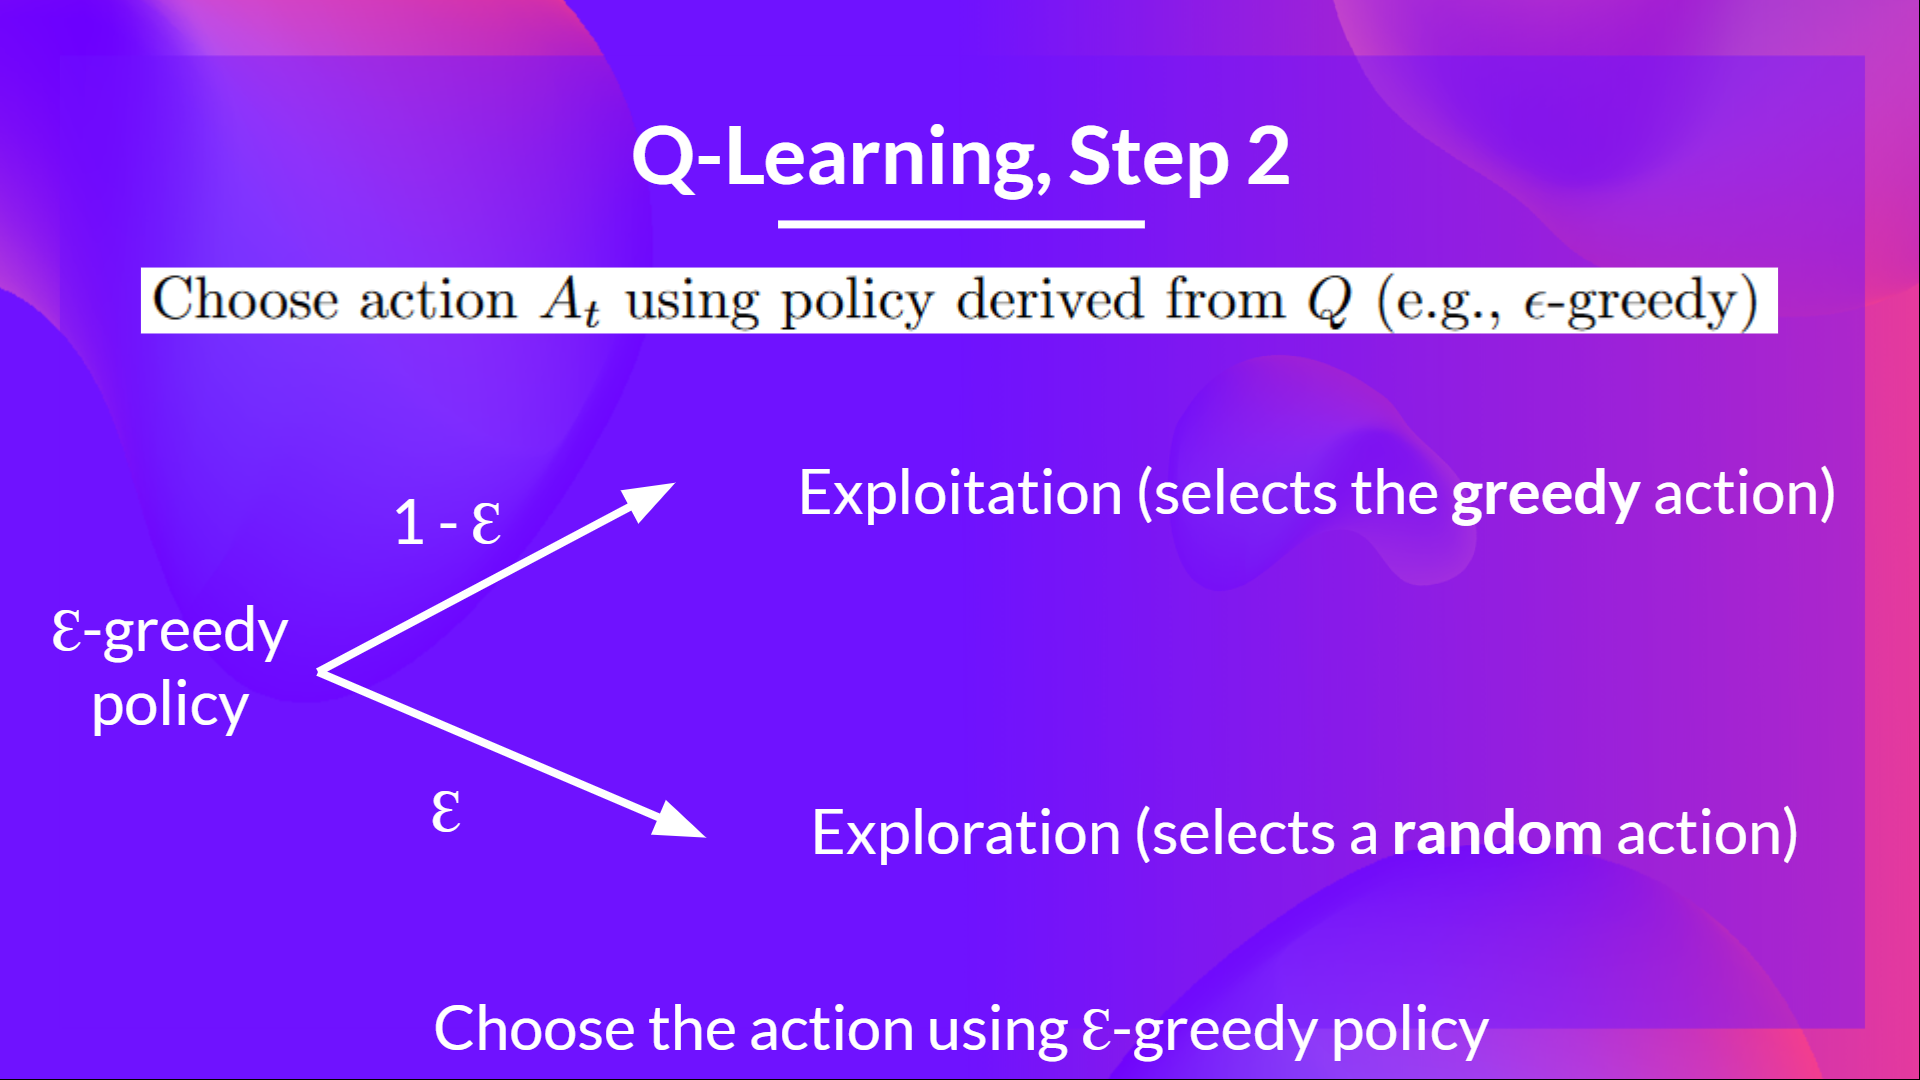
Epsilon-greedy is the training policy that handles the exploration/exploitation trade-off.
Epsilon-贪婪是一种处理勘探/开采权衡的培训策略。
The idea with epsilon-greedy:
埃西隆-贪婪的想法:
- With probability 1 - ɛ : we do exploitation (i.e. our agent selects the action with the highest state-action pair value).
- With probability ɛ: we do exploration (trying random action).
And as the training goes, we progressively reduce the epsilon value since we will need less and less exploration and more exploitation.
概率为1的 - ɛ:我们进行利用(即我们的代理选择具有最高状态-动作对值的动作)。概率ɛ:我们进行探索(尝试随机动作)。随着培训的进行,我们逐渐降低epsilon值,因为我们将需要越来越少的探索和更多的利用。
Q-学习
1 | |
Solution
解
1 | |
Define the hyperparameters ⚙️
定义超级参数⚙️
The exploration related hyperparameters are some of the most important ones.
与勘探相关的超参数是最重要的参数之一。
- We need to make sure that our agent explores enough of the state space to learn a good value approximation. To do that, we need to have progressive decay of the epsilon.
- If you decrease epsilon too fast (too high decay_rate), you take the risk that your agent will be stuck, since your agent didn’t explore enough of the state space and hence can’t solve the problem.
1 | |
Create the training loop method
我们需要确保我们的代理探索足够的状态空间来学习良好的值近似。要做到这一点,我们需要使epsilon逐步衰减。如果您将epsilon降低得太快(Decay_Rate太高),您的代理将面临被卡住的风险,因为您的代理没有探索足够的状态空间,因此无法解决问题。创建训练循环方法
The training loop goes like this:
Q-学习培训循环是这样的:
1 | |
1 | |
Solution
解
1 | |
Train the Q-Learning agent 🏃
训练Q-学习代理🏃
1 | |
Let’s see what our Q-Learning table looks like now 👀
让我们看看我们的Q-Learning表现在是什么样子,👀
1 | |
The evaluation method 📝
评价方法📝
- We defined the evaluation method that we’re going to use to test our Q-Learning agent.
1 | |
Evaluate our Q-Learning agent 📈
我们定义了将用于测试Q-学习代理的评估方法。评估我们的Q-学习代理📈
- Usually, you should have a mean reward of 1.0
- The environment is relatively easy since the state space is really small (16). What you can try to do is to replace it with the slippery version, which introduces stochasticity, making the environment more complex.
1 | |
Publish our trained model to the Hub 🔥
通常,你应该有1.0的平均回报环境相对容易,因为状态空间真的很小(16)。您可以尝试将其替换为滑动版本,该版本引入了随机性,使环境变得更加复杂。将我们训练的模型发布到中心🔥
Now that we saw good results after the training, we can publish our trained model to the Hub 🤗 with one line of code.
现在我们看到了培训后的良好结果,我们可以用一行代码将我们训练过的模型发布到HubHub🤗。
Here’s an example of a Model Card:
以下是一个模型卡的示例:
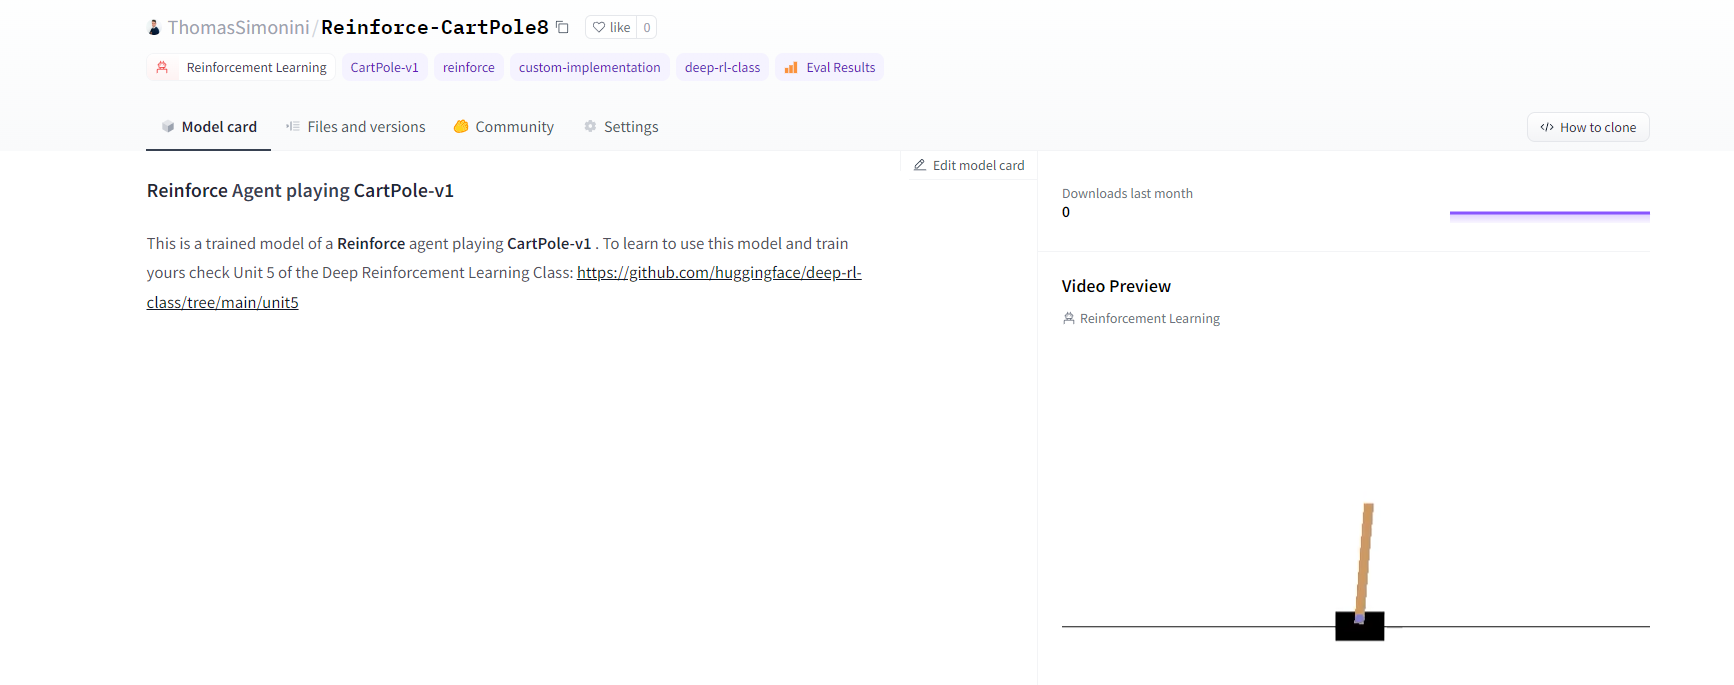
Under the hood, the Hub uses git-based repositories (don’t worry if you don’t know what git is), which means you can update the model with new versions as you experiment and improve your agent.
在引擎盖下的模型卡中,Hub使用基于Git的存储库(如果您不知道Git是什么也不用担心),这意味着您可以在试验和改进代理时使用新版本更新模型。
Do not modify this code
请勿修改此代码
1 | |
1 | |
1 | |
“””
“”
1 | |
1 | |
If you don’t want to use a Google Colab or a Jupyter Notebook, you need to use this command instead: huggingface-cli login (or login)
如果你不想使用Google Colab或Jupyter笔记本,你需要使用以下命令:huggingfacecli login(或login)
3️⃣ We’re now ready to push our trained agent to the 🤗 Hub 🔥 using push_to_hub() function
3️集线器我们现在可以使用🤗_to_🔥()函数将经过培训的代理推送到⃣集线器
- Let’s create the model dictionary that contains the hyperparameters and the Q_table.
1 | |
Let’s fill the push_to_hub function:
让我们创建包含超参数和Q_TABLE的模型字典。让我们填充ush_to_hub函数:
repo_id: the name of the Hugging Face Hub Repository that will be created/updated(repo_id = {username}/{repo_name})
💡 A goodrepo_idis{username}/q-{env_id}model: our model dictionary containing the hyperparameters and the Qtable.env: the environment.commit_message: message of the commit
1 | |
1 | |
Congrats 🥳 you’ve just implemented from scratch, trained and uploaded your first Reinforcement Learning agent.
FrozenLake-v1 no_slippery is very simple environment, let’s try an harder one 🔥.
`repo_id:将要创建和更新的Hugging Face集线器仓库的名称(repo_id={用户名}/{repo_💡})Model一个好的repo_id是{用户名}/q-{env_id}``🥳:我们的模型字典,包含超参数和Qtable。env:环境。Commit_Message`:刚刚实现的、从头开始训练并上传了第一个强化学习代理的提交祝贺消息。冰冻湖-v1 no_lippery是一个非常简单的环境,让我们来尝试一个更难的🔥。
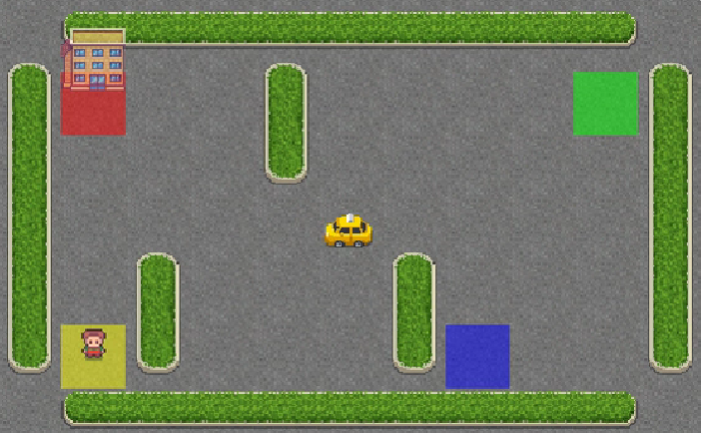
Part 2: Taxi-v3 🚖
第2部分:出租车-v3🚖
Create and understand Taxi-v3 🚕
创建并了解出租车-v3🚕
💡 A good habit when you start to use an environment is to check its documentation
💡当您开始使用一个环境时,一个好习惯是查看它的文档
👉 https://www.gymlibrary.dev/environments/toy_text/taxi/
Https://www.gymlibrary.dev/environments/toy_text/taxi/👉
In Taxi-v3 🚕, there are four designated locations in the grid world indicated by R(ed), G(reen), Y(ellow), and B(lue).
在Taxi-v3🚕中,网格世界中有四个指定位置,分别由R(Ed)、G(Reen)、Y(Low)和B(Lue)表示。
When the episode starts, the taxi starts off at a random square and the passenger is at a random location. The taxi drives to the passenger’s location, picks up the passenger, drives to the passenger’s destination (another one of the four specified locations), and then drops off the passenger. Once the passenger is dropped off, the episode ends.
当这一集开始时,出租车从一个随机的广场出发,乘客在一个随机的位置。出租车开到乘客的位置,载上乘客,开车到乘客的目的地(四个指定地点中的另一个),然后下车。一旦乘客下车,这一幕就结束了。
出租车
1 | |
There are 500 discrete states since there are 25 taxi positions, 5 possible locations of the passenger (including the case when the passenger is in the taxi), and 4 destination locations.
由于有25个出租车位置、5个可能的乘客位置(包括乘客在出租车上的情况)和4个目的地位置,因此存在500个离散状态。
1 | |
1 | |
The action space (the set of possible actions the agent can take) is discrete with 6 actions available 🎮:
操作空间(代理可以采取的可能操作的集合)是离散的,有6个操作可用🎮:
- 0: move south
- 1: move north
- 2: move east
- 3: move west
- 4: pickup passenger
- 5: drop off passenger
Reward function 💰:
0:向南移动1:向北移动2:向东移动3:向西移动4:接送乘客5:接送乘客返回函数💰:
- -1 per step unless other reward is triggered.
- +20 delivering passenger.
- -10 executing “pickup” and “drop-off” actions illegally.
1 | |
Define the hyperparameters ⚙️
除非触发其他奖励,否则每一步-1\f25+20-10\f6运送乘客。非法执行-10\f25“-10\f6和-10\f25”-10\f25“-10\f6操作。定义超参数-10\f25⚙️-10
⚠ DO NOT MODIFY EVAL_SEED: the eval_seed array allows us to evaluate your agent with the same taxi starting positions for every classmate
⚠请勿修改EVAL_SEED:EVAL_SEED数组允许我们使用每个同学相同的出租车起始位置来评估您的代理
1 | |
Train our Q-Learning agent 🏃
培训我们的Q-学习代理🏃
1 | |
Create a model dictionary 💾 and publish our trained model to the Hub 🔥
创建模型词典💾并将我们训练好的模型发布到中心🔥
- We create a model dictionary that will contain all the training hyperparameters for reproducibility and the Q-Table.
1 | |
1 | |
Now that’s on the Hub, you can compare the results of your Taxi-v3 with your classmates using the leaderboard 🏆 👉 https://huggingface.co/spaces/huggingface-projects/Deep-Reinforcement-Learning-Leaderboard
我们创建了一个模型词典,其中将包含有关可重复性和Q表的所有训练超参数。现在,您可以使用排行榜https://huggingface.co/spaces/huggingface-projects/Deep-Reinforcement-Learning-Leaderboard🏆👉将您的出租车v3与您的同学进行比较
⚠ To see your entry, you need to go to the bottom of the leaderboard page and click on refresh ⚠
⚠要查看您的条目,您需要转到排行榜页面的底部,然后单击刷新⚠
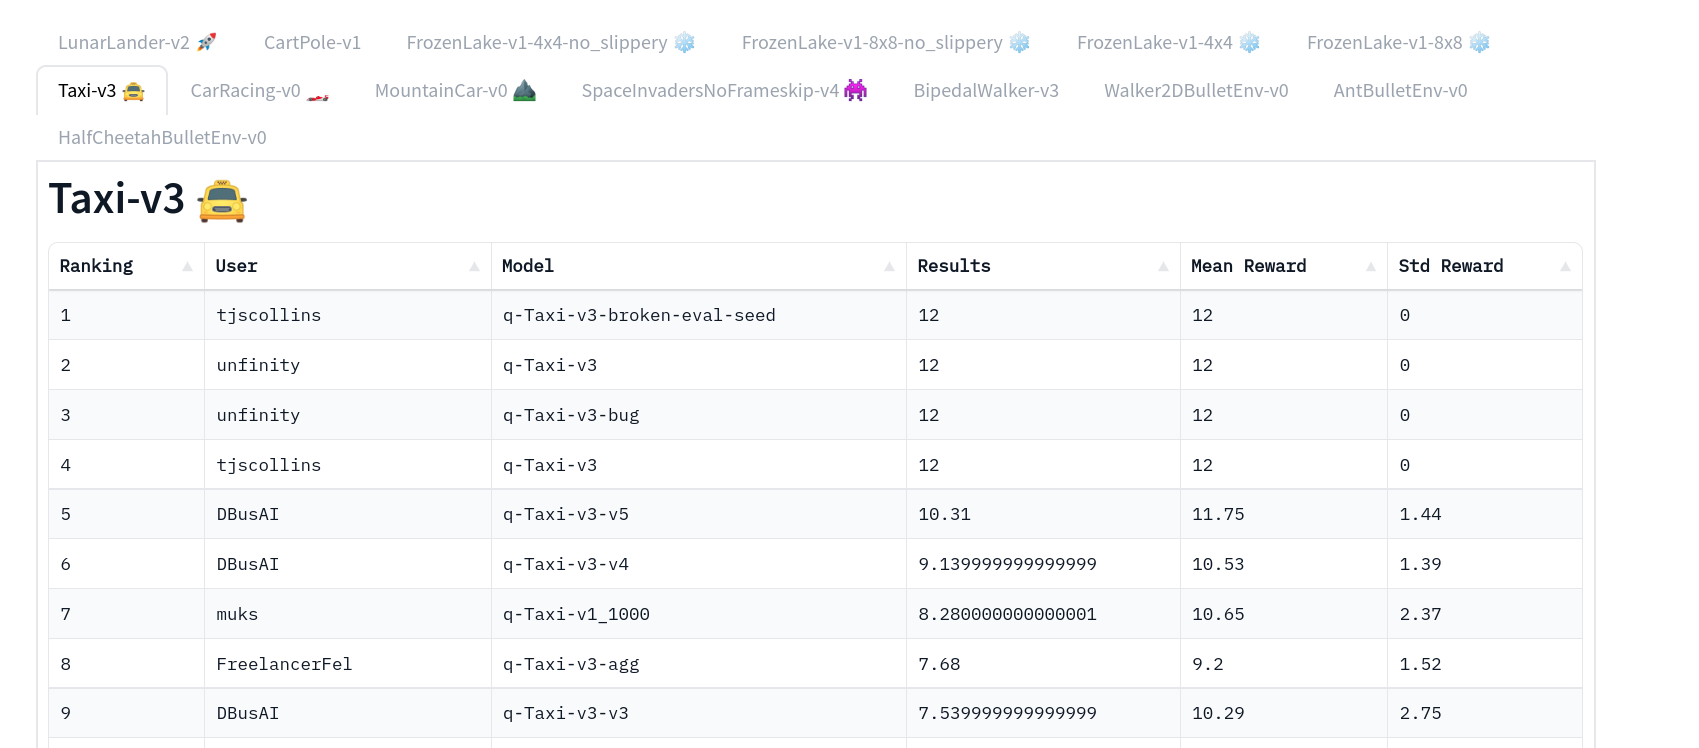
出租车排行榜
Part 3: Load from Hub 🔽
第3部分:从集线器🔽加载
What’s amazing with Hugging Face Hub 🤗 is that you can easily load powerful models from the community.
拥抱Face Hub🤗的神奇之处在于,你可以轻松地从社区加载强大的模型。
Loading a saved model from the Hub is really easy:
从集线器加载保存的模型非常简单:
- You go https://huggingface.co/models?other=q-learning to see the list of all the q-learning saved models.
- You select one and copy its repo_id

3. Then we just need to use load_from_hub with:
转到https://huggingface.co/models?other=q-learning查看所有Q学习保存的模型列表。选择一个并复制其repo_idCopy id 3。然后我们只需要使用Load_From_Hub,其中:
- The repo_id
- The filename: the saved model inside the repo.
Do not modify this code
Repo_id文件名:repo中保存的模型。请勿修改此代码
1 | |
.
。
1 | |
1 | |
Some additional challenges 🏆
🏆面临的一些额外挑战
The best way to learn is to try things by your own! As you saw, the current agent is not doing great. As a first suggestion, you can train for more steps. With 1,000,000 steps, we saw some great results!
In the Leaderboard you will find your agents. Can you get to the top?
学习的最好方法就是自己去尝试!如你所见,目前的代理做得不是很好。作为第一个建议,你可以训练更多的步数。一百万步,我们看到了一些很棒的结果!在排行榜上,你会找到你的代理人。你能爬到山顶吗?
Here are some ideas to achieve so:
以下是实现这一目标的一些想法:
- Train more steps
- Try different hyperparameters by looking at what your classmates have done.
- Push your new trained model on the Hub 🔥
Are walking on ice and driving taxis too boring to you? Try to change the environment, why not using FrozenLake-v1 slippery version? Check how they work using the gym documentation and have fun 🎉.
训练更多的步数通过观察你的同学做了什么来尝试不同的超参数。把你的新训练的模型推到Hub🔥上,在冰上行走,开出租车对你来说太无聊了吗?试着改变环境,为什么不用FrozenLake-v1滑行版本呢?使用健身房文档检查它们是如何工作的,并享受有趣的🎉。
Congrats 🥳, you’ve just implemented, trained, and uploaded your first Reinforcement Learning agent.
祝贺🥳,您刚刚实现、培训并上传了您的第一个强化学习代理。
Understanding Q-Learning is an important step to understanding value-based methods.
理解Q-学习是理解基于价值的方法的重要一步。
In the next Unit with Deep Q-Learning, we’ll see that creating and updating a Q-table was a good strategy — however, this is not scalable.
在下一单元的深度Q-学习中,我们将看到创建和更新Q表是一个很好的策略–然而,这是不可伸缩的。
For instance, imagine you create an agent that learns to play Doom.
例如,假设您创建了一个学习扮演末日的代理。
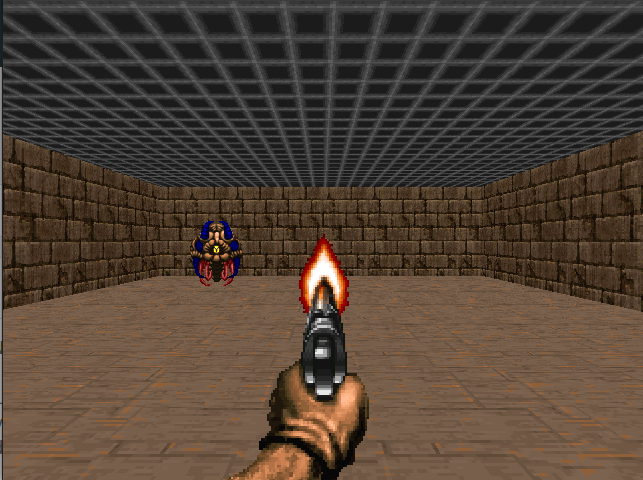
Doom is a large environment with a huge state space (millions of different states). Creating and updating a Q-table for that environment would not be efficient.
Doom Doom是一个具有巨大状态空间(数百万个不同状态)的大型环境。为该环境创建和更新Q表将不会有效率。
That’s why we’ll study, in the next unit, Deep Q-Learning, an algorithm where we use a neural network that approximates, given a state, the different Q-values for each action.
这就是为什么我们将在下一单元中学习深度Q-学习,这是一种算法,我们使用神经网络来逼近给定的状态,每个动作的不同Q值。
See you on Unit 3! 🔥
环境与您在第3单元见!🔥