B1-Unit_1-Introduction_to_Deep_Reinforcement_Learning-J9-on
中英文对照学习,效果更佳!
原课程链接:https://huggingface.co/deep-rl-course/unit1/additional-readings?fw=pt
Train your first Deep Reinforcement Learning Agent 🤖
训练你的第一个深度强化学习代理🤖

![]()
在Colab中公开提问
Now that you’ve studied the bases of Reinforcement Learning, you’re ready to train your first agent and share it with the community through the Hub 🔥:
A Lunar Lander agent that will learn to land correctly on the Moon 🌕
现在您已经学习了强化学习的基础,您已经准备好培训您的第一个代理并通过中心🔥与社区共享它:一个将学习正确着陆在月球🌕上的月球着陆器代理
And finally, you’ll upload this trained agent to the Hugging Face Hub 🤗, a free, open platform where people can share ML models, datasets, and demos.
最后,您将把这个训练有素的特工上传到Hugging Face中心🤗,这是一个免费、开放的平台,人们可以在这里分享ML模型、数据集和演示。
Thanks to our leaderboard, you’ll be able to compare your results with other classmates and exchange the best practices to improve your agent’s scores. Who will win the challenge for Unit 1 🏆?
多亏了我们的排行榜,你将能够与其他同学比较你的成绩,并交流最佳实践,以提高你的代理的分数。谁将赢得单元1🏆的挑战?
To validate this hands-on for the certification process, you need to push your trained model to the Hub and get a result of >= 200.
要验证认证流程的实际操作,您需要将经过培训的模型推送到中心,并获得>=200的结果。
To find your result, go to the leaderboard and find your model, the result = mean_reward - std of reward
要找到您的结果,请转到排行榜并找到您的模型,结果=均值_奖励-奖励的标准
If you don’t find your model, go to the bottom of the page and click on the refresh button.
如果您没有找到您的模型,请转到页面底部并单击刷新按钮。
For more information about the certification process, check this section 👉 https://huggingface.co/deep-rl-course/en/unit0/introduction#certification-process
有关认证过程的更多信息,请查看https://huggingface.co/deep-rl-course/en/unit0/introduction#certification-process👉这一节
And you can check your progress here 👉 https://huggingface.co/spaces/ThomasSimonini/Check-my-progress-Deep-RL-Course
您可以在https://huggingface.co/spaces/ThomasSimonini/Check-my-progress-Deep-RL-Course👉此处查看您的进度
So let’s get started! 🚀
那么让我们开始吧!🚀
To start the hands-on click on Open In Colab button 👇 :
要开始动手操作,请单击以可乐打开按钮👇:
![]()
在Colab开业
You can either do this hands-on by reading the notebook or following it with the video tutorial 📹 :
您可以通过阅读笔记本或观看视频教程📹来实际操作:
Unit 1: Train your first Deep Reinforcement Learning Agent 🤖
单元1:培训您的第一个深度强化学习代理🤖
In this notebook, you’ll train your first Deep Reinforcement Learning agent a Lunar Lander agent that will learn to land correctly on the Moon 🌕. Using Stable-Baselines3 a Deep Reinforcement Learning library, share them with the community, and experiment with different configurations
单元1缩略图在本笔记本中,你将训练你的第一个深度强化学习代理,一个将学习正确着陆在月球🌕上的月球着陆器代理。使用稳定基线3深度强化学习库,与社区共享它们,并尝试不同的配置
The environment 🎮
The Environment🎮(环境指南)
The library used 📚
LUNARLANDER-v2库使用📚
We’re constantly trying to improve our tutorials, so if you find some issues in this notebook, please open an issue on the Github Repo.
稳定-基线3我们一直在努力改进我们的教程,所以如果你在这个笔记本中发现了一些问题,请在Github Repo上打开一个问题。
Objectives of this notebook 🏆
此笔记本电脑🏆的目标
At the end of the notebook, you will:
在笔记本结尾处,您将:
- Be able to use Gym, the environment library.
- Be able to use Stable-Baselines3, the deep reinforcement learning library.
- Be able to push your trained agent to the Hub with a nice video replay and an evaluation score 🔥.
This hands-on is from Deep Reinforcement Learning Course
能够使用GYM,环境库。能够使用稳定基线3,深度强化学习库。能够通过良好的视频回放和评估分数🔥将您训练的代理推到中心。此动手操作来自深度强化学习课程
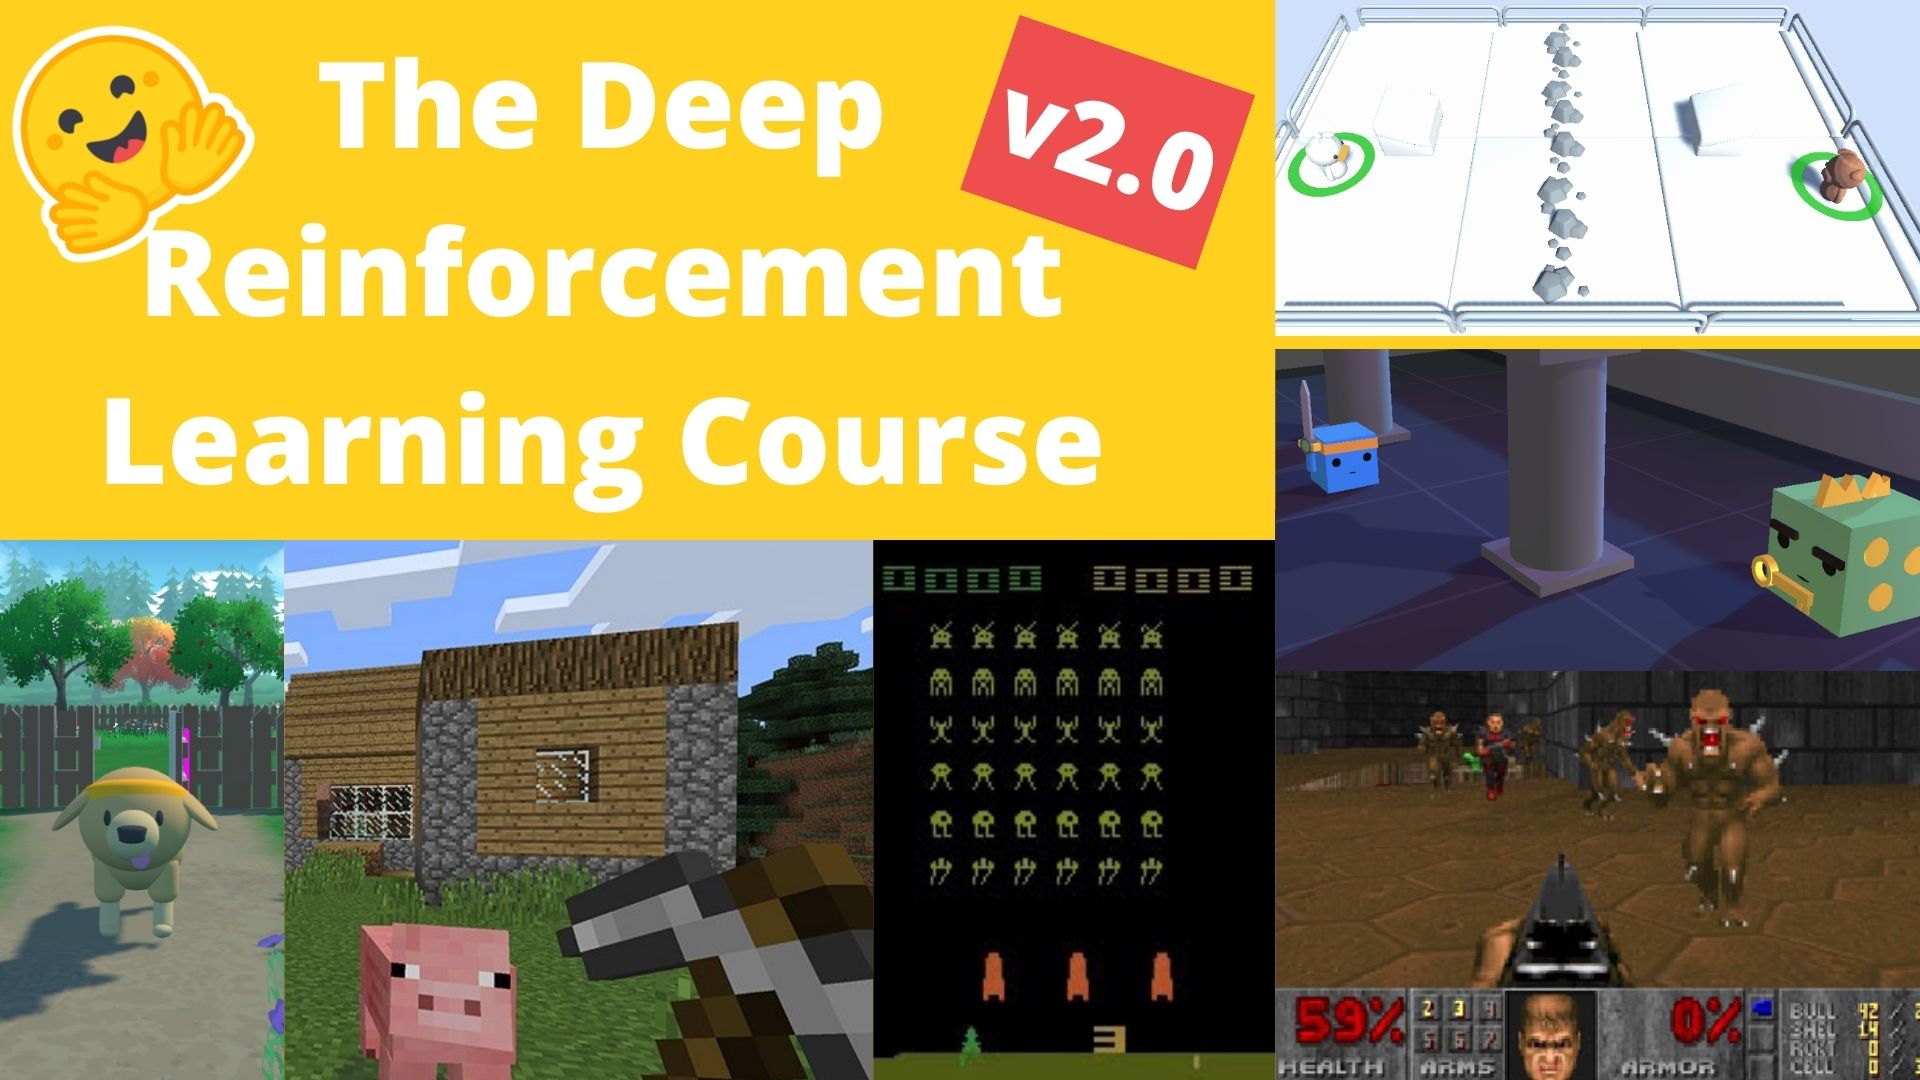
In this free course, you will:
深度RL课程插图在此免费课程中,您将:
- 📖 Study Deep Reinforcement Learning in theory and practice.
- 🧑💻 Learn to use famous Deep RL libraries such as Stable Baselines3, RL Baselines3 Zoo, CleanRL and Sample Factory 2.0.
- 🤖 Train agents in unique environments
And more check 📚 the syllabus 👉 https://simoninithomas.github.io/deep-rl-course
在理论和实践中学习深度强化学习。学习使用著名的https://simoninithomas.github.io/deep-rl-course RL库,如稳定基线3、RL基线3动物园、CleanRL和Sample Factory 2.0。在独特的环境中培训代理📚更多地查看👉Deep RL的教学大纲
Don’t forget to sign up to the course (we are collecting your email to be able to send you the links when each Unit is published and give you information about the challenges and updates).
别忘了注册课程(我们正在收集您的电子邮件,以便能够在每个单元发布时向您发送链接,并为您提供有关挑战和更新的信息)。
The best way to keep in touch and ask questions is to join our discord server to exchange with the community and with us 👉🏻 https://discord.gg/ydHrjt3WP5
保持联系和提问的最好方式是加入我们的Discord服务器,与社区和我们的https://discord.gg/ydHrjt3WP5👉🏻交流
Prerequisites 🏗️
必备条件🏗️
Before diving into the notebook, you need to:
🔲 📝 Read Unit 0 that gives you all the information about the course and help you to onboard 🤗
在开始阅读笔记本之前,您需要:🔲📝阅读单元0,它为您提供了有关课程的所有信息,并帮助您加入🤗
🔲 📚 Develop an understanding of the foundations of Reinforcement learning by reading Unit 1
🔲📚通过阅读单元1来理解强化学习的基础
A small recap of what is Deep Reinforcement Learning 📚
什么是深度强化学习📚的小结
Let’s do a small recap on what we learned in the first Unit:
RL过程让我们对我们在第一单元中学到的内容做一个小结:
- Reinforcement Learning is a computational approach to learning from action. We build an agent that learns from the environment by interacting with it through trial and error and receiving rewards (negative or positive) as feedback.
- The goal of any RL agent is to maximize its expected cumulative reward (also called expected return) because RL is based on the reward hypothesis, which is that all goals can be described as the maximization of the expected cumulative reward.
- The RL process is a loop that outputs a sequence of state, action, reward, and next state.
- To calculate the expected cumulative reward (expected return), we discount the rewards: the rewards that come sooner (at the beginning of the game) are more probable to happen since they are more predictable than the long-term future reward.
- To solve an RL problem, you want to find an optimal policy; the policy is the “brain” of your AI that will tell us what action to take given a state. The optimal one is the one that gives you the actions that max the expected return.
There are two ways to find your optimal policy:
强化学习是一种从行动中学习的计算方法。我们构建了一个从环境中学习的智能体,它通过反复尝试与环境进行交互,并接受回报(负或正)作为反馈。任何RL智能体的目标都是最大化其预期累积回报(也称为预期回报),因为RL基于回报假设,即所有目标都可以描述为预期累积回报的最大化。RL过程是一个循环,输出状态、动作、奖励和下一个状态的序列。为了计算预期累积回报(预期回报),我们对奖励打折扣:更早到来的奖励(在游戏开始时)更有可能发生,因为它们比长期未来的奖励更可预测。要解决RL问题,你想要找到一个最优策略;策略是你的人工智能的“大脑”,它将告诉我们在给定的状态下应该采取什么行动。最优策略是给你最大预期回报的策略。有两种方法可以找到你的最优策略:
- By training your policy directly: policy-based methods.
- By training a value function that tells us the expected return the agent will get at each state and use this function to define our policy: value-based methods.
- Finally, we spoke about Deep RL because we introduce deep neural networks to estimate the action to take (policy-based) or to estimate the value of a state (value-based) hence the name “deep.”
Let’s train our first Deep Reinforcement Learning agent and upload it to the Hub 🚀
通过直接训练您的策略:基于策略的方法。通过训练一个值函数来告诉我们代理将在每个状态获得的预期回报,并使用此函数来定义我们的策略:基于值的方法。最后,我们谈到了深度RL,因为我们引入了深度神经网络来估计要采取的操作(基于策略)或估计状态的值(基于值),因此得名为“深度”。让我们训练我们的第一个深度强化学习代理,并将其上载到中心🚀
Set the GPU 💪
设置图形处理器💪
To accelerate the agent’s training, we’ll use a GPU. To do that, go to
Runtime > Change Runtime type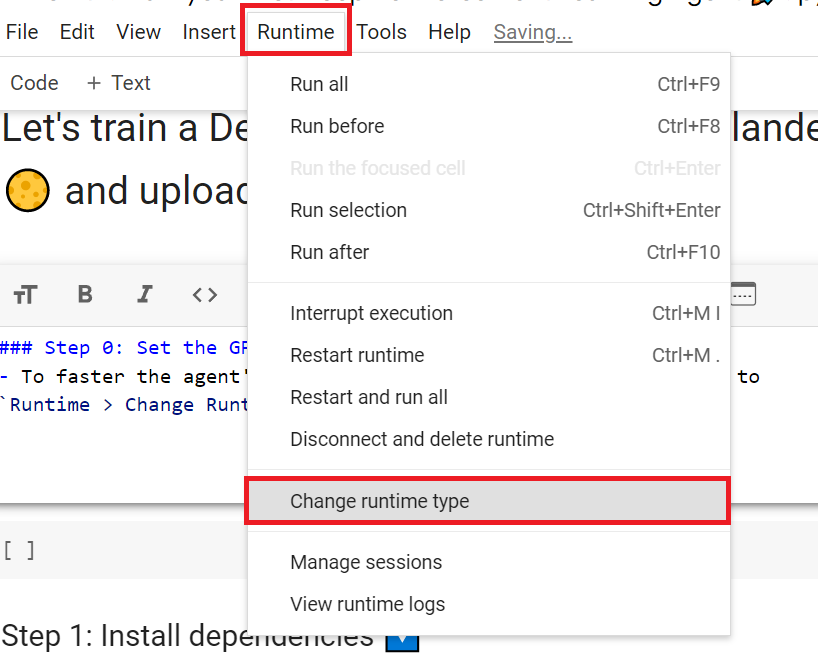
Hardware Accelerator > GPU
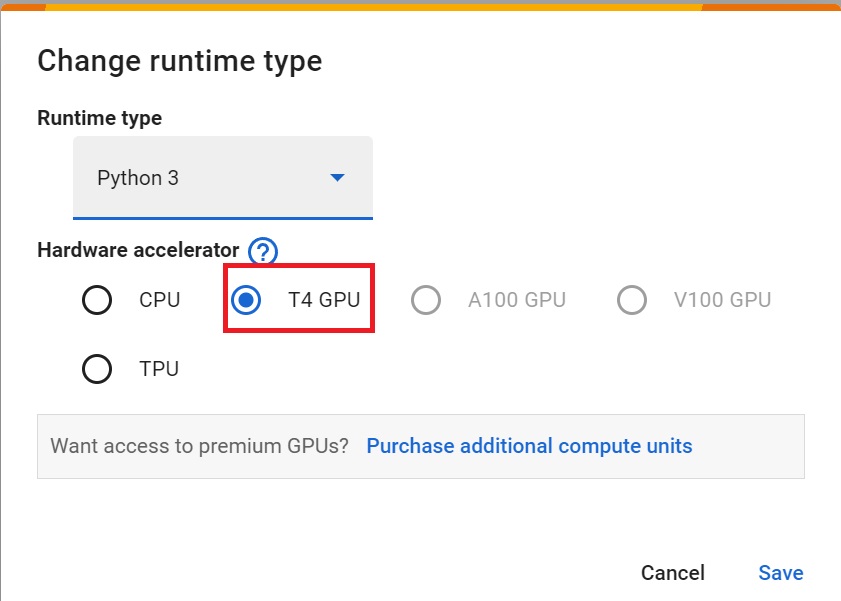
为了加快工程师的培训,我们将使用GPU。为此,请转到运行时>更改运行时类型GPU步骤1硬件加速器>GPUGPU步骤2
Install dependencies and create a virtual screen 🔽
安装依赖项并创建虚拟屏幕🔽
The first step is to install the dependencies, we’ll install multiple ones.
第一步是安装依赖项,我们将安装多个依赖项。
gym[box2D]: Contains the LunarLander-v2 environment 🌛 (we usegym==0.21)stable-baselines3[extra]: The deep reinforcement learning library.huggingface_sb3: Additional code for Stable-baselines3 to load and upload models from the Hugging Face 🤗 Hub.
To make things easier, we created a script to install all these dependencies.
`gym[box2D]:包含LUNARLander-v2环境🌛(我们使用gym==0.21)稳定基线3[Extra]:深度强化学习库。huggingfacesb3`:用于稳定基线3的额外代码,用于从Hugging Face🤗Hub加载和上传模型。为了更简单,我们创建了一个脚本来安装所有这些依赖项。
1 | |
1 | |
During the notebook, we’ll need to generate a replay video. To do so, with colab, we need to have a virtual screen to be able to render the environment (and thus record the frames).
在笔记本期间,我们需要生成一个回放视频。要做到这一点,使用CoLab,我们需要一个虚拟屏幕来渲染环境(并因此记录帧)。
Hence the following cell will install virtual screen libraries and create and run a virtual screen 🖥
因此,下面的单元将安装虚拟屏幕库,并创建和运行虚拟屏幕🖥
1 | |
To make sure the new installed libraries are used, sometimes it’s required to restart the notebook runtime. The next cell will force the runtime to crash, so you’ll need to connect again and run the code starting from here. Thanks for this trick, we will be able to run our virtual screen.
为了确保使用新安装的库,有时需要重新启动笔记本运行时。下一个单元将强制运行时崩溃,因此您需要再次连接并从此处开始运行代码。感谢这个技巧,我们将能够运行我们的虚拟屏幕。
1 | |
1 | |
Import the packages 📦
导入包📦
One additional library we import is huggingface_hub to be able to upload and download trained models from the hub.
我们导入的另一个库是huggingfaceHub,它能够从HuggingFace_Hub上传和下载经过训练的模型。
The Hugging Face Hub 🤗 works as a central place where anyone can share and explore models and datasets. It has versioning, metrics, visualizations and other features that will allow you to easily collaborate with others.
Hugging Face中心🤗是一个中心,任何人都可以在这里分享和探索模型和数据集。它具有版本控制、指标、可视化和其他功能,使您可以轻松地与其他人协作。
You can see here all the Deep reinforcement Learning models available 👉 https://huggingface.co/models?pipeline_tag=reinforcement-learning&sort=downloads
您可以在此处看到所有可用的深度强化学习模型https://huggingface.co/models?pipeline_tag=reinforcement-learning&sort=downloads👉
1 | |
Understand what is Gym and how it works 🤖
了解什么是健身房以及它是如何工作的🤖
🏋 The library containing our environment is called Gym.
You’ll use Gym a lot in Deep Reinforcement Learning.
🏋包含我们的环境的库被称为GYM。在深度强化学习中,你会经常使用健身房。
The Gym library provides two things:
健身库提供两项功能:
- An interface that allows you to create RL environments.
- A collection of environments (gym-control, atari, box2D…).
Let’s look at an example, but first let’s remember what’s the RL Loop.
允许您创建RL环境的界面。环境集合(健身房控制、雅达利、BOX 2D…)让我们看一个例子,但首先让我们记住什么是RL循环。
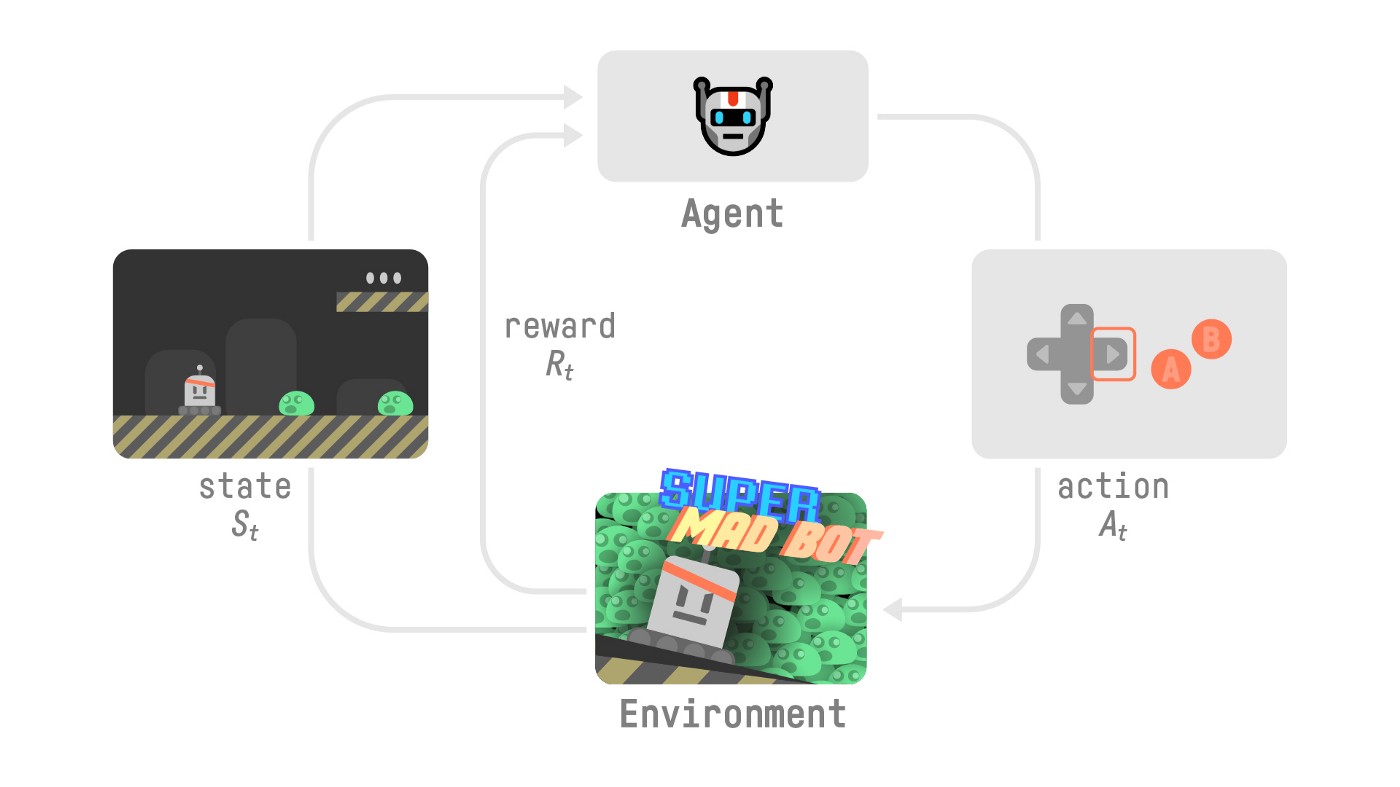
At each step:
每一步的RL流程:
- Our Agent receives state S0 from the Environment — we receive the first frame of our game (Environment).
- Based on that state S0, the Agent takes action A0 — our Agent will move to the right.
- Environment to a new state S1 — new frame.
- The environment gives some reward R1 to the Agent — we’re not dead (Positive Reward +1).
With Gym:
我们的代理从新环境收到状态S0-我们收到游戏的第一帧(环境)。基于该状态S0,如果代理采取行动A0,我们的代理将向右移动。环境到新的状态S1-新的框架。环境给代理一些新的奖励R1-我们没有死。(正奖励+1)。有了健身房:
1️⃣ We create our environment using gym.make()
1️⃣我们使用gim.make()创建我们的环境
2️⃣ We reset the environment to its initial state with observation = env.reset()
2观察重置我们使用️=env.⃣()将环境重置为其初始状态
At each step:
在每一步中:
3️⃣ Get an action using our model (in our example we take a random action)
3️⃣使用我们的模型获取操作(在我们的示例中,我们采取随机操作)
4️⃣ Using env.step(action), we perform this action in the environment and get
4️⃣使用env.Step(Action),我们在环境中执行此操作并获取
observation: The new state (st+1)reward: The reward we get after executing the actiondone: Indicates if the episode terminatedinfo: A dictionary that provides additional information (depends on the environment).
If the episode is done:
`reward:新状态(st+1)reward:执行动作后得到的奖励doned:剧集是否结束info`:提供附加信息的词典(取决于环境)。如果剧集结束:
- We reset the environment to its initial state with
observation = env.reset()
Let’s look at an example! Make sure to read the code
我们将环境重置为其初始状态,方法是Observation=env.Reset()让我们看一个例子!请务必阅读代码
1 | |
Create the LunarLander environment 🌛 and understand how it works
创建月球着陆器环境🌛并了解其工作原理
The environment 🎮
The Environment🎮(环境指南)
In this first tutorial, we’re going to train our agent, a Lunar Lander, to land correctly on the moon. To do that, the agent needs to learn to adapt its speed and position(horizontal, vertical, and angular) to land correctly.
在第一个教程中,我们将训练我们的代理,月球着陆器,以正确地降落在月球上。要做到这一点,代理需要学习适应它的速度和位置(水平、垂直和角度),以正确着陆。
💡 A good habit when you start to use an environment is to check its documentation
💡当您开始使用一个环境时,一个好习惯是查看它的文档
👉 https://www.gymlibrary.dev/environments/box2d/lunar_lander/
Https://www.gymlibrary.dev/environments/box2d/lunar_lander/👉
Let’s see what the Environment looks like:
让我们看看环境是什么样子的:
1 | |
We see with Observation Space Shape (8,) that the observation is a vector of size 8, where each value contains different information about the lander:
我们通过Observation Space Shape(8,)看到,观测是一个大小为8的向量,其中每个值包含关于着陆器的不同信息:
- Horizontal pad coordinate (x)
- Vertical pad coordinate (y)
- Horizontal speed (x)
- Vertical speed (y)
- Angle
- Angular speed
- If the left leg has contact point touched the land
- If the right leg has contact point touched the land
1 | |
The action space (the set of possible actions the agent can take) is discrete with 4 actions available 🎮:
水平垫坐标(X)垂直垫坐标(Y)水平速度(X)垂直速度(Y)角度速度如果左腿的接触点接触到陆地如果右腿的接触点接触到陆地行动空间(工程师可以采取的可能行动的集合)是离散的,有4个行动可用🎮:
- Do nothing,
- Fire left orientation engine,
- Fire the main engine,
- Fire right orientation engine.
Reward function (the function that will gives a reward at each timestep) 💰:
什么都不做,起火左定向引擎,起火主机,起火右定向引擎。奖励函数(每个时间步将给予奖励的函数)💰:
- Moving from the top of the screen to the landing pad and zero speed is about 100~140 points.
- Firing main engine is -0.3 each frame
- Each leg ground contact is +10 points
- Episode finishes if the lander crashes (additional - 100 points) or come to rest (+100 points)
Vectorized Environment
从屏幕顶部移动到着陆台,零速度大约为100~140分。主机为-0.3每帧每条腿的地面接触为+10分如果着陆器坠毁(额外-100分)或静止(+100分),第三集结束
- We create a vectorized environment (method for stacking multiple independent environments into a single environment) of 16 environments, this way, we’ll have more diverse experiences during the training.
1 | |
Create the Model 🤖
我们创建了一个由16个环境组成的矢量化环境(将多个独立环境堆叠成一个环境的方法),这样我们在培训过程中就会有更多样化的体验。创建🤖模型
- Now that we studied our environment and we understood the problem: being able to land correctly the Lunar Lander to the Landing Pad by controlling left, right and main orientation engine. Let’s build the algorithm we’re going to use to solve this Problem 🚀.
- To do so, we’re going to use our first Deep RL library, Stable Baselines3 (SB3).
- SB3 is a set of reliable implementations of reinforcement learning algorithms in PyTorch.
💡 A good habit when using a new library is to dive first on the documentation: https://stable-baselines3.readthedocs.io/en/master/ and then try some tutorials.
现在我们研究了我们的环境,我们了解了问题:通过控制左、右和主定位引擎,能够将月球着陆器正确地降落在着陆台上。让我们构建我们要用来解决这个问题的算法。要做到这一点,我们将使用我们的第一个Deep RL库,稳定基线3(Sb3)。Sb3是一组在https://stable-baselines3.readthedocs.io/en/master/中可靠的强化学习算法实现。🚀使用新库时的一个好习惯是首先阅读文档:💡,然后尝试一些教程。

Image.png
To solve this problem, we’re going to use SB3 PPO. PPO (aka Proximal Policy Optimization) is one of the of the SOTA (state of the art) Deep Reinforcement Learning algorithms that you’ll study during this course.
为了解决这个问题,我们将使用SB3 PPO。PPO(又名近邻策略优化)是您将在本课程中学习的SOTA(最新技术)深度强化学习算法之一。
PPO is a combination of:
PPO是以下各项的组合:
- Value-based reinforcement learning method: learning an action-value function that will tell us what’s the most valuable action to take given a state and action.
- Policy-based reinforcement learning method: learning a policy that will gives us a probability distribution over actions.
Stable-Baselines3 is easy to set up:
基于值的强化学习方法:学习动作-值函数,该函数将告诉我们在给定状态和动作的情况下采取什么最有价值的动作。基于策略的强化学习方法:学习将给出动作的概率分布的策略。稳定基线3很容易设置:
1️⃣ You create your environment (in our case it was done above)
1️⃣您可以创建您的环境(在我们的例子中,它是在上面完成的)
2️⃣ You define the model you want to use and instantiate this model model = PPO("MlpPolicy")
2️策略您定义要使用的模型并实例化此模型⃣=ppo(“MlpPolicy”)
3️⃣ You train the agent with model.learn and define the number of training timesteps
3️⃣您使用delam.learn培训代理,并定义培训时间步数
1 | |
1 | |
Solution
解
1 | |
Train the PPO agent 🏃
培训PPO代理🏃
- Let’s train our agent for 1,000,000 timesteps, don’t forget to use GPU on Colab. It will take approximately ~20min, but you can use less timesteps if you just want to try it out.
- During the training, take a ☕ break you deserved it 🤗
1 | |
Solution
让我们为我们的代理培训1,000,000个时间步长,不要忘记在Colab上使用GPU。这大约需要20分钟,但如果您只是想试一试,可以使用较少的时间。在培训期间,休息一下☕🤗Solution是您应得的
1 | |
Evaluate the agent 📈
评估代理📈
- Now that our Lunar Lander agent is trained 🚀, we need to check its performance.
- Stable-Baselines3 provides a method to do that:
evaluate_policy. - To fill that part you need to check the documentation
- In the next step, we’ll see how to automatically evaluate and share your agent to compete in a leaderboard, but for now let’s do it ourselves
💡 When you evaluate your agent, you should not use your training environment but create an evaluation environment.
既然我们的月球着陆器代理经过了评估培训,我们就需要检查它的性能。稳定基线3提供了一种方法:🚀_💡。要完成这一部分,您需要检查文档在下一步中,我们将了解如何自动评估和共享您的代理以在排行榜中竞争,但现在让我们自己来做评估当您评估您的代理时,您不应该使用您的培训环境,而是创建一个评估环境。
1 | |
Solution
解
1 | |
- In my case, I got a mean reward is
200.20 +/- 20.80after training for 1 million steps, which means that our lunar lander agent is ready to land on the moon 🌛🥳.
Publish our trained model on the Hub 🔥
在我的例子中,在训练了100,000步后,我得到的平均奖励是`200.20+/-20.80‘,这意味着我们的月球着陆器已经准备好登陆月球🌛🥳。在🔥上发布我们训练过的模型
Now that we saw we got good results after the training, we can publish our trained model on the Hub 🤗 with one line of code.
📚 The libraries documentation 👉 https://github.com/huggingface/huggingface_sb3/tree/main#hugging-face—x-stable-baselines3-v20
现在我们看到培训后获得了很好的结果,我们可以用一行代码在Hub🤗上发布我们训练过的模型。Https://github.com/huggingface/huggingface_sb3/tree/main#hugging-face—x-stable-baselines3-v20📚👉库文档
Here’s an example of a Model Card (with Space Invaders):
以下是一张模型卡(带有太空入侵者)的例子:
By using package_to_hub you evaluate, record a replay, generate a model card of your agent and push it to the hub.
您可以使用Package_to_hub评估、录制回放、生成您的代理商的模板卡并将其推送到集线器。
This way:
这条路:
- You can showcase our work 🔥
- You can visualize your agent playing 👀
- You can share with the community an agent that others can use 💾
- You can access a leaderboard 🏆 to see how well your agent is performing compared to your classmates 👉 https://huggingface.co/spaces/huggingface-projects/Deep-Reinforcement-Learning-Leaderboard
To be able to share your model with the community there are three more steps to follow:
您可以展示我们的工作🔥您可以可视化您的代理玩👀您可以与社区共享其他人可以使用的代理💾您可以访问排行榜🏆以查看您的代理与您的同学相比表现如何👉您可以与社区共享您的模型您还需要遵循三个步骤:
1️⃣ (If it’s not already done) create an account to HF ➡ https://huggingface.co/join
1到HF https://huggingface.co/join的️➡⃣(如果尚未完成)创建帐户
2️⃣ Sign in and then, you need to store your authentication token from the Hugging Face website.
2️⃣登录,然后,您需要存储来自Hugging Face网站的身份验证令牌。
- Create a new token (https://huggingface.co/settings/tokens) with write role
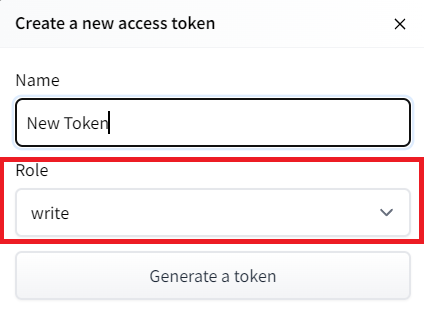
创建新令牌(具有写角色的https://huggingface.co/settings/tokens)创建HF令牌
- Copy the token
- Run the cell below and paste the token
1 | |
If you don’t want to use a Google Colab or a Jupyter Notebook, you need to use this command instead: huggingface-cli login
复制令牌运行下面的单元格并粘贴令牌如果您不想使用Google Colab或Jupyter Notebook,则需要使用以下命令:huggingfacecli login
3️⃣ We’re now ready to push our trained agent to the 🤗 Hub 🔥 using package_to_hub() function
3️集线器我们现在可以使用🤗_to_🔥()函数将我们训练有素的代理推送到⃣集线器
Let’s fill the package_to_hub function:
让我们填充Package_to_hub函数:
model: our trained model.model_name: the name of the trained model that we defined inmodel_savemodel_architecture: the model architecture we used: in our case PPOenv_id: the name of the environment, in our caseLunarLander-v2eval_env: the evaluation environment defined in eval_envrepo_id: the name of the Hugging Face Hub Repository that will be created/updated(repo_id = {username}/{repo_name})
💡 A good name is {username}/{model_architecture}-{env_id}
`Model:我们训练过的模型。Model_name:我们在Model_save``Model_Architture中定义的训练过的模型的名称:我们使用的模型架构:在本例中为ppenv_id:环境的名称,在我们的示例中为LunarLander-v2eval_env:val_env中定义的评估环境repo_id:将要创建/更新的Hugging Face集线库的名称(repo_id={用户名}/{repo_name})💡好的名称是{用户名}/{模型架构}-{env_id}`
commit_message: message of the commit
1 | |
Solution
`Commit_Message`:提交解决方案的消息
1 | |
Congrats 🥳 you’ve just trained and uploaded your first Deep Reinforcement Learning agent. The script above should have displayed a link to a model repository such as https://huggingface.co/osanseviero/test_sb3. When you go to this link, you can:
祝贺🥳,您刚刚培训并上传了第一个深度强化学习代理。上面的脚本应该显示一个指向模型存储库(如https://huggingface.co/osanseviero/test_sb3.)的链接当您转到此链接时,您可以:
- see a video preview of your agent at the right.
- click “Files and versions” to see all the files in the repository.
- click “Use in stable-baselines3” to get a code snippet that shows how to load the model.
- a model card (
README.mdfile) which gives a description of the model
Under the hood, the Hub uses git-based repositories (don’t worry if you don’t know what git is), which means you can update the model with new versions as you experiment and improve your agent.
在右侧查看您的代理的视频预览。单击“文件和版本”以查看存储库中的所有文件。单击“在稳定-基线3中使用”以获取显示如何加载模型的代码片段。模型卡(Readme.md文件)在引擎盖下提供模型的描述,Hub使用基于Git的存储库(如果您不知道Git是什么也不用担心),这意味着您可以在试验和改进代理时使用新版本更新模型。
Compare the results of your LunarLander-v2 with your classmates using the leaderboard 🏆 👉 https://huggingface.co/spaces/huggingface-projects/Deep-Reinforcement-Learning-Leaderboard
使用排行榜https://huggingface.co/spaces/huggingface-projects/Deep-Reinforcement-Learning-Leaderboard🏆👉将您的LUNAR LANDER-V2与您的同学进行比较
Load a saved LunarLander model from the Hub 🤗
从集线器🤗加载保存的月球着陆器模型
Thanks to ironbar for the contribution.
Loading a saved model from the Hub is really easy.
感谢Ironbar的贡献。从中心加载保存的模型真的很容易。
You go https://huggingface.co/models?library=stable-baselines3 to see the list of all the Stable-baselines3 saved models.
您可以访问https://huggingface.co/models?library=stable-baselines3查看所有已保存的稳定基线模型的列表。
- You select one and copy its repo_id
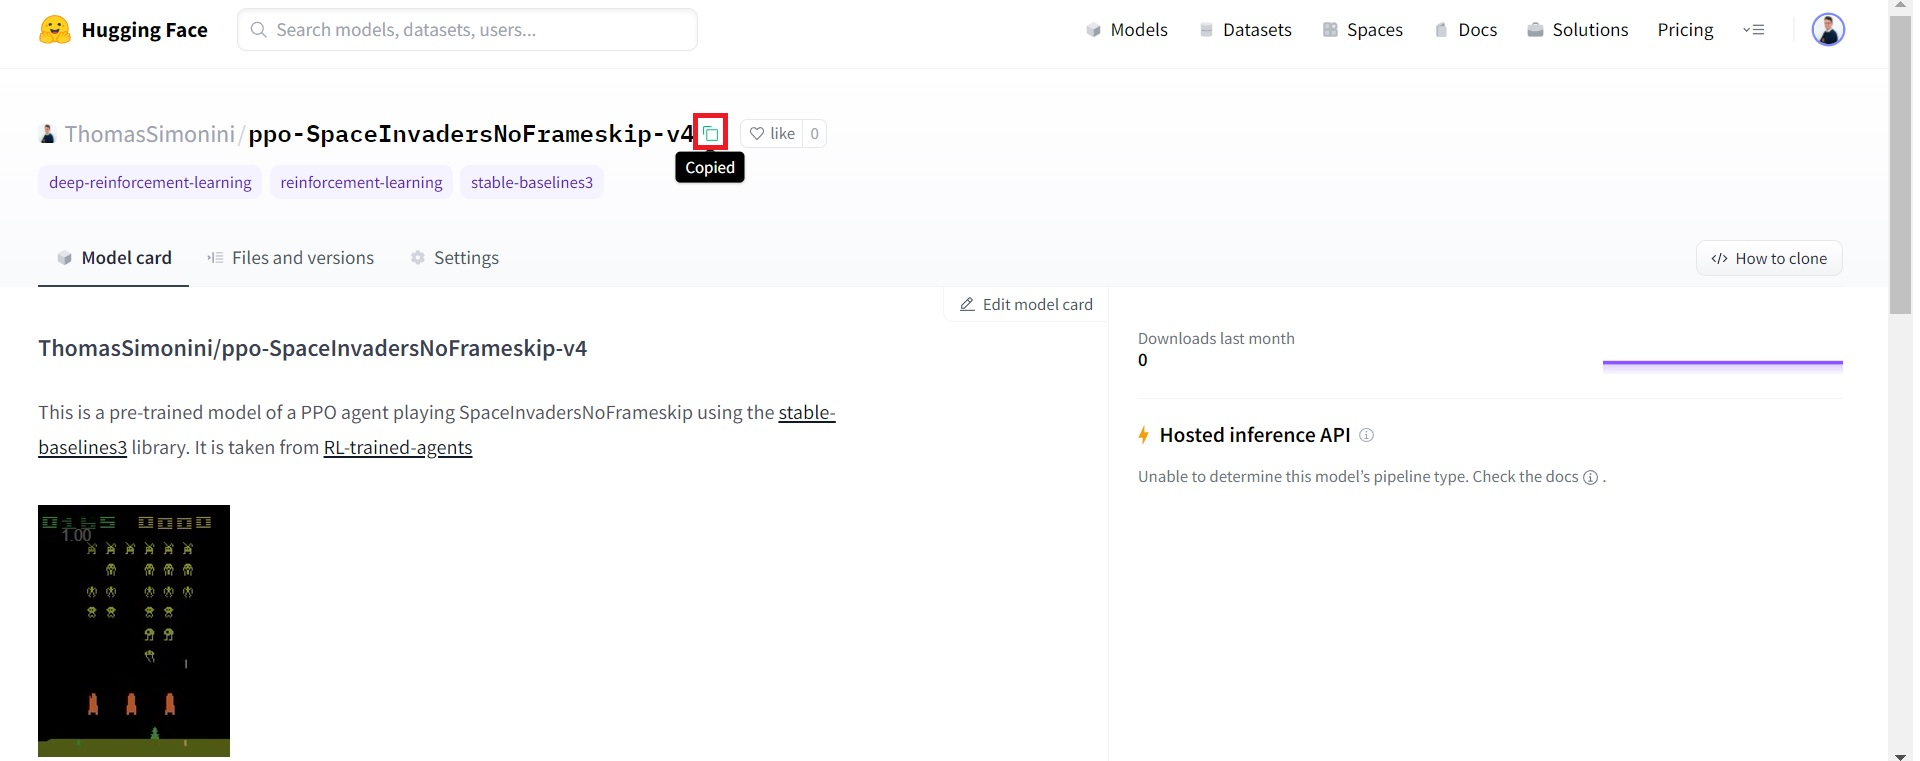
2. Then we just need to use load_from_hub with:
您选择一个并复制其repo_idCopy-id 2。然后,我们只需要将Load_From_Hub与:
- The repo_id
- The filename: the saved model inside the repo and its extension (*.zip)
1 | |
Let’s evaluate this agent:
Repo_id文件名:repo中保存的模型及其扩展名(*.zip)让我们评估一下这个代理:
1 | |
Some additional challenges 🏆
🏆面临的一些额外挑战
The best way to learn is to try things by your own! As you saw, the current agent is not doing great. As a first suggestion, you can train for more steps. With 1,000,000 steps, we saw some great results!
In the Leaderboard you will find your agents. Can you get to the top?
学习的最好方法就是自己去尝试!如你所见,目前的代理做得不是很好。作为第一个建议,你可以训练更多的步数。一百万步,我们看到了一些很棒的结果!在排行榜上,你会找到你的代理人。你能爬到山顶吗?
Here are some ideas to achieve so:
以下是实现这一目标的一些想法:
- Train more steps
- Try different hyperparameters of
PPO. You can see them at https://stable-baselines3.readthedocs.io/en/master/modules/ppo.html#parameters. - Check the Stable-Baselines3 documentation and try another models such as DQN.
- Push your new trained model on the Hub 🔥
Compare the results of your LunarLander-v2 with your classmates using the leaderboard 🏆
训练更多的步骤尝试PPO的不同超参数。你可以在https://stable-baselines3.readthedocs.io/en/master/modules/ppo.html#parameters.Check的稳定基线3文档中看到它们,并尝试其他模型,如DQN。将您新训练的模型推送到🔥上,使用排行榜🏆将您的月球着陆器-v2的结果与您的同学进行比较
Is moon landing too boring to you? Try to change the environment, why not using MountainCar-v0, CartPole-v1 or CarRacing-v0? Check how they works using the gym documentation and have fun 🎉.
登月对你来说太无聊了吗?试着改变环境,为什么不使用Mountain Car-V0,CartPole-V1或Carrating-V0?使用健身房文档检查它们是如何工作的,并享受有趣的🎉。
Congrats on finishing this chapter! That was the biggest one, and there was a lot of information.
祝贺你读完了这一章!这是最大的一次,有很多信息。
If you’re still feel confused with all these elements…it’s totally normal! This was the same for me and for all people who studied RL.
如果你仍然对所有这些元素感到困惑,…这完全是正常的!这对我和所有研究RL的人来说都是一样的。
Take time to really grasp the material before continuing and try the additional challenges. It’s important to master these elements and having a solid foundations.
在继续学习和尝试其他挑战之前,花点时间真正掌握这些材料。掌握这些要素并拥有坚实的基础是很重要的。
Naturally, during the course, we’re going to dive deeper into these concepts but it’s better to have a good understanding of them now before diving into the next chapters.
当然,在课程中,我们将更深入地研究这些概念,但在深入下一章之前,最好现在就对它们有一个很好的理解。
Next time, in the bonus unit 1, you’ll train Huggy the Dog to fetch the stick.
下一次,在奖励单元1中,你将训练小狗Huggy去拿棍子。
哈吉